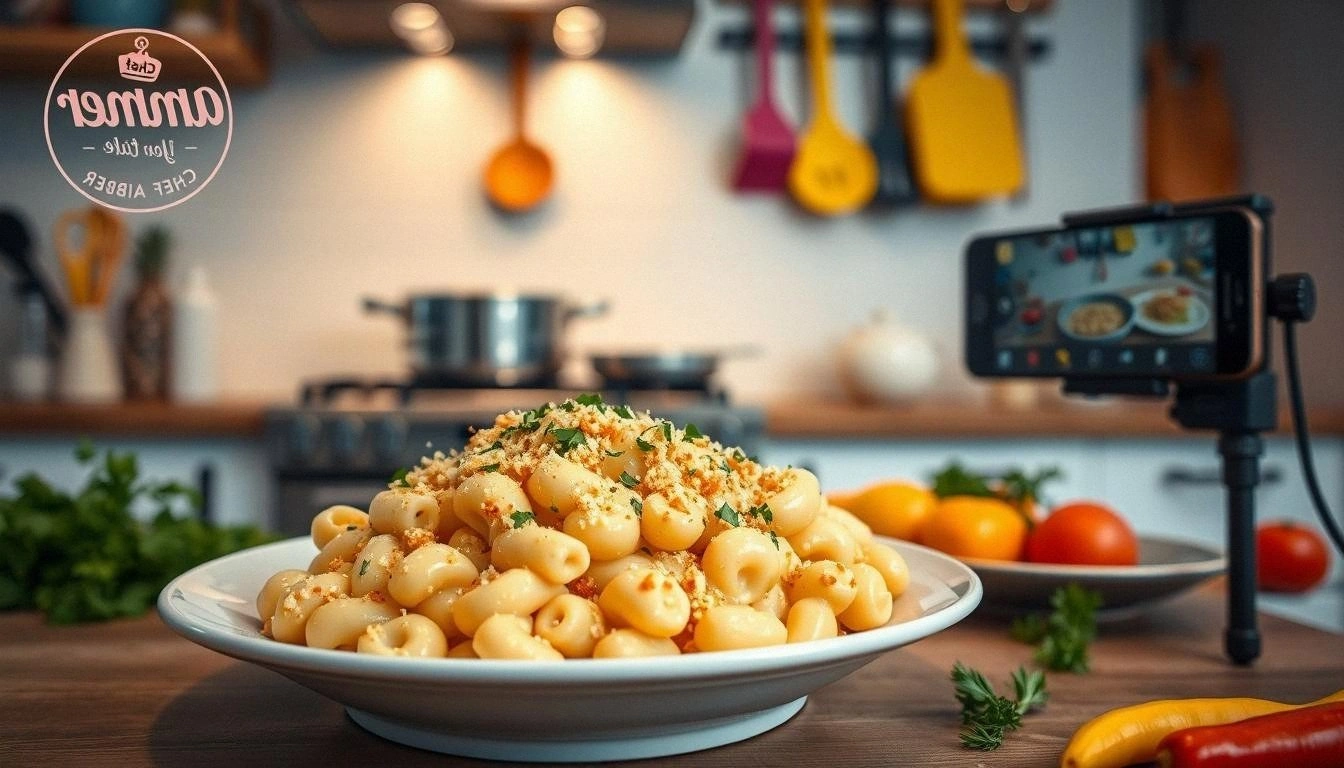
You ever had a kitchen moment that turns into a culinary revelation? I was standing over a pot of overcooked pasta, the noodles clinging together like a bad relationship, when a friend dared me to rescue the disaster with a single, simple recipe. I grabbed my trusty skillet, a splash of milk, and a handful of cheese, and the universe answered with a velvety, melt‑in‑your-mouth sauce that turned that flop into a triumph. That night, the air smelled like buttery comfort, the sound of bubbling was music, and the taste was an instant hug from the inside. I swear I could still taste the warmth of that moment, the way the cheese coated each noodle like a silk blanket.
Fast forward to today, and I’m still buzzing with the same excitement I felt that night. This isn’t just another mac and cheese; it’s a culinary confession, a secret weapon for any dinner table, a comfort food that feels like a warm blanket on a rainy afternoon. The sauce is so silky it glides over the pasta, the edges crisp like a well‑seasoned crust, and every bite is a balanced dance of creamy, cheesy, and just enough bite. I’m about to pull back the curtain on a version that will make you question every other mac and cheese you’ve ever tried. I dare you to taste this and not go back for seconds.
What makes this recipe a game‑changer is not just the ingredients or the technique, but the way they come together to create a dish that feels both indulgent and wholesome. Think of the sauce as a velvet curtain, pulling back to reveal a golden, cheesy center that oozes with every forkful. Picture the pasta, perfectly al dente, with a slight bite that balances the richness of the cheese. Imagine the breadcrumb topping, lightly toasted to a golden brown that adds crunch without overpowering the creamy base. The result is a dish that feels like a hug, a celebration, and a comforting hug all at once.
The secret? A blend of classic and unexpected elements that work together like a well‑tuned orchestra. From the moment you stir the roux to the final sprinkle of paprika, every step is designed to amplify flavor while keeping the dish approachable. I’ll walk you through each step, from the initial sauté to the final bake, ensuring you never miss a beat. By the end, you’ll wonder how you ever made mac and cheese any other way.
What Makes This Version Stand Out
- Flavor: The sauce is a harmonious blend of cheddar, mozzarella, and parmesan, each contributing a distinct depth that elevates the dish beyond ordinary comfort food.
- Texture: The pasta is cooked al dente, providing a satisfying bite that contrasts beautifully with the silky sauce.
- Simplicity: With only a handful of ingredients, you can achieve restaurant‑quality results without a trip to the grocery store.
- Uniqueness: The addition of paprika and garlic powder gives a subtle smoky kick that sets this recipe apart.
- Crowd Reaction: Friends and family rave about the crispy breadcrumb topping and the melt‑in‑your‑mouth sauce.
- Ingredient Quality: Using high‑quality cheeses and fresh milk makes all the difference in flavor and mouthfeel.
- Cooking Method: The combination of stovetop roux, baking, and a quick broil step creates layers of texture and flavor.
- Make‑Ahead Potential: Assemble the dish, bake, and refrigerate. Reheat with a splash of milk for a quick, delicious meal.
Inside the Ingredient List
The Flavor Base
The foundation of this dish is the roux, a simple blend of flour and butter that forms the backbone of the sauce. The butter adds richness, while the flour thickens the mixture into a silky base that holds the cheese together. Skipping the roux results in a watery sauce that can’t cling to the pasta, turning a potential crowd‑pleaser into a disappointment. If you’re short on flour, a tablespoon of cornstarch can substitute, but the texture will shift slightly, becoming a bit more gelatinous.
The Creamy Crew
Heavy cream is the secret to that lush mouthfeel, while whole milk balances the richness without making the dish too heavy. The cream’s fat content creates a glossy finish and a velvety texture that feels indulgent yet comforting. If you prefer a lighter version, replace half the cream with evaporated milk; the result will still be creamy but with a slightly different profile. The key is to add the dairy slowly, allowing each splash to incorporate fully before adding the next.
The Unexpected Star
Paprika isn’t just a garnish; it’s a flavor enhancer that brings a subtle smokiness and a pop of color to the dish. A pinch of smoked paprika elevates the sauce, giving it a depth that feels like a secret ingredient. If you’re a spice enthusiast, a dash of cayenne can add a gentle heat, but be careful not to overpower the creamy base. The garlic powder provides a mellow, savory backdrop that rounds out the cheese’s sharpness.
The Final Flourish
Breadcrumbs toasted with butter and parmesan create a crunchy crown that contrasts the silky sauce. They add a satisfying crunch and a golden finish that makes every bite exciting. To achieve the perfect crunch, toast the breadcrumbs in a skillet with a tablespoon of butter until they’re golden brown, then mix in grated parmesan before sprinkling on top. If you’re gluten‑free, use almond flour breadcrumbs or a gluten‑free breadcrumb blend to keep the dish inclusive.
Everything’s prepped? Good. Let’s get into the real action.
The Method — Step by Step
- Boil the Pasta: Bring a large pot of salted water to a boil. Add 1 pound of elbow macaroni and cook until just al dente, about 8 minutes. Drain and set aside, reserving a cup of pasta water for later. The al dente bite is crucial; it keeps the pasta from becoming mushy once the sauce coats it. I’ve found that a quick splash of cold water after draining helps stop the cooking process instantly.
- Make the Roux: In a large skillet, melt 3 tablespoons of butter over medium heat. Sprinkle in 3 tablespoons of all‑purpose flour, stirring constantly. Cook for 2 minutes until the mixture turns a pale golden color and releases a nutty aroma. This step builds the sauce’s base; don’t rush it, or you’ll end up with a raw flour taste.
- Introduce the Dairy: Slowly pour in 2 cups of whole milk, whisking continuously to avoid lumps. Once the milk is incorporated, add 1 cup of heavy cream, stirring until the mixture is smooth and starts to thicken. The key is to let the sauce thicken slightly before adding the cheese; otherwise, the cheese will clump.
- Add the Cheeses: Lower the heat to low and add 1 cup of shredded sharp cheddar, 1/2 cup of shredded mozzarella, and 1/4 cup of grated parmesan. Stir gently until the cheeses melt completely, creating a glossy, uniform sauce. If the sauce looks too thick, add a splash of reserved pasta water to reach your desired consistency.
- Season It: Stir in 1 teaspoon of garlic powder, 1/2 teaspoon of smoked paprika, 1/4 teaspoon of black pepper, and a pinch of salt to taste. The paprika gives that smoky depth, while the garlic powder adds subtle earthiness. Taste the sauce; you should hear a faint crunch of cheese and a whisper of spice.
- Combine Pasta and Sauce: Return the drained pasta to the skillet, tossing it gently until every noodle is coated in the sauce. If the mixture feels dry, add a little more pasta water until it coats the pasta without becoming soupy. The pasta should feel silky, not sticky.
- Transfer to Baking Dish: Preheat your oven to 375°F (190°C). Grease a 9×13 inch baking dish and pour the pasta mixture in, spreading it evenly. This step is where the magic happens, turning a simple stovetop dish into an oven‑baked masterpiece.
- Top It Off: In a small bowl, combine 1 cup of breadcrumbs with 2 tablespoons of melted butter and 1/4 cup of grated parmesan. Sprinkle the breadcrumb mixture evenly over the pasta. This topping will develop a golden crust that’s crisp on the outside and tender on the inside.
- Bake and Broil: Bake for 20 minutes, then switch the oven to broil and cook for an additional 2–3 minutes until the breadcrumb topping is golden brown. Watch carefully; the broil can quickly turn golden to burnt. The final result is a dish with a crispy top, a creamy interior, and a comforting aroma that fills the kitchen.
- Rest Before Serving: Let the dish rest for 5 minutes after removing it from the oven. This allows the sauce to set, making it easier to cut into neat portions. The rest also lets the flavors meld together, enhancing the overall taste experience.
That’s it — you did it. But hold on, I’ve got a few more tricks that will take this to another level. Let’s dive into the insider tips that will elevate your dish from good to legendary.
Insider Tricks for Flawless Results
The Temperature Rule Nobody Follows
Many cooks think the oven temperature is flexible, but it’s actually crucial for achieving that perfect breadcrumb crust. Baking at 375°F (190°C) ensures the top browns evenly without overcooking the interior. If you lower the temperature, the crust will be pale and the sauce might become too thick. If you raise it, the top will burn before the pasta cooks through. Stick to the sweet spot, and your dish will rise to perfection.
Why Your Nose Knows Best
Before you even taste the dish, the aroma is a reliable indicator of quality. A rich, buttery scent with a hint of paprika signals that the roux has cooked properly. If you smell raw flour or a metallic tang, it’s a sign the sauce hasn’t thickened enough or the cheese isn’t melting evenly. Trust your nose; it’s the ultimate kitchen compass.
The 5-Minute Rest That Changes Everything
After baking, let the mac and cheese rest for 5 minutes. This brief pause allows the sauce to set, preventing it from sliding off the pasta when you cut it. It also lets the flavors meld, creating a cohesive taste that’s more than the sum of its parts. Skipping this step can result in a sloppy dish that’s hard to serve.
Use Fresh Cheese for a Richer Flavor
The difference between store‑bought pre‑shredded cheese and fresh, freshly grated cheese is like night and day. Fresh cheese melts more smoothly and delivers a deeper, more complex flavor profile. If you can, buy a block of cheddar and grate it yourself; the extra effort pays off in taste.
Add a Splash of Milk When Reheating
Reheating leftover mac and cheese can often result in a dry, clumpy texture. To rescue it, add a tablespoon of milk or a splash of heavy cream, then stir gently before microwaving or reheating on the stovetop. The added moisture restores the sauce’s silkiness and prevents the cheese from separating.
Creative Twists and Variations
This recipe is a playground. Here are some of my favorite ways to switch things up:
Spicy Jalapeño Mac
Add diced jalapeños to the sauce for a fiery kick. The heat pairs beautifully with the creamy base, creating a dish that’s both comforting and exhilarating.
Sausage & Spinach Edition
Sauté sliced Italian sausage and fresh spinach before adding the pasta. The savory meat and earthy greens add depth and make the dish heartier.
Vegan Dairy-Free Version
Replace the butter and cheeses with a plant‑based butter and nutritional yeast. Use oat milk instead of dairy milk for a creamy, dairy‑free sauce that still satisfies.
Truffle Oil Finale
Drizzle a teaspoon of truffle oil over the baked mac before serving. The earthy aroma elevates the dish into gourmet territory, perfect for a special occasion.
Cauliflower Crumble Top
Swap the breadcrumbs for roasted cauliflower florets, giving a low‑carb twist and an extra layer of texture that’s both crunchy and wholesome.
Pesto Infusion
Stir in a couple of spoonfuls of basil pesto before baking. The herbal brightness brightens the dish and adds a fresh, green note.
Storing and Bringing It Back to Life
Fridge Storage
Cool the mac and cheese completely before placing it in an airtight container. Store in the refrigerator for up to 3 days. The sauce will thicken slightly as it cools, so add a splash of milk when reheating.
Freezer Friendly
Pack the dish in a freezer‑safe container or zip‑lock bag. Freeze for up to 2 months. Thaw overnight in the refrigerator and reheat on the stovetop, adding a little milk to loosen the sauce.
Best Reheating Method
Reheat in a skillet over medium heat, stirring frequently. Add a tablespoon of milk or cream to restore the sauce’s creaminess. Microwave reheating works too, but stir halfway through to prevent separation.