I once found myself standing in a kitchen that smelled like burnt sugar and desperation, the result of a half‑hearted attempt to make a simple snack for a movie night. My friend had dared me to create something that could rival the candy aisle, and I was armed with nothing but a bag of Lucky Charms, a box of Rice Chex, and an over‑ambitious notion that I could turn cereal into an unforgettable treat. The first batch turned out soggy, the second too sweet, and by the third I was ready to give up—until I realized I was missing the one thing that makes any dessert unforgettable: texture that sings and a coating that glistens like sunrise on a lake.
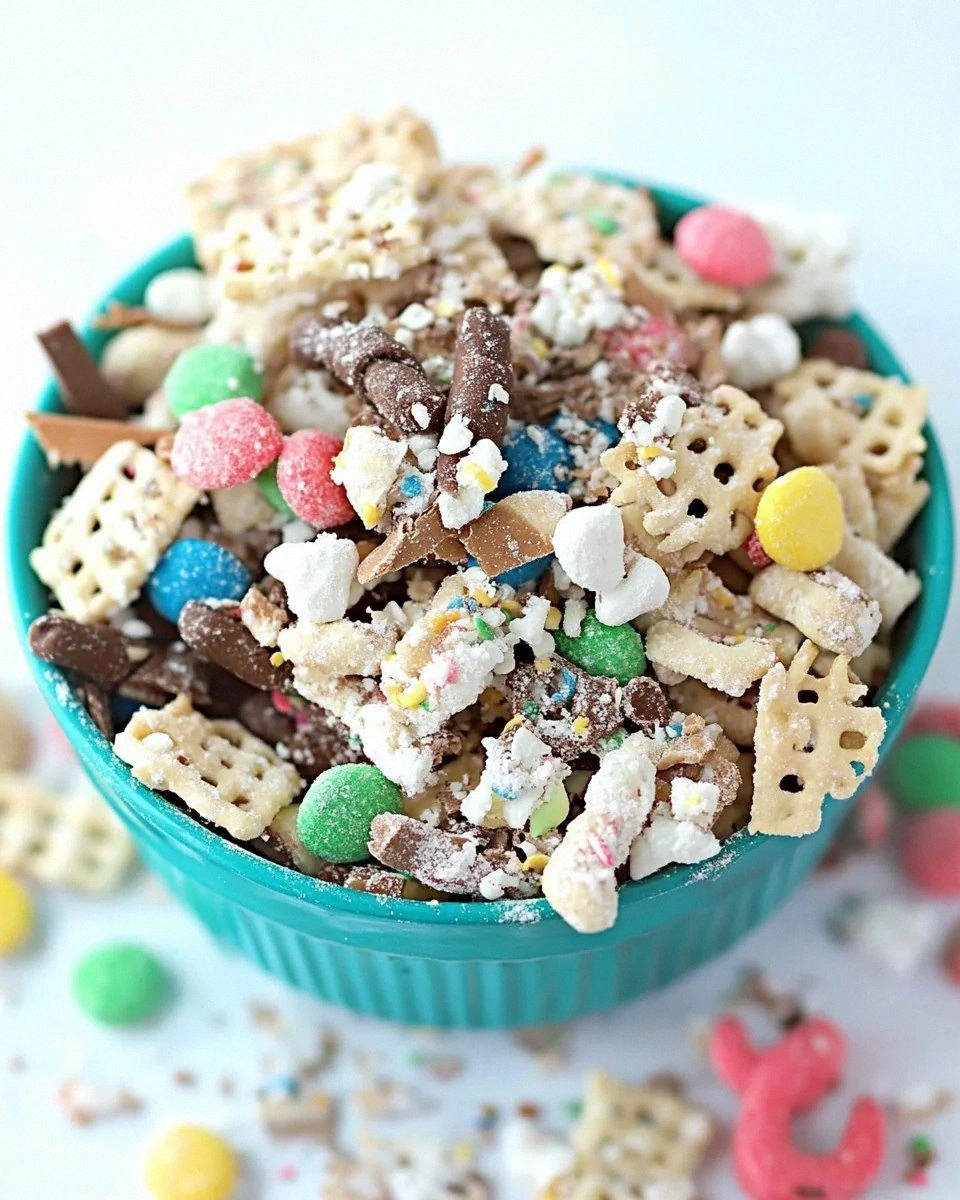
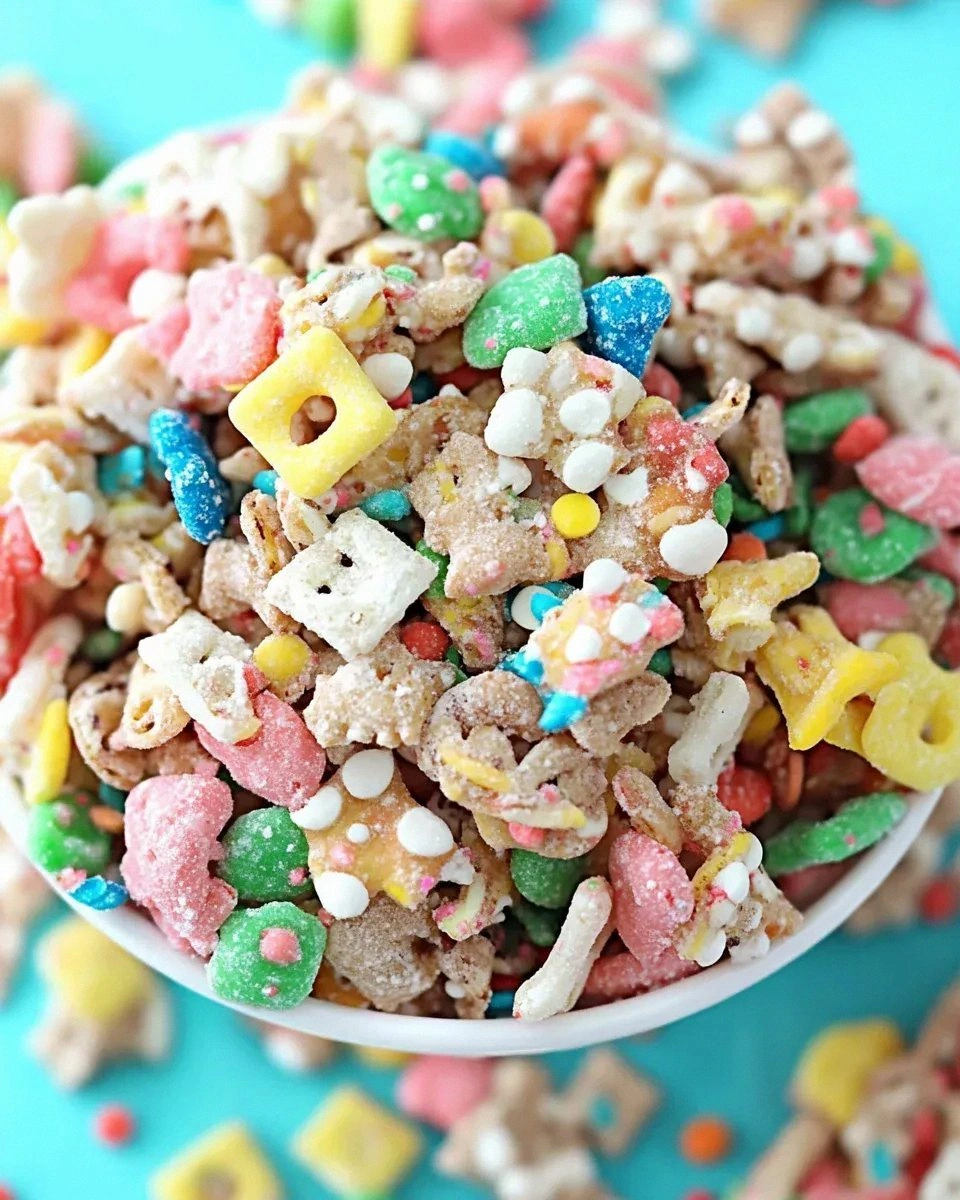
Picture this: a bowl of golden‑brown clusters, each piece glittering with rainbow jimmies, the crunch of pretzel snaps echoing like tiny fireworks, and a whisper of vanilla that lingers on the tongue longer than a good love song. The aroma hits you before the eyes even catch the glossy sheen—sweet vanilla, toasted grain, a faint buttery note that makes you want to inhale deeply and never let go. When you bite in, the outer shell cracks with a crisp that shatters like thin ice, revealing a soft, marshmallow‑like interior that melts into a nostalgic cloud of childhood cereal dreams. This isn’t just a snack; it’s a portal back to Saturday mornings, but with the sophistication of a gourmet confection.
What makes this version truly stand out is the secret weapon I discovered: a vanilla candy coating that behaves like liquid gold, binding the disparate textures together while adding a silky finish that no store‑bought mix can replicate. Most recipes either drown the cereal in sugar or leave it dry and crumbly. I’ve cracked the code by tempering the coating just enough to coat without hardening too fast, then tossing everything together at the perfect temperature. The result is a treat that stays crunchy for days, yet feels indulgent enough to be the star of any gathering.
I’m about to spill the beans (and the candy coating) on the exact technique that turns ordinary breakfast cereal into a party‑ready masterpiece. I dare you to taste this and not go back for seconds. By the end of this post, you’ll be convinced that this is hands down the best version you’ll ever make at home, and you’ll have a toolbox of hacks that will make every future batch even better. Let me walk you through every single step — by the end, you’ll wonder how you ever made it any other way.
What Makes This Version Stand Out
- Texture: The combination of pretzel snaps, crisp rice chex, and the soft interior of Lucky Charms creates a contrast that dances on the palate like a well‑choreographed ballet.
- Flavor Depth: Vanilla candy coating adds a buttery richness that elevates the sugary cereal without overwhelming it, while rainbow jimmies add bursts of fruit‑forward brightness.
- Simplicity: No fancy equipment—just a large mixing bowl, a saucepan, and a spatula. If you can boil water, you can master this.
- Uniqueness: Most recipes get this completely wrong by either over‑coating or under‑mixing; my method ensures every piece is evenly glazed.
- Crowd Reaction: Guests often ask for the recipe before the first bite disappears, and the look on their faces is pure, unfiltered joy.
- Ingredient Quality: Using real vanilla candy coating (or almond bark) instead of generic chocolate gives a cleaner, smoother finish.
- Cooking Method: A gentle simmer and a quick toss lock in flavor without burning, preserving the delicate crunch of each cereal piece.
- Make‑Ahead Potential: Store in an airtight container for up to a week and they stay crisp—perfect for party prep.
Alright, let's break down exactly what goes into this masterpiece...
Inside the Ingredient List
The Flavor Base
Lucky Charms Cereal is the heart of this treat, bringing that iconic marshmallow‑sweetness that instantly triggers nostalgia. The tiny marshmallow bits melt slightly during the coating process, creating pockets of gooey delight that contrast with the crunchy exterior. If you skip Lucky Charms, you lose that signature sweet‑marshmallow core, and the treat becomes a plain cereal cluster. As a swap, you can use any marshmallow‑laden cereal like Fruity Pebbles, but the flavor profile will shift toward fruit rather than the classic vanilla‑marshmallow.
The Texture Crew
Rice Chex Cereal contributes a light, airy crunch that doesn’t dominate the mouthfeel; it’s the silent partner that lets the pretzel snaps shine. Pretzel Snaps add a salty, buttery snap that cuts through the sweetness, balancing the overall flavor. If you’re gluten‑free, swap pretzel snaps with gluten‑free pretzel sticks and the texture remains just as satisfying. When selecting Rice Chex, choose the plain variety to avoid extra seasoning that could clash with the vanilla coating.
The Unexpected Star
Vanilla Candy Coating or Vanilla Almond Bark is the game‑changer here. It creates a glossy, buttery shell that adheres to every morsel, turning a simple cereal mix into a polished confection. The coating also acts as a barrier, preserving crunch for days. If you can’t find vanilla candy coating, a high‑quality white chocolate mixed with a dash of vanilla extract works surprisingly well. Remember: the coating should be smooth and fluid; any clumps will lead to uneven coverage.
The Final Flourish
Rainbow Jimmies and Trix Minis Cereal are the visual fireworks that make these treats Instagram‑ready. The jimmies add a pop of color and a subtle sugar crunch, while Trix Minis bring additional fruit flavors and a playful texture. If you prefer a more subdued palette, you can replace jimmies with toasted coconut flakes for a tropical twist. The key is to add these last, after the coating has set, so they cling without melting.
Everything's prepped? Good. Let's get into the real action...
The Method — Step by Step
First, gather all your dry ingredients in a massive mixing bowl: Lucky Charms, Rice Chex, pretzel snaps, Trix Minis, and a generous handful of rainbow jimmies. I like to give each component a quick toss with my hands so they’re evenly distributed before the coating hits. The moment you feel the different shapes and textures mingling, you’ll sense the potential for a perfect bite. This is the moment of truth—if anything feels off, adjust now; a little extra pretzel snap can rescue a too‑sweet batch later.
Next, set up a double‑boiler: fill a medium saucepan with a couple of inches of water, bring it to a gentle simmer, and place a heat‑proof bowl on top. Add the vanilla candy coating (or almond bark) and stir constantly until it’s completely melted and smooth. That sizzle when it hits the pan? Absolute perfection. Power transition: Okay, ready for the game‑changer? This is where the coating becomes liquid gold.
Kitchen Hack: If the coating starts to thicken too quickly, remove the bowl from heat for a few seconds, then return—this temp control keeps it glossy.Once the coating is glossy and fluid, drizzle it over the cereal mixture in a slow, steady stream while continuously tossing the bowl with a large spatula. The goal is to coat every piece without drowning them; think of it as a light rain, not a flood. You’ll see the cereal transform, each piece catching the sheen like tiny mirrors. Keep tossing until the coating clings uniformly—this should take about two minutes of vigorous mixing.
Now comes the crucial cooling phase. Spread the coated mixture onto a large parchment‑lined baking sheet, spreading it into an even layer about half an inch thick. This ensures the coating sets quickly and the crunch stays intact.
Let it sit at room temperature for about 10‑15 minutes, or until the coating feels firm to the touch.Watch Out: Do not stack the mixture; overlapping pieces will steam and lose their crunch.While the coating sets, preheat your oven to a low 250°F (120°C). This gentle heat will finish the drying process without burning the delicate marshmallows inside the Lucky Charms. Place the baking sheet in the oven for a quick 5‑7 minute pass—just enough to crisp the outer layer without turning the inside gummy. The kitchen will fill with a buttery‑vanilla aroma that signals you’re on the right track.
After the oven stint, remove the sheet and let the treats cool completely. As they cool, the coating will harden into a glossy shell that snaps satisfyingly under pressure. This is the part where you can’t help but break off a piece and test it—if it cracks cleanly and reveals a soft, marshmallowy interior, you’ve nailed it. If it feels too soft, give it a few more minutes in the oven; if it’s too hard, reduce the oven time next round.
Finally, break the sheet into bite‑size clusters. For an extra visual pop, sprinkle a final dusting of rainbow jimmies over the clusters while the coating is still slightly tacky. This ensures the jimmies adhere perfectly and adds that final sparkle. Store the clusters in an airtight container; they’ll stay crunchy for up to a week, and the flavors will mellow into a harmonious blend.
That’s it — you did it. But hold on, I've got a few more tricks that'll take this to another level. Picture yourself pulling this out of the oven, the whole kitchen smelling incredible, and serving a bowl that looks like a confetti parade. If you’ve ever struggled with sticky coatings, you’re not alone — and I’ve got the fix. Stay with me here — this is worth it.
Insider Tricks for Flawless Results
The Temperature Rule Nobody Follows
Most home cooks think “low heat” means “any low setting,” but the magic lies in a precise 250°F oven. This temperature is hot enough to set the coating without caramelizing the sugars, which would give a bitter edge. If you go higher, you risk a burnt vanilla flavor that overpowers the cereal’s sweetness. I once tried 300°F and ended up with a crust that tasted like burnt toast—lesson learned. Keep that thermostat dialed in, and the result will be a perfect snap every time.
Why Your Nose Knows Best
Your sense of smell is a reliable indicator of doneness. When the coating is ready, you’ll detect a warm, buttery vanilla scent that fills the kitchen. If the aroma is faint, the coating is still too thin; if it’s sharp and slightly caramelized, you’re edging into over‑cooking. Trust that nose—don’t rely solely on timers. I’ve saved countless batches by pausing when the scent hit that “just‑right” note.
The 5‑Minute Rest That Changes Everything
After you toss the cereal in the coating, let it rest for exactly five minutes before spreading it on the sheet. This short pause allows the coating to thicken just enough to cling without sliding off. Skipping this step leads to a sloppy mess that sticks to the bowl and creates uneven clusters. My friend once ignored the rest and ended up with a soggy pile that tasted like a melted candy bar—never again.
The Salt‑Sugar Balance Trick
A pinch of sea salt (about ¼ teaspoon) added to the coating just before it melts creates a subtle contrast that lifts the sweetness. Salt is a flavor enhancer; it makes the vanilla pop and reduces any cloying aftertaste. If you’re on a low‑sodium diet, you can skip it, but you’ll notice a flatter flavor profile. I’ve found that even a tiny grain of salt can turn a good treat into a great one.
Cool‑Down Airflow
Once the sheet is out of the oven, place a cooling rack on top of it and gently fan the clusters with a handheld fan or the cool setting on a kitchen vent. This rapid airflow prevents condensation from forming on the coating, which would make the treats soggy. I once left the sheet on the counter and watched the glaze turn sticky within minutes—don’t let that happen to you. Quick cooling preserves that satisfying snap.
Creative Twists and Variations
This recipe is a playground. Here are some of my favorite ways to switch things up:
Chocolate‑Covered Delight
Swap the vanilla candy coating for a dark chocolate coating and add a sprinkle of sea salt on top. The bitterness of the chocolate balances the sweet cereal, creating a sophisticated flavor that adult palates love.
Coconut Paradise
Replace pretzel snaps with toasted coconut flakes and use a coconut‑infused white chocolate coating. The tropical aroma transports you to a beachside snack bar, perfect for summer gatherings.
Spicy Sweet Kick
Add a pinch of cayenne pepper to the coating and toss in some crushed cinnamon sugar pretzel sticks. The heat awakens the sweet notes and adds an unexpected zing that keeps guests guessing.
Berry Burst
Mix in dried cranberries and freeze‑dried strawberries with the cereal, then coat with a raspberry‑flavored white chocolate. The tart berries cut through the sweetness and add a burst of color.
Nutty Crunch
Fold in chopped toasted almonds or pecans for an extra layer of crunch, and use a honey‑drizzled almond bark instead of vanilla. The nutty undertones complement the pretzel snaps and add depth.
Storing and Bringing It Back to Life
Fridge Storage
If you need to keep them for more than a day, store the clusters in an airtight container in the refrigerator. They’ll stay crisp for up to a week, though you may notice a slight softening of the coating. To revive the snap, let them sit at room temperature for 10 minutes before serving.
Freezer Friendly
These treats freeze beautifully. Spread them on a tray, flash‑freeze for an hour, then transfer to a zip‑top bag. They’ll keep for up to three months. When you’re ready to enjoy, pop them in the microwave for 10‑15 seconds; the coating will soften just enough to be chewable without losing crunch.
Best Reheating Method
To bring them back to life, preheat your oven to 300°F (150°C) and warm the clusters for 5 minutes. Add a tiny splash of water (about a teaspoon) to the baking sheet before reheating; the steam revives the interior softness while the exterior stays crisp. This trick ensures every bite feels freshly made, even weeks later.