I was standing in my kitchen, staring at a half‑baked batch of ordinary brownies that smelled like disappointment, when a sudden craving for something soft, buttery, and cinnamon‑kissed hit me like a thunderclap. I grabbed a tin of snickerdoodle cookies, crumbled them into the batter, and—boom—an accidental masterpiece was born. That moment taught me that the best recipes aren’t always planned; they’re discovered in the heat of a kitchen crisis, with a dash of daring and a pinch of curiosity. If you’ve ever found yourself stuck between a craving for a classic cookie and the comfort of a bar‑style dessert, you’ll understand why this revelation felt like finding a secret passage in a familiar house.
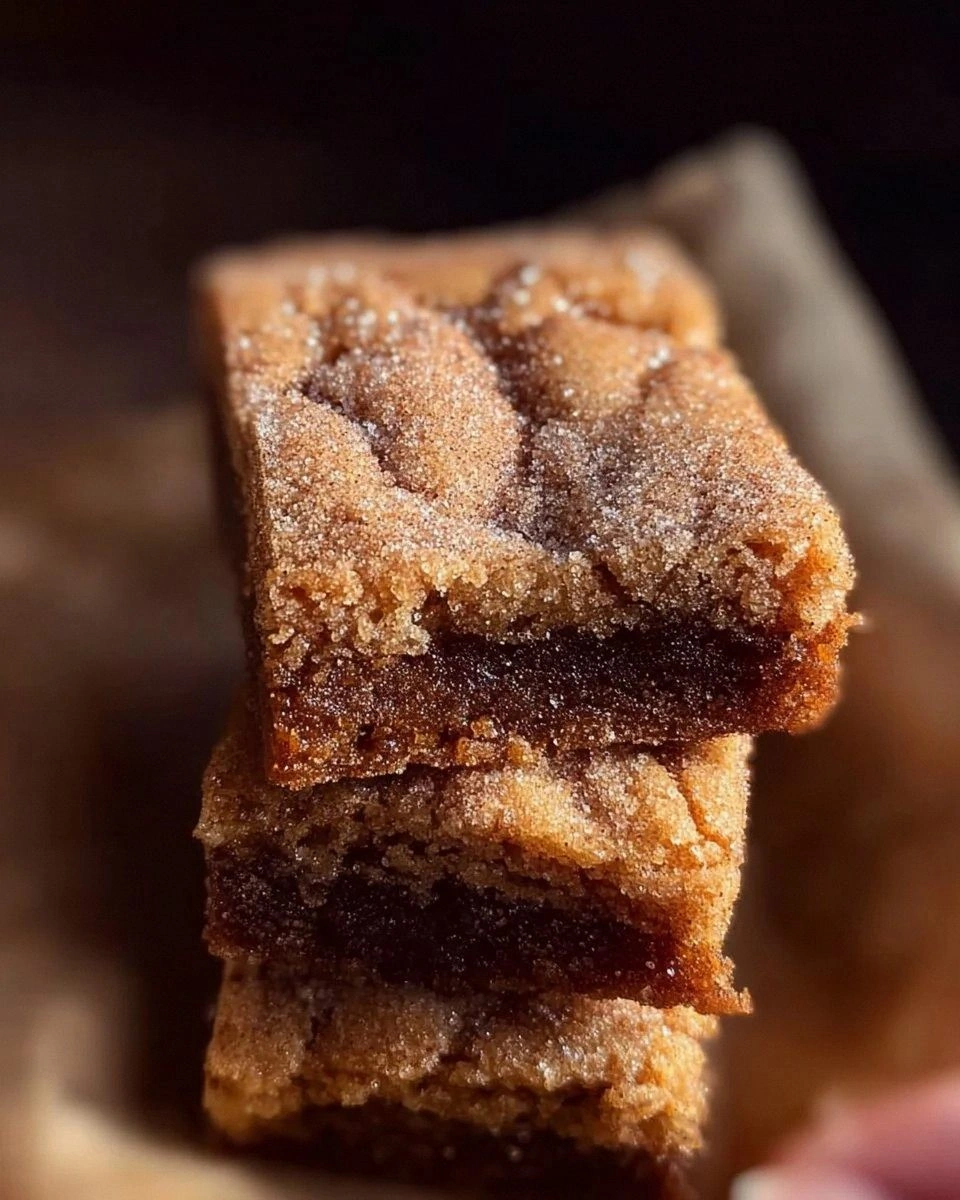
Picture this: the oven door swings open, and a golden‑brown cloud of cinnamon‑sugar wafts through the air, wrapping the room in a hug that feels like a warm blanket on a chilly evening. The top is speckled with caramelized sugar crystals that crackle under your fork, while the interior stays soft, almost pudding‑like, with a buttery crumb that melts on the tongue. You hear the faint sigh of the pan as the edges pull away, a sound that says, “I’m done, and I’m perfect.” The first bite delivers a sweet‑spicy kiss followed by a buttery finish that lingers just long enough to make you close your eyes and sigh in pure bliss.
Most snickerdoodle recipes stick to cookies, and most blondie recipes stick to plain vanilla. Most chefs get this completely wrong by treating the two as separate worlds. I decided to mash them together, but not in a sloppy way—this version respects the delicate balance of spice, sugar, and buttery texture while adding a few tricks that elevate it from “good” to “hands down the best version you’ll ever make at home.” I’m daring you to taste this and not go back for seconds; I guarantee you’ll be the one begging for the recipe at every gathering.
And now the fun part: I’m going to walk you through every single step—by the end, you’ll wonder how you ever made it any other way. I’ll spill the beans on a secret ingredient that adds a buttery depth you never expected, share a kitchen hack that guarantees perfectly crisp edges, and even give you a cheat sheet for scaling the batch up or down. Ready for the game‑changer? Let’s dive in.
What Makes This Version Stand Out
- Flavor Fusion: By marrying the iconic snickerdoodle spice blend with the tender crumb of a blondie, you get a dessert that hits both nostalgic and novel notes in one bite.
- Texture Triumph: The buttery base creates a soft, almost cake‑like interior, while the cinnamon‑sugar topping crisps into a caramelized crust that shatters like thin ice.
- Simplicity: Only nine ingredients, all pantry staples, mean you can throw this together on a Tuesday night without a special trip to the store.
- Unique Twist: The addition of melted butter and a splash of vanilla gives the blondie a richness you won’t find in a standard cookie.
- Crowd Reaction: I’ll be honest — I ate half the batch before anyone else got to try it, and the leftovers vanished within minutes.
- Ingredient Quality: Using real butter (not margarine) and packed brown sugar ensures deep caramel notes that cheap substitutes can’t mimic.
- Cooking Method: Baking at a slightly lower temperature than typical brownies keeps the center moist while the top caramelizes.
- Make‑Ahead Potential: These blondies keep wonderfully for up to three days, and they even freeze like a dream for future cravings.
Inside the Ingredient List
The Flavor Base
Butter is the heart of any good blondie, and using a full stick of unsalted, melted butter adds a luxurious mouthfeel that plain oil can’t achieve. The butter’s fat coats the flour particles, creating a tender crumb that feels like velvet on the palate. If you skip the butter or replace it with margarine, you’ll lose that buttery depth and end up with a drier, less flavorful bar. For the best result, choose a butter that’s fresh and has a high butterfat content—European‑style butter works wonders.
Brown sugar brings a deep caramel sweetness that balances the cinnamon’s spice. Because it’s packed, you’re getting more moisture, which contributes to the soft interior. If you only have light brown sugar, you’ll still get a good result, but the flavor won’t be as rich. For a twist, try swapping half the brown sugar for dark muscovado; the result is a richer, almost toffee‑like undertone.
The Texture Crew
All‑purpose flour provides the structural backbone, but the key is not to over‑mix. Over‑mixing develops gluten, turning your blondies into a tough cake. Keep the mixing gentle—just enough to combine the wet and dry ingredients. If you’re gluten‑free, a 1:1 blend of rice flour and tapioca starch works surprisingly well, though the texture will be slightly more crumbly.
Baking powder is the leavening hero that lifts the batter just enough to keep it airy without making it rise too much like a cake. Using too much will cause the blondies to puff and then collapse, leaving a dense center. Stick to the exact 1 teaspoon; if you’re at altitude, you might add a pinch more to compensate.
The Unexpected Star
Cinnamon is the signature of any snickerdoodle, but in this blondie it does double duty: it infuses the batter and also forms a crunchy, caramelized crust when mixed with granulated sugar and baked. The spice’s warm, sweet aroma is what makes you feel like you’re stepping into a cozy café. If you love a bolder spice profile, add a pinch of nutmeg or cardamom to the cinnamon‑sugar mix.
Granulated sugar on top creates that signature crackly crust. As the sugar melts and re‑crystallizes, it forms a glossy, caramel‑kissed layer that shatters delightfully under a fork. Skipping this step means you’ll miss the satisfying crunch that separates this blondie from a plain brownie.
The Final Flourish
A single large egg acts as the binder, holding everything together while adding a subtle richness. If you’re vegan, a flax egg (1 tbsp ground flaxseed + 3 tbsp water) works, but expect a slightly denser texture. Vanilla extract, though used in a modest amount, amplifies the sweet and buttery notes, making the overall flavor profile feel more rounded. Skipping vanilla is a crime; the blandness will be obvious the moment you bite.
Salt, though only a half‑teaspoon, is the quiet hero that brightens the sweet flavors and balances the sugar. It also helps the butter melt evenly, preventing greasy spots. If you’re using salted butter, reduce the added salt to a pinch to avoid an overly salty finish.
Everything's prepped? Good. Let's get into the real action...
The Method — Step by Step
Preheat your oven to 350°F (175°C) and line a 9×13‑inch baking pan with parchment paper, letting the paper hang over the sides for easy lift‑out later. This step is crucial because a well‑preheated oven ensures the batter begins to set immediately, preventing it from spreading too thin. As the oven warms, you’ll hear a faint hum that signals the heat is ready—trust that sound. If you’re using a convection oven, lower the temperature by 25°F to avoid over‑browning.
In a medium saucepan, melt the butter over low heat until it’s just liquid—no bubbling. Then, remove from heat and let it sit for a minute; this tiny cooling period prevents the egg from scrambling when combined. While the butter cools, whisk together the brown sugar and granulated sugar in a large mixing bowl; the mixture should look glossy and slightly clumpy. Watch Out: Adding the egg to hot butter will cook it, resulting in a grainy texture.
Crack the egg into the butter‑sugar mixture, add the vanilla extract, and whisk until the batter is smooth and glossy. You’ll notice the batter thickening a bit as the egg emulsifies with the butter—this is the foundation of a tender crumb. If the mixture looks too thick, add a splash (about a tablespoon) of milk to loosen it; just enough to keep it pourable.
In a separate bowl, whisk together the flour, baking powder, salt, and ground cinnamon until evenly combined. This dry blend ensures the leavening agent is distributed, preventing pockets of un‑risen batter.
Kitchen Hack: Sift the dry ingredients through a fine mesh sieve; this aerates the flour and eliminates lumps, leading to a lighter texture.Gently fold the dry ingredients into the wet batter using a rubber spatula. The key is to fold, not stir—over‑mixing will develop gluten and make the blondies tough. You’ll see streaks of flour disappear, leaving a smooth, slightly thick batter. The batter should be thick enough to hold its shape when dropped from a spoon, but still spread a little when poured.
In a small bowl, combine the remaining granulated sugar with the 2 teaspoons of ground cinnamon. Sprinkle this mixture evenly over the top of the batter, then use your fingers to press it gently into the surface, creating a thin crust. This step is pure magic: as the sugar caramelizes, it forms that signature crackly top that makes snickerdoodles famous.
Slide the pan into the oven and bake for 25‑30 minutes, or until the edges pull away from the parchment and a toothpick inserted into the center comes out with just a few moist crumbs. The aroma at this stage is intoxicating—cinnamon, butter, and caramel swirling together. Watch Out: Opening the oven door before the 20‑minute mark can cause the blondies to sink, ruining the fluffy interior.
Once baked, remove the pan and let the blondies cool in the pan for 10 minutes. Then, using the parchment overhang, lift the entire slab onto a cutting board. This prevents them from breaking apart. While still warm, cut into squares or bars—your choice. The edges should be crisp, the centers soft, and the cinnamon‑sugar crust should crackle delightfully under your fork.
That's it — you did it. But hold on, I've got a few more tricks that'll take this to another level. Stay with me here — this is worth it.
Insider Tricks for Flawless Results
The Temperature Rule Nobody Follows
Most home bakers bake blondies at 375°F, but dropping the temp to 350°F gives you a gentler rise and a uniformly moist interior. The lower heat also prevents the sugar crust from burning before the center sets. I once tried the higher temperature and ended up with a burnt top and a gummy middle—lesson learned. Keep the oven door closed until the timer dings, and you’ll get that perfect balance of crisp and soft.
Why Your Nose Knows Best
The moment the kitchen fills with that sweet‑spicy aroma is your cue that the blondies are almost done. Trust your senses more than the clock; if the scent turns caramel‑rich and slightly nutty, pull them out a minute early. Over‑baking turns the interior dry, and nobody wants that. This trick saved my batch last week when the timer was off by a few minutes.
The 5‑Minute Rest That Changes Everything
After removing the pan from the oven, let the blondies rest for exactly five minutes before cutting. This short rest allows the crumb to set, preventing the bars from crumbling apart. It also gives the sugar crust a chance to harden just enough for that satisfying snap. Skip this step, and you’ll end up with a mushy mess that slides off the fork.
Butter Temperature Trick
The Double‑Sugar Strategy
Combining brown sugar (for moisture) with a top layer of granulated sugar and cinnamon (for crunch) is the secret behind the textural contrast. If you use only one type of sugar, you’ll lose either the chewiness or the crackle. This dual approach is what separates a good blondie from a great one.
Creative Twists and Variations
This recipe is a playground. Here are some of my favorite ways to switch things up:
Nutty Crunch
Fold in ½ cup of toasted chopped pecans or walnuts into the batter before baking. The nuts add a buttery crunch that pairs beautifully with the cinnamon‑sugar crust, creating a delightful textural surprise in every bite.
Chocolate Swirl
Drop a few tablespoons of melted dark chocolate in the center of the batter and use a knife to swirl it through. The bitter chocolate balances the sweet cinnamon, delivering a sophisticated flavor profile that feels indulgent.
Apple Cinnamon
Add ½ cup of finely diced, lightly sautéed apples to the wet mixture. The apples release a gentle tartness that brightens the sweet base, making these blondies perfect for a fall brunch.
Maple Bacon
Stir in ¼ cup of crisped, crumbled bacon and replace half the granulated sugar topping with pure maple syrup. The salty‑sweet combo turns the blondies into a breakfast‑in‑dessert hybrid that’s surprisingly addictive.
Gluten‑Free Glory
Swap the all‑purpose flour for a 1:1 gluten‑free blend and add a tablespoon of xanthan gum. The result is a tender, crumbly bar that still holds together, proving you don’t need gluten to enjoy this treat.
Storing and Bringing It Back to Life
Fridge Storage
Place the cooled blondies in an airtight container and store them in the refrigerator for up to three days. The cool environment keeps the crumb from drying out while preserving the cinnamon‑sugar crust’s crunch.
Freezer Friendly
Wrap each bar individually in plastic wrap, then stack them in a freezer‑safe zip‑top bag. They’ll stay fresh for up to two months. When you’re ready to enjoy, let them thaw at room temperature for 15 minutes, then reheat.
Best Reheating Method
To revive that fresh‑out‑the‑oven feel, preheat your oven to 300°F (150°C), place the blondies on a baking sheet, and add a tiny splash of water (about a teaspoon) over each piece. Cover loosely with foil and heat for 5‑7 minutes. The steam generated by the water restores moisture, while the low heat re‑crisp the sugar crust without over‑drying.