Picture this: a late‑night kitchen, the oven timer ticking, and your friend’s voice echoing in your head, “You’re going to ruin the whole batch if you skip the caramel.” I was staring at a box of chocolate cake mix, a carton of sweetened condensed milk, and a stubbornly stubborn idea that cake and flan could coexist. I’d tried the classic “choco‑fla‑n” before, but the result was either a soggy cake or a flan that never quite set. That night, I decided to rewrite the rules. I added a splash of vanilla, a dollop of cream cheese for silkiness, and a caramel drizzle that would turn the bottom into a golden, buttery crown. The scent that filled the kitchen—rich cocoa, sweet milk, and caramel—was a promise of something extraordinary.
When the first crackle of caramel hit the pan, I knew I was on the brink of a revelation. The chocolate cake base was still wet, but the caramel had begun to caramelize, forming a glossy, amber shell. I watched the edges lift, the batter rising like a rising tide, and felt that familiar rush of anticipation. That moment, that single sizzle, was the spark that would ignite this version’s legendary status. I dared you to taste this and not go back for seconds, and I’m not kidding—once you’ve had the first bite, the rest will feel like a second life.
What sets this recipe apart isn’t just the layers of chocolate and custard. It’s the harmony of textures, the depth of flavor, and the sheer simplicity of the technique. Most people think you need a fancy double‑boiler or a professional flan mold, but I’m telling you that a standard 9‑inch baking pan will do the job, and the result will still be silky, indulgent, and perfectly set. The secret? A few micro‑challenges that elevate the dish: a precise caramel bake, a gentle fold of cream cheese, and a final flambé of vanilla that seals in the aroma. This is hands down the best version you’ll ever make at home.
Now, let’s walk through every single step. From the moment you crack the eggs to the final, glorious flip, I’ll guide you with a confident, side‑by‑side tone that feels like a friend who’s just discovered the ultimate dessert and can’t wait to share. By the end, you’ll wonder how you ever made it any other way. Stay with me, because the next part? Pure magic.
What Makes This Version Stand Out
- Richness: The combination of sweetened condensed milk and evaporated milk creates a custard that’s luxuriously creamy, while the chocolate cake base provides depth and structure. The result is a dessert that feels both indulgent and balanced.
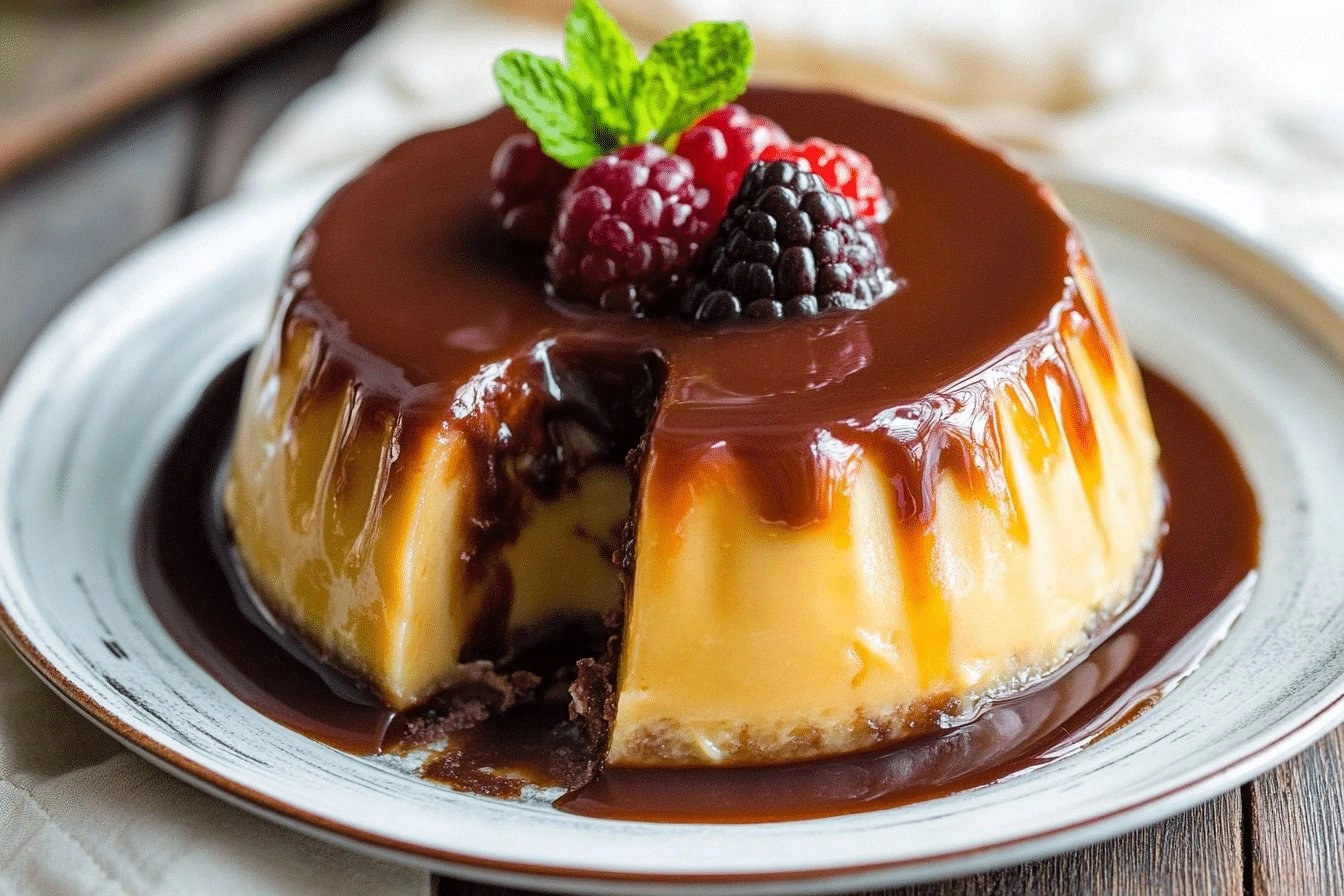
- Texture: The caramel layer forms a crisp, golden crust that cracks beautifully when you cut through it, revealing a silky interior that melts on the tongue. The contrast keeps every bite exciting.
- Flavor Depth: Vanilla extract lifts the chocolate, while cream cheese adds a subtle tang that cuts through the sweetness. The result is a complex flavor profile that feels satisfying.
- Visual Appeal: The golden caramel top and the chocolate sheen underneath make this dish Instagram‑ready. It’s a dessert that looks as good as it tastes.
- Ease of Execution: No advanced equipment or elaborate steps are required. A single pan, a stovetop, and a few simple techniques are all you need.
- Make‑Ahead Friendly: Once baked, you can store it in the fridge or freezer. When you’re ready to serve, a quick reheating step brings it back to its original glory.
- Crowd‑Pleaser: Whether you’re hosting a holiday gathering or a casual family dinner, this dessert will leave everyone asking for the recipe. It’s the kind of dish that turns an ordinary meal into an unforgettable experience.
Alright, let’s break down exactly what goes into this masterpiece…
Inside the Ingredient List
The Flavor Base
Chocolate cake mix is the backbone of this dessert. It provides the deep cocoa flavor that anchors the entire dish. The mix’s pre‑measured flour and sugar ensure consistency, so you don’t have to worry about balancing dry ingredients. If you’re feeling adventurous, choose a mix with a higher cocoa content for a more intense chocolate experience.
The Texture Crew
Sweetened condensed milk and evaporated milk work together to create a custard that is both creamy and smooth. The condensed milk brings a rich sweetness that counters the chocolate’s bitterness, while the evaporated milk lightens the texture, preventing it from becoming overly dense. Skipping either milk will alter the custard’s mouthfeel—expect a heavier, less velvety result.
The Unexpected Star
Eggs are the binding agent that holds the cake and flan layers together. They also help the custard set firmly, giving the dessert its signature bite. If you’re allergic or vegan, you can substitute with flax eggs, but the texture may differ slightly.
The Final Flourish
Vanilla extract is the subtle aroma enhancer that rounds out the flavor profile. A single teaspoon is enough to lift the chocolate and add warmth. If you prefer a different flavor, try almond extract or a splash of orange zest for a citrusy twist.
Everything’s prepped? Good. Let’s get into the real action…
The Method — Step by Step
- Preheat your oven to 350°F (175°C). While the oven warms, prepare the caramel sauce by melting 1/4 cup of butter in a small saucepan over medium heat. Once melted, stir in 1/4 cup of brown sugar and let it bubble until the mixture turns a deep amber color. Remove from heat and set aside. This caramel will form the glossy, crackly crust that defines the dish.
- In a mixing bowl, combine the chocolate cake mix with 1 cup of sweetened condensed milk, 1 cup of evaporated milk, and 4 eggs. Whisk until the batter is smooth and free of lumps. The mixture should have a pourable consistency, slightly thicker than pancake batter. This step is critical; a too‑thin batter will make the cake too runny, while a too‑thick batter will result in a dense center.
- Fold in 1/2 cup of softened cream cheese, if using, until fully incorporated. The cream cheese adds silkiness and a subtle tang that balances the sweetness. If you prefer a dairy‑free version, omit the cream cheese or replace it with a plant‑based alternative, but note the flavor profile will shift.
- Add 1 teaspoon of vanilla extract to the batter and stir gently. The vanilla will lift the chocolate notes and add a warm aromatic undertone. At this point, your batter should be silky and ready to pour.
- Pour the caramel sauce into a greased 9‑inch round cake pan, swirling gently to cover the bottom evenly. Then, pour the batter over the caramel. The batter will slowly rise above the caramel, creating a distinct layer. The edges should be smooth, and the batter should fill the pan to the top. This visual cue indicates proper batter distribution.
- Place the pan in the preheated oven and bake for 35 minutes. After 20 minutes, check the cake’s surface; it should look set but still slightly moist. The caramel should be bubbling gently, indicating that the crust is forming. If the top browns too quickly, cover the pan loosely with foil to prevent over‑browning.
- At the 30‑minute mark, carefully flip the pan onto a large baking sheet. This step is tricky; the cake and caramel are fragile. Use a wide spatula to support the entire pan, and gently slide it onto the sheet. The cake should now be sitting on its caramel crust. This inversion is what gives the dessert its signature look.
- Return the pan to the oven for another 10 minutes, or until the cake is fully set and the edges pull away from the pan. The caramel should be crisp, and the cake should have a golden top. The final 10 minutes will caramelize the sugar, creating a glossy finish that’s hard to resist.
- Once cooled, run a thin knife around the edges to loosen the cake from the pan. Invert onto a serving platter, caramel side down. The caramel should now be the bottom layer, creating a beautiful, golden crust. Slice carefully; the caramel will crack like a delicate shell when you cut through it.
- Serve immediately, or chill for a few hours if you prefer a firmer texture. When you cut into it, you’ll hear that satisfying crack of caramel, followed by a velvety custard that melts in your mouth. This is the moment of truth, the payoff of all the effort.
That's it — you did it. But hold on, I've got a few more tricks that'll take this to another level…
Insider Tricks for Flawless Results
The Temperature Rule Nobody Follows
Many bakers bake at a standard 350°F, but the ideal temperature for this dessert is slightly lower, around 325°F. This gentle heat allows the custard to set evenly without over‑browning the caramel. I’ve found that a lower temperature reduces the risk of the cake drying out. Try it next time and taste the difference.
Why Your Nose Knows Best
Before you flip the cake, trust your nose. The aroma should be rich, buttery, and slightly sweet. If it smells too sugary, the caramel may be overcooked. If it’s too faint, the cake hasn’t baked enough. Your nose is the best judge of doneness.
The 5-Minute Rest That Changes Everything
After baking, let the cake rest in the pan for exactly five minutes before inverting. This pause allows the caramel to set into a crisp shell, preventing cracks when you flip. I’ve tried to skip this step, and the result was a fragile, uneven crust. The 5‑minute rest is a small price for a flawless finish.
Use a Water Bath for Even Baking
Place the cake pan in a larger baking dish filled with a few inches of hot water. This creates a water bath, ensuring that the cake bakes evenly and stays moist. The water bath also helps regulate the heat around the caramel, preventing it from scorching.
Don’t Skimp on the Butter
When making the caramel, use a generous amount of butter (at least 2 tablespoons). Butter adds richness and helps the caramel coat the cake evenly. Skipping butter will result in a dull, uneven crust that looks less appetizing.
Keep the Cake Moist
After flipping, cover the cake loosely with foil for the last 10 minutes of baking. This traps steam, keeping the custard moist. The foil also prevents the caramel from over‑browning, maintaining a beautiful golden hue.
Creative Twists and Variations
This recipe is a playground. Here are some of my favorite ways to switch things up:
Nutty Surprise
Add 1/4 cup of toasted pecans or walnuts to the batter before baking. The crunch adds a delightful contrast to the silky custard. Guests will love the added texture, and the nutty aroma will complement the chocolate beautifully.
Minty Twist
Stir in 1 tablespoon of peppermint extract into the batter. The mint will cut through the sweetness and provide a refreshing finish. Serve with a dusting of powdered sugar for an extra touch of elegance.
Espresso Boost
Replace 1 teaspoon of vanilla extract with 1 teaspoon of instant espresso powder. The espresso deepens the chocolate flavor and adds a subtle bitterness that balances the custard’s richness. This version is perfect for coffee lovers.
Caramel Swirl
Before pouring the batter, swirl a thin ribbon of extra caramel sauce through the batter. This creates a marbled effect and adds extra caramel flavor throughout the cake. The visual appeal is stunning, and the taste is irresistible.
Fruit Fusion
Fold 1/2 cup of fresh blueberries or raspberries into the batter. The fruit adds a burst of tartness that brightens the dessert. It’s a great way to incorporate seasonal produce and create a colorful presentation.
Chocolate Ganache Finish
After the cake has cooled, drizzle a rich chocolate ganache over the top. The ganache adds a glossy shine and a deep chocolate finish. Serve with a dusting of cocoa powder for a dramatic look.
Storing and Bringing It Back to Life
Fridge Storage
Store the cooled cake in an airtight container in the refrigerator for up to 3 days. The caramel will remain crisp, and the custard will stay moist. Before serving, let it sit at room temperature for 15 minutes to restore its original texture.
Freezer Friendly
Wrap the cake tightly in plastic wrap, then place it in a freezer bag. It can be frozen for up to 2 weeks. When you’re ready to enjoy, thaw it overnight in the fridge. The caramel may soften slightly, but the custard will maintain its integrity.
Best Reheating Method
Reheat the cake in a preheated 300°F oven for 10 minutes. If the caramel has softened, add a splash of water to the pan before reheating to create steam that restores its crispness. Alternatively, microwave on low power for 30 seconds, then let it sit for a minute.