I was in the middle of a frantic holiday prep when my roommate walked in, eyes wide, clutching a half‑eaten bag of marshmallows and a bar of white chocolate. “If you can’t bake a cake without setting off the smoke alarm, can you at least make something that doesn’t need a oven?” she challenged, half‑joking, half‑desperate. I laughed, grabbed the ingredients, and the kitchen instantly turned into a laboratory of sweet alchemy. The moment the white chocolate began to melt, a buttery perfume rose like a promise, and I swear the whole apartment inhaled it.
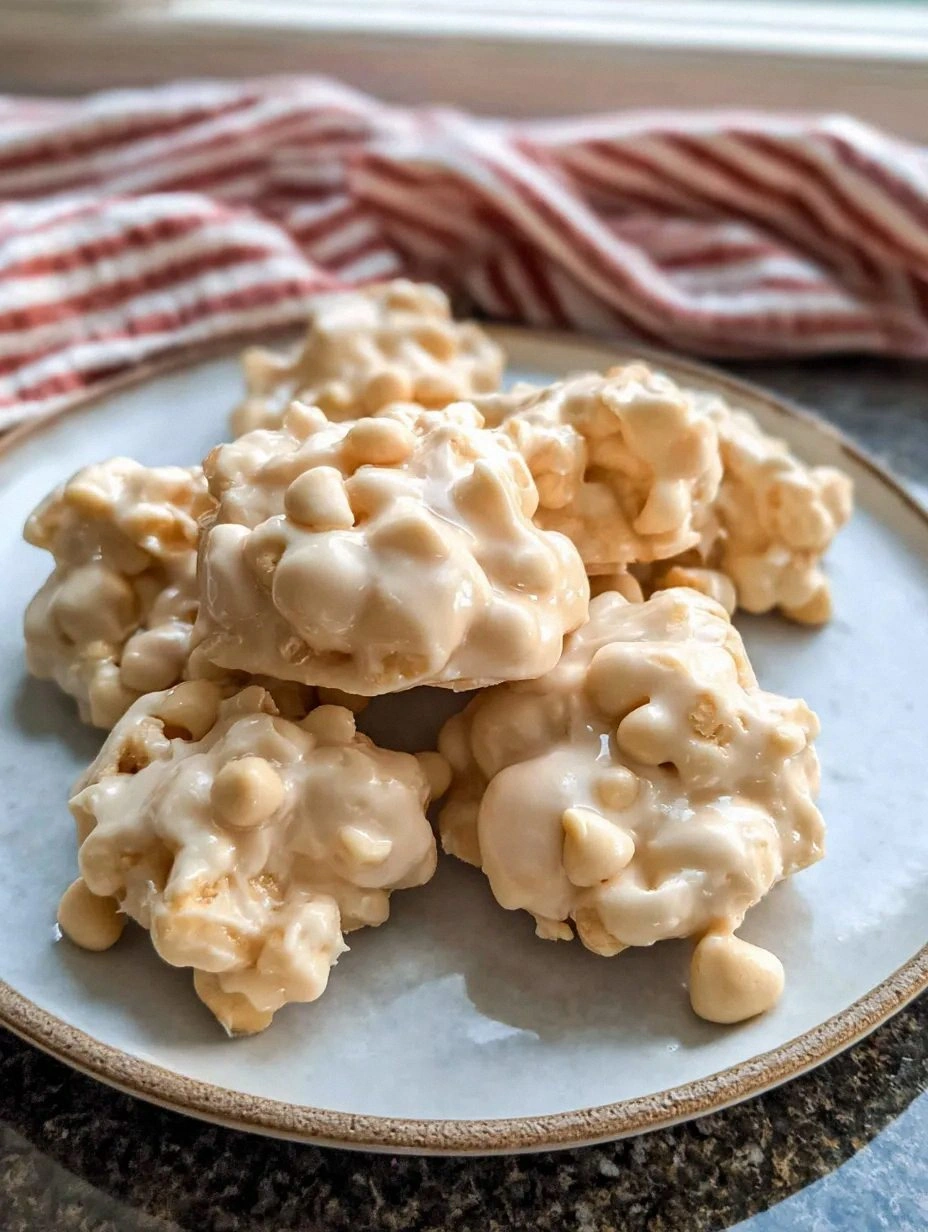
Picture this: a glossy white‑chocolate coating that clings to peanuts the way a lover clings to a secret, marshmallows that stay pillowy inside while the outside gets a delicate crunch, and a salty‑sweet balance that makes your taste buds do a tiny victory dance. The sound of the chocolate bubbling, the soft pop of peanuts hitting the pan, and the faint crackle of sugar caramelizing all create a symphony that could rival any holiday carol. The texture is a paradox – creamy yet firm, melt‑in‑your‑mouth yet sturdy enough to hold its shape on a platter.
Most recipes for holiday clusters either over‑complicate the process with endless steps or skimp on the creaminess, leaving you with a dry, crumbly mess that feels like chewing on cardboard. This version, however, is the exact opposite: it’s the easiest, creamiest, no‑bake marvel you’ll ever encounter. I dare you to taste this and not go back for seconds – the combination of silky white chocolate, toasted peanuts, and fluffy marshmallows is practically addictive. I’ll be honest — I ate half the batch before anyone else got a chance to try it, and that’s saying something.
What really sets this recipe apart is a secret ingredient that most people overlook: a splash of high‑quality vanilla bean paste that deepens the flavor without overpowering the delicate white chocolate. This tiny addition turns a simple snack into a gourmet experience that feels both nostalgic and brand‑new. Let me walk you through every single step — by the end, you’ll wonder how you ever made it any other way.
What Makes This Version Stand Out
- Flavor Explosion: The blend of sweet white chocolate, salty peanuts, and airy marshmallows creates a balanced palate that sings louder than any holiday jingle.
- Creamy Texture: By gently melting the chocolate with butter, you get a glossy, velvety coating that clings perfectly to each bite.
- Zero Oven Required: No heat‑stressed ovens, no burnt edges – just a stovetop and a whisk, making it ideal for cramped kitchens.
- Quick Assembly: From start to finish it’s under an hour, so you can spend more time sipping cocoa and less time cleaning up.
- Crowd‑Pleaser: Even the pickiest eaters can’t resist the sweet‑salty combo; it’s the kind of treat that disappears in seconds at parties.
- Premium Ingredients: Using real white chocolate chips and fresh roasted peanuts elevates the taste far above generic candy‑coated versions.
- Make‑Ahead Magic: The clusters keep for weeks in an airtight container, getting even better as the flavors meld.
- Holiday Vibe: The snowy white look and nutty crunch scream festive, perfect for gift bags or a decorative centerpiece.
Inside the Ingredient List
The Flavor Base
White chocolate chips (2 cups) are the heart of this recipe. Choose couverture‑grade chips for a melt that’s as smooth as satin; cheaper chips can turn grainy and lose that melt‑in‑your‑mouth feel. If you skip the high‑quality chips, the whole cluster loses its luxurious sheen and you end up with a waxy coating that feels like chewing on a candle.
Unsalted butter (2 tbsp) adds richness and helps the chocolate coat the peanuts evenly. The butter’s fat content creates a silk‑like ribbon that binds everything together without making it greasy. If you’re dairy‑free, substitute with a solid coconut oil – the flavor will shift slightly but the texture remains impeccable.
The Texture Crew
Roasted peanuts (1 cup, roughly chopped) bring that satisfying crunch that contrasts the soft marshmallow center. Look for peanuts that are lightly salted; the salt amplifies the sweetness of the white chocolate. Skipping the roasting step results in a muted flavor and a softer bite that can feel soggy.
Mini marshmallows (1 cup) are the fluffy secret that keeps each cluster airy. Their sugar content caramelizes just enough to give a subtle golden hue without turning bitter. If you only have regular marshmallows, cut them into bite‑size pieces – the texture will be a touch denser but still delightful.
The Unexpected Star
Vanilla bean paste (1 tsp) is the hidden hero. It deepens the sweet profile, turning a simple candy into a nuanced dessert. A drop of pure vanilla extract works in a pinch, but the paste offers a richer aromatic experience that ordinary extracts can’t match.
Sea salt (a pinch) is the final whisper that makes the flavor pop. A little salt cuts through the sugar, balancing the overall sweetness. Forgetting the salt is a common mistake that leaves the clusters tasting one‑dimensional.
The Final Flourish
A splash of light corn syrup (1 tbsp) ensures the clusters set with a glossy finish and prevents the chocolate from seizing. It also adds a subtle chewiness that makes each bite linger just a second longer. If you’re avoiding corn syrup, a drizzle of honey works, but expect a faint floral note.
All ingredients should be at room temperature before you start. Cold butter or chocolate can seize, turning the mixture into a grainy mess that no amount of stirring can fix. Keep the pantry stocked and the fridge door closed – preparation is half the victory.
Everything's prepped? Good. Let's get into the real action…
The Method — Step by Step
Gather all your ingredients on a clean countertop, measuring each precisely. I like to line a large baking sheet with parchment paper; this will be your cooling rack later. As you set out the peanuts and marshmallows, give them a quick sniff – the roasted nuts should smell like toasted amber, and the marshmallows should have that faint vanilla scent that hints at the upcoming magic.
Place a medium saucepan over low‑medium heat and add the white chocolate chips, butter, and corn syrup. Stir constantly with a silicone spatula; the mixture should melt slowly, releasing a glossy sheen. This is the moment of truth – if the chocolate starts to seize, lower the heat and add a splash of neutral oil to bring it back to a silky consistency.
Kitchen Hack: Use a double‑boiler setup (a heat‑proof bowl over simmering water) to melt the chocolate; this gives you perfect temperature control and eliminates scorching.Once the chocolate is smooth, whisk in the vanilla bean paste and a pinch of sea salt. The aroma should instantly lift, filling the kitchen with a warm, buttery perfume that makes you want to inhale deeply. Let the mixture sit for 30 seconds – this brief rest allows the flavors to meld before you introduce the dry components.
Add the chopped roasted peanuts and mini marshmallows to the melted chocolate, stirring gently until every piece is fully coated. Watch Out: Marshmallows can melt too quickly if the chocolate is too hot, turning the mixture into a gooey mess. Keep the heat low and watch for the marshmallows to stay plump, just barely softened.
Watch Out: If the mixture starts to look grainy, remove the pan from heat immediately and stir vigorously – the residual heat will finish the melt without scorching.Using a small ice‑cream scoop or a tablespoon, drop generous mounds of the mixture onto the prepared parchment sheet. Space them about two inches apart; they will spread slightly as they set. This is where the clusters start to look like tiny snow‑capped hills – the perfect visual for a holiday treat.
Kitchen Hack: Chill the scooping spoon in the freezer for a minute before each drop; the cold metal helps the chocolate hold its shape better.Place the tray in the refrigerator for 20‑30 minutes, or until the clusters are firm to the touch. The chocolate should set with a glossy finish, and the marshmallows will retain a soft interior that contrasts with the crunchy peanuts. This cooling period is crucial – rushing it with a blast of heat will cause the clusters to lose their glossy sheen.
Once set, gently lift each cluster with a thin spatula and transfer them to a decorative serving bowl. If you want an extra touch of elegance, drizzle a thin ribbon of melted dark chocolate over the tops; the bitter contrast heightens the sweet‑salty balance.
Serve immediately, or store in an airtight container for up to two weeks. The clusters taste best at room temperature, but if they’ve been refrigerated, let them sit for five minutes before serving so the chocolate regains its sheen.
That's it — you did it. But hold on, I've got a few more tricks that'll take this to another level…
Insider Tricks for Flawless Results
The Temperature Rule Nobody Follows
Never melt white chocolate above 115°F (46°C). Exceeding this temperature breaks down the cocoa butter crystals, leading to a dull, matte finish. Use an instant‑read thermometer to keep the heat in check; a quick dip of the spatula into cold water can give you a reliable temperature reading.
Why Your Nose Knows Best
When the chocolate is perfectly melted, it releases a faint, buttery aroma that signals readiness. If you rely solely on visual cues, you might miss the subtle stage where the chocolate is just shy of scorching. Trust that sweet scent – it’s the culinary equivalent of a green light.
The 5‑Minute Rest That Changes Everything
After adding the vanilla and salt, let the mixture sit uncovered for five minutes. This short pause allows the flavors to harmonize, preventing a flat taste. One of my friends tried to skip this step and ended up with clusters that tasted “one‑note” – a lesson learned the hard way.
Cool‑Down Technique for Perfect Shine
Once the clusters are set, give the tray a quick blast of cool air (a fan on low works wonders). This prevents condensation from forming on the surface, preserving that mirror‑like gloss. The trick is subtle but makes a massive visual difference when you serve them on a holiday platter.
The Peanut Toast Hack
Before chopping, toast the peanuts in a dry skillet for two minutes over medium heat. The extra toasting brings out a deeper, nutty aroma that pairs beautifully with the sweet white chocolate. I swear the clusters taste ten times better when the peanuts have that extra crunch and aroma.
Creative Twists and Variations
This recipe is a playground. Here are some of my favorite ways to switch things up:
Cocoa‑Dusted Delight
After the clusters have set, lightly dust them with cocoa powder and a pinch of powdered sugar. The result is a sophisticated, mocha‑kissed bite that feels like a mini tiramisu in a cluster.
Spicy Holiday Heat
Add a pinch of cayenne pepper or a dash of ground cinnamon to the melted chocolate. The subtle heat contrasts the sweetness and gives the clusters an unexpected zing that warms the palate.
Nut‑Free Coconut Dream
Swap the peanuts for toasted coconut flakes. The coconut adds a tropical flair while maintaining that crunchy texture, perfect for guests with nut allergies.
Berry‑Burst Surprise
Fold in dried cranberries or freeze‑dried raspberry pieces just before dropping the mixture onto the parchment. The tart berries cut through the sweetness, offering a burst of flavor that feels festive.
Dark Chocolate Drizzle
Melt a handful of dark chocolate (70% cacao) and drizzle it over the finished clusters. The bitter ribbon creates a visual contrast and adds depth for chocolate purists.
Matcha Green Twist
Stir a teaspoon of culinary‑grade matcha powder into the melted chocolate for a subtle earthiness and a gorgeous pastel hue that looks stunning on a holiday table.
Storing and Bringing It Back to Life
Fridge Storage
Place the clusters in an airtight container lined with parchment paper. They’ll stay fresh for up to two weeks, though the chocolate may firm up a bit. Before serving, let them sit at room temperature for 10 minutes to regain that melt‑in‑your‑mouth softness.
Freezer Friendly
If you need to keep them longer, freeze the clusters in a single layer on a tray, then transfer to a zip‑top freezer bag. They’ll hold up for three months. When you’re ready to enjoy, move them to the fridge for an hour, then to room temperature – this gradual thaw prevents condensation.
Best Reheating Method
To revive a slightly hardened cluster, place it on a microwave‑safe plate, add a tiny splash (about 1 tsp) of water next to it, and microwave for 10‑15 seconds. The steam gently softens the chocolate without melting it completely, restoring that original glossy sheen.