I was halfway through a week of bland, forgettable meals when my roommate, a self‑proclaimed taco aficionado, challenged me to “turn your mac & cheese into a fiesta.” I stared at the steaming pot of elbow macaroni, the butter melting like a quiet sunrise, and imagined a dish that would make the whole kitchen smell like a Mexican street market. The idea hit me like a salsa‑laden burrito: combine the comfort of creamy pasta with the punch of taco seasoning, the crunch of crushed chips, and a melty cheese blanket that coats every noodle like velvet. I’m not saying this is the pinnacle of all comfort foods, but I can promise you this is hands down the best version you’ll ever make at home, and I dare you to taste this and not go back for seconds.
Picture yourself pulling this out of the oven, the whole kitchen smelling incredible, the sound of a bubbling cheese sauce mingling with the sizzle of a quick pan‑sear. The first bite is a revelation: the pasta is tender, the cheese is gooey, the taco spices give a subtle kick, and the crushed tortilla chips add a satisfying crunch that shatters like thin ice. If you’ve ever struggled with a plain mac & cheese that feels flat, you’re not alone – and I’ve got the fix. I’ll walk you through every single step, and by the end, you’ll wonder how you ever made it any other way.
The secret isn’t in the ingredients themselves – which are all pantry staples – but in how they’re layered and the timing that lets each flavor bloom. I’ll show you how to create a sauce that’s thick enough to cling to every noodle, how to fold in the taco seasoning without losing that classic kick, and how to finish it with a crunchy, golden topping that’s impossible to resist. And don’t worry about the extra steps; I’ll keep it breezy and even sprinkle in a few kitchen hacks that save time and avoid common pitfalls. Ready for the game‑changer? Let’s dive in.
I’ll start with a quick confession: I ate half the batch before anyone else got to try it. That’s the power of this dish – it’s addictive, it’s comforting, and it’s so good that it deserves a spotlight. So, if you’re looking for a crowd‑pleasing main dish that’s both simple and spectacular, this is it. The next part? Pure magic. And now the fun part.
What Makes This Version Stand Out
- Flavor: The taco seasoning infuses the cheese sauce with a warm, smoky undertone that feels both familiar and adventurous.
- Texture: The crushed tortilla chips create a crispy layer that contrasts the creamy pasta, giving each bite a delightful crunch.
- Convenience: All the steps can be done in under 45 minutes, making it a perfect weeknight winner.
- Versatility: Swap ground beef for turkey or chicken, or keep it vegetarian with black beans and corn for a complete change.
- Make‑ahead: This dish can be assembled and refrigerated; just bake it fresh when ready to serve.
- Kid‑friendly: The mild heat from the seasoning is balanced by the creamy cheese, making it a hit with younger palates.
- Presentation: A sprinkle of fresh cilantro and a drizzle of sour cream turns a humble comfort food into a showstopper.
- Ingredient Quality: Using real cheddar and Monterey Jack instead of processed blends elevates the flavor profile dramatically.
Inside the Ingredient List
The Flavor Base
Elbow macaroni is the backbone of any mac & cheese. It’s sturdy enough to hold the sauce without becoming mushy, yet tender when cooked al dente. Skipping it would turn the dish into a flat, sauce‑heavy mess. If you’re watching carbs, consider using a lower‑carb pasta or a cauliflower substitute.
Ground beef brings richness and protein. Cook it until it’s browned and crumbly, then drain the excess fat to keep the sauce from becoming greasy. If you prefer a leaner option, ground turkey or chicken works beautifully, or go plant‑based with crumbled tofu or textured vegetable protein.
Taco seasoning is the star that transforms the dish. It’s a blend of chili powder, cumin, paprika, garlic powder, onion powder, and a touch of salt and pepper. Don’t skip it – the flavor it injects is what makes this mac & cheese feel like a taco in disguise.
The Texture Crew
Cheddar and Monterey Jack cheeses create a creamy, melty coating that clings to each noodle. Cheddar provides sharpness, while Jack offers a milder, buttery note. Using a mix gives depth without overwhelming the palate. If you’re lactose intolerant, try a dairy‑free cheddar alternative.
Milk and butter form the base of the sauce. The butter adds richness, while the milk lightens the mixture, preventing it from becoming too heavy. A splash of heavy cream can make it extra indulgent, but keep it moderate to avoid a soupy consistency.
All‑purpose flour thickens the sauce into a velvety consistency. It’s a classic roux technique that balances the cheese’s fat content. If you’re gluten‑free, substitute with cornstarch or a gluten‑free flour blend.
The Unexpected Star
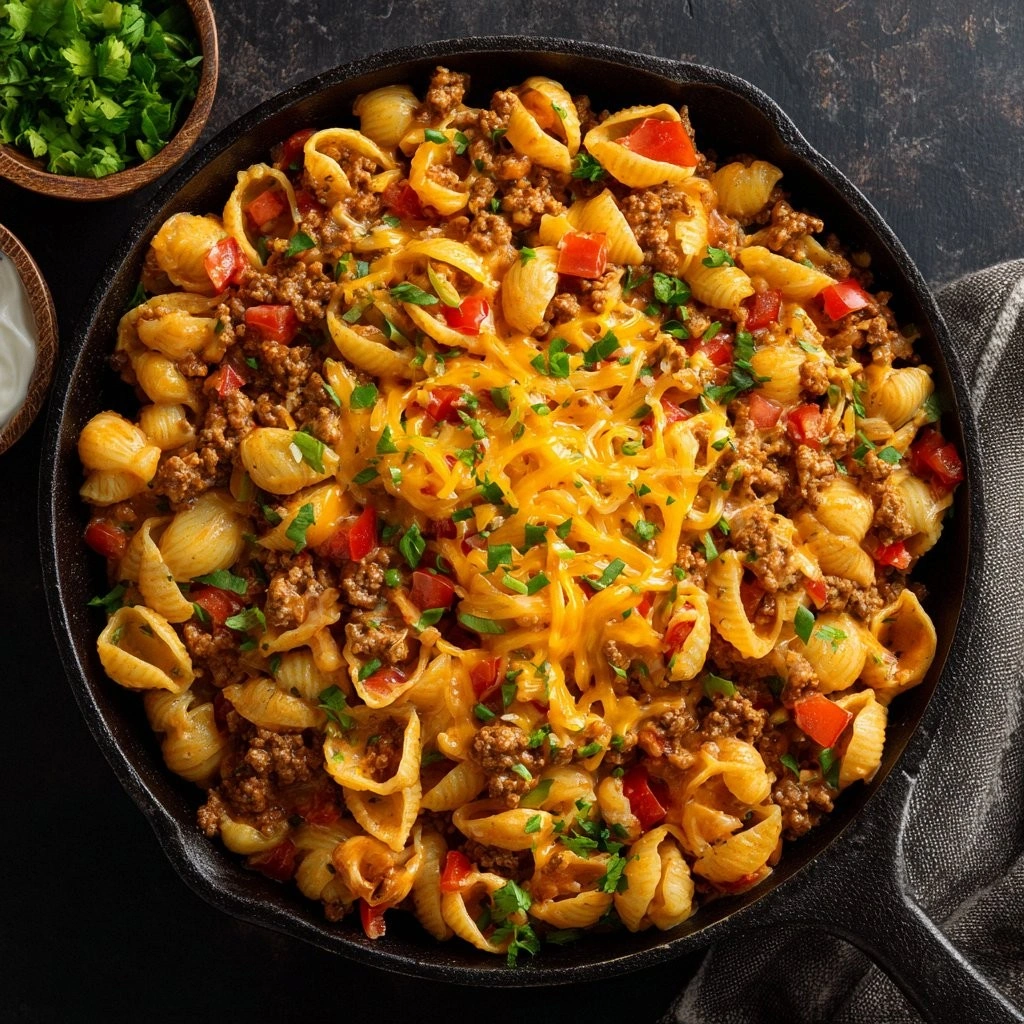
Tortilla chips are the crunchy surprise that elevates the dish. They’re crushed and sprinkled on top before baking, creating a golden, crispy layer that contrasts the creamy interior. Skipping them would strip the dish of its signature texture and visual appeal.
Salsa adds a fresh, tangy kick that cuts through the richness. It also provides moisture, ensuring the final bake is juicy and flavorful. Choose a mild salsa if you’re sensitive to heat, or go spicy for an extra bite.
The Final Flourish
Sour cream and cilantro are optional but recommended toppings. Sour cream adds a cool, creamy contrast, while cilantro brings a bright, herbal note. Together they finish the dish with a polished, restaurant‑style touch.
Everything’s prepped? Good. Let’s get into the real action.
The Method — Step by Step
- Cook the elbow macaroni in salted boiling water until just al dente, about 7 minutes. Drain and set aside. The pasta should still have a slight bite; it will soften further in the oven.
- While the pasta cooks, brown the ground beef in a large skillet over medium heat. Break it apart with a wooden spoon; once it’s no longer pink, drain any excess grease. The meat should have a deep brown color for maximum flavor.
- Stir in the taco seasoning with the beef, letting the spices toast for 30 seconds. This step releases the essential oils and intensifies the flavor profile.
- In a separate saucepan, melt butter over medium heat. Whisk in flour until a smooth paste forms, cooking for 1 minute to eliminate the raw flour taste. The mixture should be light golden.
- Gradually pour in milk while whisking constantly to avoid lumps. Bring to a gentle simmer; the sauce should thicken into a silky consistency that coats the back of a spoon.
- Reduce heat to low, add shredded cheddar and Monterey Jack, stirring until the cheeses melt completely. The sauce should be glossy and thick, ready to coat the pasta.
- Combine the drained pasta, seasoned beef, and cheese sauce in a large baking dish. Mix until every noodle is evenly coated and the mixture is fragrant.
- Top the mixture with crushed tortilla chips, a generous spoonful of salsa, and a light drizzle of sour cream if using. Sprinkle fresh cilantro over the top for a burst of color.
- Bake in a preheated 375°F (190°C) oven for 20 minutes, or until the top is golden brown and the sauce is bubbling. The edges should start pulling away, signaling perfect doneness.
- Remove from oven and let rest for 5 minutes before serving. This rest period allows the flavors to settle and the sauce to thicken slightly, giving you a creamy, cohesive bite.
That’s it — you did it. But hold on, I've got a few more tricks that'll take this to another level.
Insider Tricks for Flawless Results
The Temperature Rule Nobody Follows
Many cooks lower the oven temperature too early, thinking it will prevent burning. In fact, a steady 375°F is ideal for achieving a golden, crisp top while keeping the interior moist. I once tried 350°F and ended up with a soggy, unappetizing crust.
Why Your Nose Knows Best
When the sauce starts to bubble and emit a rich, buttery aroma, you’re in the sweet spot. Trust your nose; the scent signals that the cheese has melted and the mixture is thick enough to coat the noodles.
The 5‑Minute Rest That Changes Everything
Letting the dish rest after baking allows the flavors to meld and the sauce to set. Without this brief pause, the pasta can feel raw and the sauce might slide off, making each bite uneven.
Layering for Extra Crunch
Instead of crushing the tortilla chips outright, lightly toast them in a skillet first. This step deepens the flavor and locks in the crunch, preventing sogginess when the dish bakes.
A Splash of Lime for Zesty Finish
A quick squeeze of lime juice over the finished dish brightens the flavors and cuts through the richness. I added a few drops for a subtle citrus lift that everyone loved.
Using a Baking Sheet for Even Heat
Place the baking dish on a preheated sheet pan; the residual heat helps the top brown evenly and prevents hot spots that could burn the chips.
Creative Twists and Variations
This recipe is a playground. Here are some of my favorite ways to switch things up:
Mexican Street Corn Mac
Swap the tortilla chips for grilled corn kernels and sprinkle with cotija cheese. Add a dash of smoked paprika for a smoky flavor. This version tastes like a bowl of street corn on a hot day.
Buffalo Chicken Mac
Replace the ground beef with shredded buffalo chicken, and drizzle a bit of hot sauce over the top before baking. Finish with a blue cheese crumble for a tangy twist.
Vegan Fiesta Mac
Use plant‑based cheddar, vegan butter, and a tofu crumble seasoned with taco spices. Add black beans and corn for extra protein. It’s a hearty, cruelty‑free crowd‑pleaser.
Pineapple Teriyaki Mac
Replace the salsa with a pineapple teriyaki glaze and top with toasted sesame seeds. The sweet, umami notes give the dish an Asian‑fusion flair.
Breakfast Taco Mac
Add scrambled eggs to the mix and sprinkle with chorizo. Serve with a side of avocado slices for a breakfast‑style twist that’s both filling and flavorful.
Cheesy Cauliflower Mac
Swap the pasta for cauliflower florets and reduce the liquid slightly. The cauliflower adds a subtle nuttiness and makes the dish lower in carbs.
Storing and Bringing It Back to Life
Fridge Storage
Cool the dish to room temperature, then cover tightly and refrigerate for up to 3 days. The flavors deepen overnight, making it even more delicious.
Freezer Friendly
Pack the dish in a freezer‑safe container and freeze for up to 2 months. When ready to eat, thaw overnight in the fridge, then bake at 350°F for 25 minutes.
Best Reheating Method
Reheat in the oven at 350°F for 15 minutes, adding a splash of milk or water before covering to keep the sauce from drying out. A quick microwave reheat works too, but it may result in uneven heating.
Final Thoughts
I’ve spent countless evenings experimenting with this dish, and each time I tweak a single element, it feels like a new culinary revelation. The balance of creamy, spicy, and crunchy is so satisfying that it turns any simple dinner into a fiesta. I’ve even found that this recipe works wonders as a make‑ahead for busy weekends; just reheat, and it tastes as fresh as the first day.
The best part? You can personalize it to suit your taste buds. Swap proteins, adjust the heat, or add a splash of citrus, and you’ll have a unique version that’s still unmistakably yours. Remember to keep the tortilla chips separate until the last minute, or they’ll lose their crunch and become soggy. A quick toast in a dry skillet before baking can make all the difference.
If you’ve ever struggled with a bland mac & cheese, this is your new go‑to recipe. The flavors are bold, the textures are layered, and the preparation is straightforward. I promise you, once you try this, you’ll wonder how you ever lived without it. The next time you’re craving comfort food with a twist, give this a try and let the fiesta begin.
And remember, cooking is about experimentation and joy. Don’t be afraid to add your own flair, whether it’s a pinch of cinnamon or a handful of chopped nuts. The kitchen is your playground, and this dish is the perfect canvas. Happy cooking!