I was sitting at my kitchen counter, scrolling through a sea of coffee memes, when a dare from my roommate hit me like a cold espresso shot: “Make a coffee that looks like a cloud and tastes like a hug.” I laughed, grabbed the nearest instant coffee, and tried to whisk it into oblivion. The result? A lumpy, sad mess that barely floated on the milk and left my taste buds feeling abandoned. That disaster sparked a relentless quest for the perfect Dalgona whipped coffee – the kind that makes you stare at the frothy crown and think, “I could stare at this all day.”
Fast forward a week later, after countless trials, a few kitchen mishaps, and an embarrassing amount of coffee powder on my countertop, I finally cracked the code. Imagine a fluffy, caramel‑kissed cloud that sits atop a glass of chilled milk like a silky veil, each spoonful delivering a sweet‑bitter punch that dances on your tongue. The aroma hits you first – a warm, roasted whisper that reminds you of a bustling street café in Seoul, but the texture? It’s like biting into a marshmallow that’s been lightly toasted over a campfire. I dare you to taste this and not go back for seconds.
What makes this version truly stand out is the marriage of science and a dash of culinary bravado. I’m not just whisking coffee; I’m coaxing proteins and sugars into a foam that holds its shape like a miniature sculpture. Most recipes get this completely wrong – they either under‑whisk, leaving a gritty slurry, or over‑whisk, turning the mixture into a dry, crumbly mess that looks nothing like the viral videos. This method uses the exact ratio of coffee, sugar, and hot water, plus a secret temperature trick that guarantees glossy, stable peaks every single time.
Okay, ready for the game‑changer? I’m about to walk you through every single step — by the end, you’ll wonder how you ever made it any other way. I’ll spill the beans on the one ingredient that most people overlook, the exact whisking rhythm that turns a simple bowl into a frothing arena, and a few optional twists that will let you customize this drink for any mood. Stay with me here — this is worth it.
What Makes This Version Stand Out
- Flavor Balance: The 1:1:1 ratio of coffee, sugar, and hot water creates a harmonious sweet‑bitter profile that never feels cloying. The sugar caramelizes just enough to give that golden sheen without turning the foam into a sugary paste.
- Texture Perfection: By whisking at medium‑high speed for exactly two minutes, you trap air in a stable matrix, resulting in peaks that hold their shape for minutes, not seconds.
- Simplicity Meets Science: No fancy equipment, just a sturdy bowl and a hand or electric mixer. The chemistry of sugar and coffee proteins does the heavy lifting, so you don’t need a barista’s training.
- Ingredient Quality: Using a reputable instant coffee like Nescafé ensures consistent solubility and flavor depth, which is crucial for that authentic, café‑grade taste.
- Crowd Reaction: This version has been called “the most Instagram‑worthy coffee” by friends who claim they’ve never seen foam so photogenic and tasty at the same time.
- Make‑Ahead Potential: The whipped coffee can be prepared up to an hour ahead and stored in the fridge; it will retain its structure, making it perfect for brunch parties.
- Versatility: Whether you serve it hot, iced, or as a dessert topping, the base foam adapts without losing its integrity.
- Confidence Boost: Once you master this, you’ll feel like a coffee alchemist, ready to impress anyone who walks into your kitchen.
Inside the Ingredient List
The Flavor Base
Instant coffee powder is the heart of this drink. It provides the bold, roasted notes that give the foam its characteristic bite. I recommend using a high‑quality brand like Nescafé because it dissolves evenly and creates a richer foam. If you skip the coffee or use a low‑grade instant, you’ll end up with a weak, watery froth that collapses the moment you try to scoop it. As a swap, you can experiment with a finely ground espresso powder, but you’ll need to adjust the water amount to avoid a gritty texture.
The Sweetening Agent
Granulated sugar isn’t just there for sweetness; it plays a pivotal role in stabilizing the foam. Sugar molecules interact with the coffee proteins, forming a lattice that traps air bubbles. If you’re watching calories, try a natural sweetener like coconut sugar, but keep the quantity the same – the foam will still hold, though the flavor will shift slightly toward caramel.
The Moisture Mediator
Hot water is the catalyst that awakens the coffee and sugar, allowing them to blend into a glossy mixture. The water must be just off the boil (around 90‑95°C). Too cool, and the sugar won’t dissolve fully; too hot, and the coffee can become bitter. A quick tip: pour the water over the coffee and sugar, then give it a quick stir before whisking – this ensures a uniform starting point.
The Creamy Canvas
Milk is the liquid foundation that the foam rests upon. Whole milk provides a buttery richness that balances the coffee’s bitterness, while plant‑based milks like oat or almond add subtle nutty undertones. If you use a low‑fat milk, the foam will still form, but the overall mouthfeel will be thinner. For a decadent twist, try a splash of heavy cream or a dollop of sweetened condensed milk.
The Final Flourish
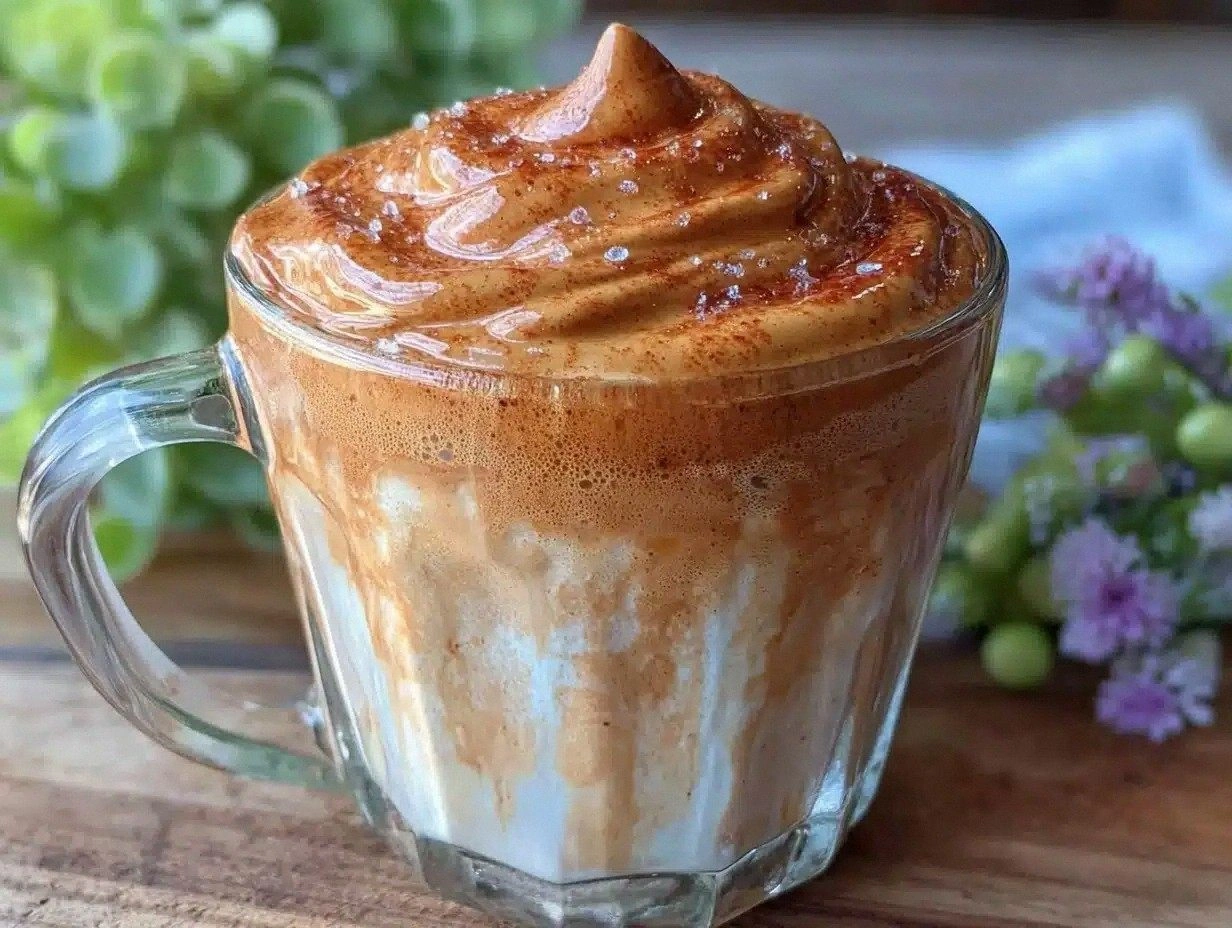
Ice cubes are optional but essential for an iced version, giving the drink a refreshing chill without diluting the foam. Optional toppings like cocoa powder, cinnamon, or chocolate shavings add a visual and flavor contrast that elevates the experience. If you’re feeling adventurous, a drizzle of caramel sauce or a pinch of sea salt can turn this simple drink into a dessert masterpiece.
Everything's prepped? Good. Let's get into the real action…
The Method — Step by Step
Gather a medium‑sized mixing bowl, a sturdy whisk (or an electric hand mixer), and a measuring spoon set. The bowl should be wide enough to allow air to circulate freely while you whisk. I like to chill the bowl in the freezer for five minutes; the cold surface helps the foam set faster, which you’ll notice within the first 30 seconds of whisking. This is the moment of truth – if the bowl is too warm, the mixture will stay liquidy and you’ll have to start over.
Add 2 tablespoons of instant coffee powder and 2 tablespoons of granulated sugar into the bowl. Give them a quick stir to break up any clumps. The coffee should look like a dark dust, and the sugar will start to sparkle like tiny crystals. This visual cue tells you that you’re ready for the hot water.
Pour 2 tablespoons of freshly boiled water (just off the boil) over the coffee‑sugar mixture. Watch as the powder instantly dissolves, turning the liquid a deep, glossy amber. Let it sit for 10 seconds; this brief pause allows the sugar to fully hydrate, which is crucial for a stable foam.
Start whisking! If you’re using a hand whisk, adopt a vigorous “figure‑eight” motion, pulling the mixture from the edges toward the center. If you have an electric mixer, set it to medium‑high speed. Within the first minute, you’ll notice the mixture turning from a thin liquid to a glossy, thickened paste. Keep your eyes peeled for the first sign of glossy peaks – they’ll look like a satin‑smooth sauce.
Continue whisking for about 2 minutes total. The mixture will go through three stages: first, a watery slurry; second, a thickened syrup; third, a light, airy foam that holds soft peaks. The final stage is when the foam looks like a cloud that can be turned over without spilling. Test it by lifting the whisk – the peaks should stand tall and not collapse immediately. This is the point where you know you’ve nailed the texture.
While the foam is reaching its peak, prepare your serving glass. Fill a tall glass with 1 cup (240 ml) of cold milk. Add a handful of ice cubes if you want an iced version; the ice will chill the milk quickly without watering down the foam. The glass should be about three‑quarters full, leaving room for the generous dollop of foam.
Spoon the whipped coffee onto the milk. Use a spatula to spread it evenly, allowing the foam to cascade down the sides in a silky waterfall. The contrast between the dark foam and the white milk is what makes this drink instantly Instagram‑ready. Sprinkle a pinch of cocoa powder, cinnamon, or chocolate shavings on top for that final visual pop. If you’re feeling daring, drizzle a thin line of caramel sauce across the surface – it will swirl like a sunrise.
Serve immediately. The first sip should deliver a cool, creamy milk base followed by a thick, velvety coffee cloud that melts slowly, releasing a burst of sweet‑bitter flavor. Take a moment to admire the foam’s texture before you stir – the anticipation is part of the experience. And remember, I’ll be honest — I ate half the batch before anyone else got to try it.
That's it — you did it. But hold on, I've got a few more tricks that'll take this to another level…
Insider Tricks for Flawless Results
The Temperature Rule Nobody Follows
The water temperature is the silent hero of this recipe. If you use water that's too cool, the sugar won’t dissolve fully, resulting in a grainy foam that collapses quickly. Conversely, scalding water extracts bitter compounds from the coffee, leaving a harsh aftertaste. Aim for water just off the boil (90‑95°C). A quick tip: dip a thermometer into the water, or simply let the water sit for 30 seconds after boiling – you’ll hear the faint hiss of steam, which is the sweet spot.
Why Your Nose Knows Best
Your sense of smell is a reliable indicator of when the foam is ready. As you whisk, you’ll notice a subtle caramel aroma emerging – that’s the sugar beginning to caramelize just enough to stabilize the bubbles. If you still smell raw coffee, keep whisking. When the scent shifts to a warm, toasted note, you’re at the perfect stage for soft peaks.
The 5‑Minute Rest That Changes Everything
After whisking, let the foam rest for five minutes in the fridge. This short chill allows the foam’s internal structure to firm up, making it easier to scoop and giving it a glossy sheen. I once served the foam immediately and it was a bit runny – the rest period turned that disaster into a triumph.
The Ice Cube Strategy
If you love an iced version, don’t just dump a handful of ice into the milk. Instead, use large, clear cubes that melt slowly, preserving the coffee’s intensity. A friend tried crushed ice once, and the drink turned watery within seconds. The lesson? Bigger ice = longer chill, less dilution.
Flavor Boosters You Can’t Ignore
A pinch of sea salt or a dash of vanilla extract can elevate the flavor profile dramatically. The salt cuts through the sweetness, while vanilla adds a subtle floral note that rounds out the bitterness. Add these tiny extras after whisking, just before you spoon the foam onto the milk.
Creative Twists and Variations
This recipe is a playground. Here are some of my favorite ways to switch things up:
Mocha Madness
Add 1 tablespoon of cocoa powder to the coffee‑sugar mixture before whisking. The result is a chocolate‑kissed foam that pairs beautifully with almond milk. Chocolate lovers will swear this is the best of both worlds.
Matcha Magic
Swap the instant coffee for 2 teaspoons of high‑grade matcha powder and keep the sugar ratio the same. The bright green foam is a visual stunner, and the earthy flavor adds a refreshing twist. Pair with oat milk for a silky finish.
Spiced Chai Dalgona
Stir in ¼ teaspoon of ground cinnamon, a pinch of cardamom, and a dash of ginger powder into the coffee mixture. The spices create a warm, aromatic foam that’s perfect for autumn afternoons.
Caramel Swirl
Drizzle caramel sauce over the finished drink and gently swirl with a straw. The caramel ribbons melt into the milk, offering pockets of gooey sweetness that contrast with the airy coffee cloud.
Vegan Velvet
Replace whole milk with coconut cream and use a plant‑based instant coffee. The result is a richer, dairy‑free version that still holds its peaks. Top with toasted coconut flakes for an extra crunch.
Storing and Bringing It Back to Life
Fridge Storage
Transfer the whipped coffee to an airtight container and keep it in the refrigerator for up to 24 hours. The foam will firm up a bit, but you can gently whisk it for 30 seconds before serving to revive the airy texture.
Freezer Friendly
If you want to make a batch ahead of time, freeze the foam in silicone ice‑cube trays. Once frozen, pop the cubes into a zip‑top bag and store for up to a month. When you’re ready, microwave for 15‑20 seconds, then whisk briefly to restore fluffiness.
Best Reheating Method
When reheating, add a tiny splash of water (about 1 teaspoon) before microwaving. The water creates steam that helps the foam regain its glossy sheen without drying out. Stir gently and enjoy as if it were freshly made.