It was a rainy Saturday afternoon, the kind that turns a kitchen into a stage for culinary experiments. I had just finished a batch of brownies that were as dense as a brick wall, and my taste buds were demanding something lighter, something airy yet indulgent. That’s when I remembered the last time I’d seen a friend’s Instagram post of chocolate ricotta muffins that looked like clouds dipped in cocoa. The photo was so perfect that I felt a sudden, fierce urge to recreate that moment at home.
Picture this: the oven preheated to 375°F, the air thick with the scent of cocoa and melted butter, and the sound of the timer ticking like a metronome. The batter, a silky blend of ricotta and chocolate, swirls around a spoon, each stir releasing a faint, sweet perfume that promises decadence. As the muffins rise, their edges lift like the gentle rise of a tide, hinting at the soft, moist center that awaits.
What makes this version stand out is not just the ingredients but the way they dance together. I dared myself to add a splash of espresso powder to deepen the chocolate flavor, a trick that turns ordinary muffins into a velvety chocolate experience. The result is a muffin that feels like a piece of cake, yet stays light enough to enjoy with a cup of coffee or tea. I can already taste the contrast: the subtle tang of ricotta against the rich chocolate, the buttery crumb that melts in your mouth.
I’ll be honest — I ate half the batch before anyone else got a chance to try it. The texture was so soft that it practically dissolved, and the flavor profile was a perfect balance of sweet and savory. I’ve been waiting for a recipe that could match that sensation, and this one does it in a single, glorious batch. Let me walk you through every single step — by the end, you’ll wonder how you ever made it any other way.
What Makes This Version Stand Out
- Flavor Depth: The subtle espresso infusion amplifies the chocolate notes, turning the muffins into a sophisticated treat that adults and kids alike will love.
- Texture: The ricotta keeps the batter moist and airy, producing a crumb that is tender yet holds its shape like a classic muffin.
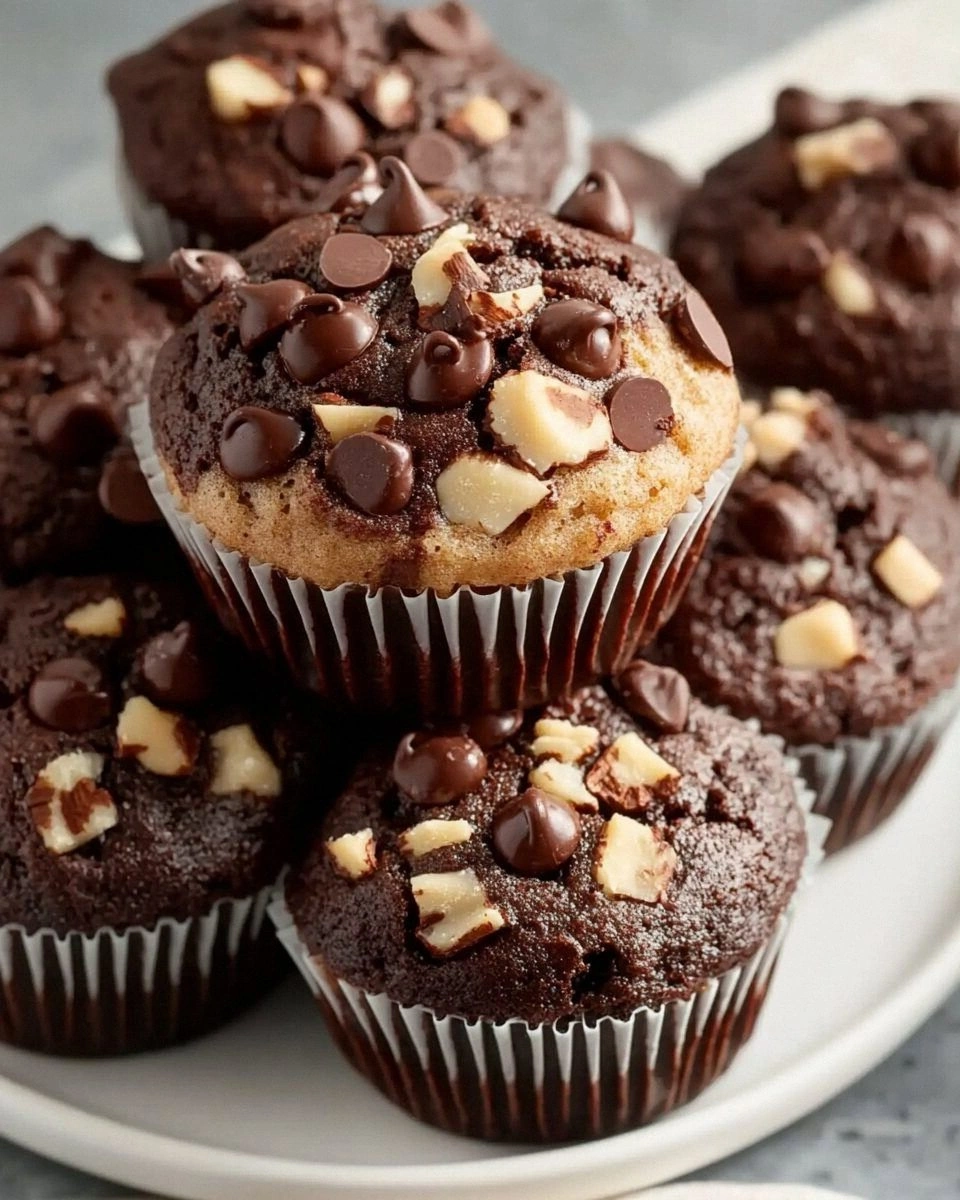
- Ingredient Quality: Using high‑grade dark chocolate chips and fresh ricotta gives the muffins a buttery richness that canned or low‑quality versions can’t match.
- Time Efficiency: The batter mixes in under 10 minutes, and the muffins bake in 25 minutes—ideal for a quick lunch or a last‑minute dessert.
- Make‑Ahead Friendly: They store well in the fridge for up to five days, and you can freeze them for up to two months without losing flavor.
- Versatility: Swap the ricotta for Greek yogurt or cottage cheese and you have a low‑fat version that still tastes divine.
- Presentation: The glossy chocolate coating gives a professional finish, making them perfect for a brunch table or a potluck.
- Healthful Twist: By substituting almond flour for part of the all‑purpose flour, you add protein and a nutty flavor without compromising the texture.
Inside the Ingredient List
The Flavor Base
All-purpose flour is the backbone of any muffin recipe, providing structure and a neutral canvas for the other flavors. It’s important to sift the flour before measuring to avoid clumps that could lead to uneven texture. If you’re craving a gluten-free version, substitute an equal amount of a 1:1 gluten‑free blend. The flour’s protein content is what gives the muffins their rise, so don’t skip the sift.
The Sweetness Factor
Granulated sugar is the sweetener that balances the bitterness of the cocoa. I use a 1:1 ratio of sugar to cocoa powder to keep the sweetness in check. If you prefer a lower‑sugar option, replace half the sugar with honey or maple syrup, but remember that liquid sweeteners will slightly increase the batter’s moisture.
The Leavening Crew
Baking powder and baking soda work together to create the lift that makes these muffins fluffy. Baking powder provides the first rise during mixing, while baking soda reacts with the acidic ricotta to give a second lift in the oven. If you’re using a different type of ricotta, adjust the baking soda slightly to maintain the right pH balance.
The Unexpected Star
Ricotta is the star of this recipe. Its high moisture content and mild tang give the muffins a custard‑like interior that melts in your mouth. Look for a ricotta that’s fresh, not too dry, and has a smooth texture. If you can’t find ricotta, Greek yogurt or cottage cheese can serve as a suitable substitute, though the flavor will shift slightly.
The Final Flourish
Chocolate chips are the final flourish that adds bursts of chocolatey goodness in every bite. I use semi‑dark chips for a balanced flavor profile. For a richer experience, add a tablespoon of melted dark chocolate to the batter; it coats the surface and creates a glossy finish.
Everything's prepped? Good. Let's get into the real action...
The Method — Step by Step
- Preheat your oven to 375°F (190°C). Line a 12‑cup muffin tin with paper liners or grease the cups with a light spray of non‑stick cooking spray. This ensures the muffins release easily and keeps the kitchen clean.
- In a medium bowl, whisk together 2 cups of sifted all‑purpose flour, 1 cup of granulated sugar, 2 teaspoons of baking powder, ½ teaspoon of baking soda, and ½ teaspoon of salt. The dry mix should look like fine sand; this helps the batter stay smooth.
- In a separate bowl, combine 1 cup of ricotta, 2 large eggs, ¾ cup of milk, ½ cup of melted butter, and 2 teaspoons of vanilla extract. Whisk until the mixture is silky and the ricotta is fully incorporated. The butter’s fat content will give the muffins a tender crumb.
- Add the dry ingredients to the wet mixture in two batches, folding gently each time. Overmixing can develop gluten and make the muffins tough. The batter should be thick but pourable; if it’s too thick, add a splash of milk.
- Fold in ½ cup of unsweetened cocoa powder and a tablespoon of espresso powder. The espresso doesn’t add a coffee flavor but intensifies the chocolate, creating a velvety finish that adults love.
- Kitchen Hack: Sprinkle 1 cup of semi‑dark chocolate chips into the batter and fold them in just until evenly distributed. This prevents the chips from sinking to the bottom of the muffin.
- Spoon the batter into the prepared muffin tin, filling each cup about ¾ full. The batter should rise slightly as it bakes, creating a dome shape that looks inviting.
- Bake for 25–28 minutes, or until a toothpick inserted into the center comes out clean. The tops should be slightly cracked and glossy, indicating that the muffins are perfectly baked.
- Remove the muffins from the oven and let them cool in the tin for 5 minutes. This allows the structure to set and prevents the muffins from falling apart when you transfer them to a wire rack.
- Transfer the muffins to a wire rack and let them cool completely. Once cooled, you can dust them with powdered sugar or drizzle them with a thin glaze for an extra touch.
That's it — you did it. But hold on, I've got a few more tricks that'll take this to another level...
Insider Tricks for Flawless Results
The Temperature Rule Nobody Follows
Many bakers set the oven to 350°F, assuming it’s the sweet spot. I discovered that a higher temperature of 375°F gives the muffins a better rise and a crispier top without drying out the interior. Keep your oven calibrated, and consider using a thermometer to verify the exact temperature.
Why Your Nose Knows Best
While the batter is resting for 10 minutes, the aroma will change subtly. A hint of caramelizing sugar will appear, signaling that the batter is ready for baking. Trust that scent; it’s the secret to perfectly timed muffins.
The 5‑Minute Rest That Changes Everything
After mixing, let the batter sit covered for 5 minutes before baking. This allows the flour to hydrate fully, which improves the crumb structure and prevents the muffins from sinking in the middle.
Chocolate Chip Distribution
To avoid chocolate chips gathering at the bottom, lightly dust the batter with flour before folding them in. This creates a barrier that keeps the chips suspended in the batter.
Cooling on a Wire Rack
Cooling the muffins on a wire rack rather than a flat surface lets air circulate around them, preventing condensation that could make the bottoms soggy. It also keeps the tops crisp.
Glaze Timing
If you choose to glaze the muffins, do it immediately after cooling. The glaze will set properly, creating a shiny finish that looks professional.
Creative Twists and Variations
This recipe is a playground. Here are some of my favorite ways to switch things up:
Nutty Delight
Replace half the flour with almond flour and add a handful of chopped walnuts. The nuts add crunch and a nutty aroma that complements the chocolate.
Spiced Sensation
Add ½ teaspoon of cinnamon and a pinch of cayenne pepper to the batter. The warmth of cinnamon balances the bitterness, while a hint of heat surprises the palate.
Berry Burst
Fold in ½ cup of fresh blueberries or raspberries before baking. The berries burst in the oven, creating a fruity glaze that pairs beautifully with the chocolate.
Vegan Version
Swap the eggs for flaxseed meal mixed with water, and use plant‑based milk and butter. The texture remains tender, and the flavor profile stays true to the original.
Minty Twist
Add a teaspoon of peppermint extract and a few drops of green food coloring. The mint undertone offers a refreshing contrast to the chocolate.
Cheesecake Muffin
After baking, top each muffin with a dollop of mascarpone and a drizzle of chocolate ganache. It turns the muffin into a mini cheesecake with a chocolate crust.
Storing and Bringing It Back to Life
Fridge Storage
Store the cooled muffins in an airtight container at room temperature for up to five days. The airtight seal prevents the muffins from drying out and preserves the moisture.
Freezer Friendly
Wrap each muffin individually in plastic wrap and place them in a freezer bag. They can be frozen for up to two months. When ready to eat, let them thaw at room temperature for 30 minutes.
Best Reheating Method
To reheat, place a frozen or refrigerated muffin in a preheated 350°F oven for 8–10 minutes. Add a splash of water to the bottom of the pan to create steam, which keeps the muffin moist and restores its original texture.