I remember the night I stared at the empty fridge, feeling a sudden craving for something warm, comforting, and utterly simple. A disastrous attempt at a fancy sourdough had left my kitchen smelling like burnt yeast and my hands sticky with flour. That moment sparked a mission: to create an artisan bread that could be whipped up in minutes, with only four ingredients, yet deliver the depth of flavor and the crusty glory of a bakery loaf. I dared myself to design a recipe that would make every kitchen enthusiast feel like a master baker, without the intimidating steps or the endless waiting.
Picture this: you’re in a rush, the oven preheats, and you’re about to throw in a handful of flour, a splash of water, a pinch of salt, and a teaspoon of yeast. The kitchen fills with a golden aroma that rises like a promise, and the dough rises with the confidence of a well‑tuned engine. That scent is not just about bread; it’s a memory in the making, a scent that will echo through your home whenever you walk past the kitchen. The sound of the dough settling, the gentle hiss of steam, and the crackle of the crust forming are the soundtrack to a simple yet profound culinary triumph.
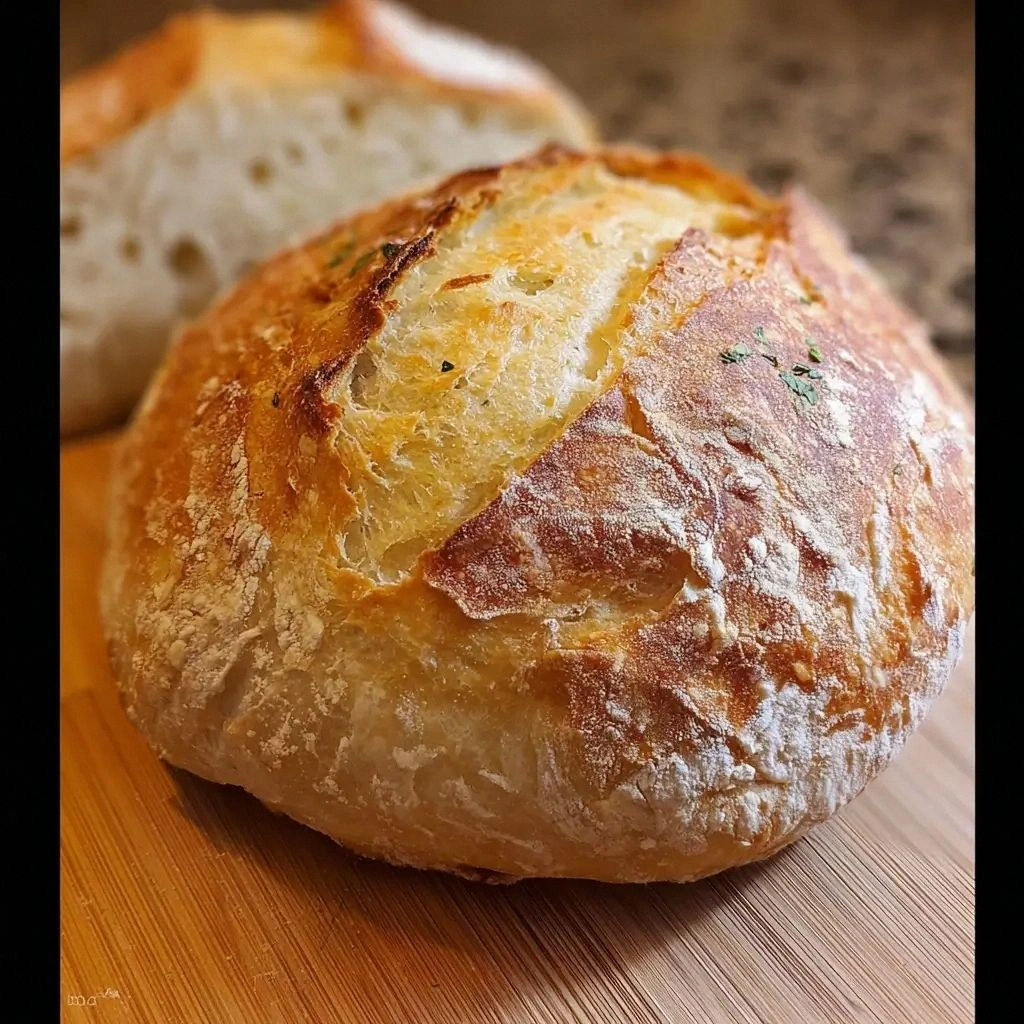
What sets this version apart is not just the minimalism but the intentional layering of texture and flavor. Each ingredient is chosen for its ability to perform multiple roles: the flour provides structure, the water hydrates the gluten, the salt controls fermentation, and the yeast propels the rise. The result is a loaf with a chewy interior, a crisp, caramelized crust, and a subtle tang that lingers on the tongue. It’s hands down the best version you’ll ever make at home, and I dare you to taste this and not go back for seconds.
I’ll be honest—when I first baked this, I ate half the batch before anyone else got a chance. Most recipes get this completely wrong by over‑mixing or under‑proofing, but this one works the way it should. Picture yourself pulling this out of the oven, the whole kitchen smelling incredible, and feeling that instant triumph that only a perfect loaf can bring. Let me walk you through every single step—by the end, you’ll wonder how you ever made it any other way.
What Makes This Version Stand Out
- Flavor: The simple ingredients combine to create a complex profile—sweetness from the flour, umami from the yeast, and a subtle saltiness that cuts through the richness. The bread’s flavor is deeper than a basic flatbread, with a subtle tang that’s almost invisible but unmistakably present.
- Texture: The crumb is airy yet dense enough to hold a slice of butter without collapsing. The crust is golden, slightly caramelized, and crackles when you bite, giving a satisfying crunch that’s the hallmark of artisanal bread.
- Time: From start to finish, you’re looking at less than an hour. No long fermentation or overnight proofing—just a quick mix, a short rise, and a single bake.
- Simplicity: Only four ingredients, no need for a stand mixer or a dough hook. The process is straightforward enough for a novice, yet refined enough for a seasoned baker to appreciate.
- Versatility: This loaf pairs beautifully with savory spreads, soups, or even a simple drizzle of olive oil. It’s a blank canvas that can be dressed up or left plain.
- Make‑ahead Potential: The dough can be refrigerated for up to 24 hours, allowing you to bake fresh bread on a busy day without starting from scratch.
Inside the Ingredient List
The Flour Factor
All‑purpose flour is the backbone of this loaf. It’s versatile, readily available, and offers a balanced protein content that creates a sturdy gluten network. If you’re craving a slightly richer flavor, you can swap half the all‑purpose flour for bread flour, which has a higher protein content and yields a chewier crumb.
When selecting flour, look for a brand with consistent texture; avoid pre‑bleached varieties that can affect the color of the crust. A good rule of thumb is to use a flour that has been stored in an airtight container to maintain its freshness. If you’re using whole wheat flour, the loaf will be denser and have a nuttier taste—great for a different texture profile.
If you’re a gluten‑sensitive baker, consider a low‑gluten flour blend, but be prepared for a softer loaf with a less pronounced rise. The key is to keep the flour’s moisture absorption in check; otherwise, the dough will be too sticky and difficult to shape.
The Hydration Hero
Water is the lifeblood of any dough. It hydrates the proteins in the flour, allowing gluten to develop, and it also dissolves the yeast and salt, facilitating fermentation. The amount of water you use determines the dough’s elasticity and the final crumb structure.
If you’re in a humid climate, you might need to reduce the water slightly to prevent an overly sticky dough. Conversely, in a dry environment, a splash more water can help the dough reach the right consistency. A good rule of thumb is to adjust the water by 10–15% based on the ambient humidity.
For a richer flavor, you can replace part of the water with milk or buttermilk, which adds a subtle tang and a softer crumb. However, this will increase the fat content slightly, so it’s a trade‑off if you’re aiming for a lean loaf.
The Salt Symmetry
Salt is more than a flavor enhancer; it strengthens the gluten network and moderates yeast activity. Too much salt can choke the dough, while too little can lead to an overly yeasty taste. The standard 1 teaspoon for 2 cups of flour strikes a balance that works well for most bakers.
If you prefer a saltier loaf, you can increase the amount to 1 ½ teaspoons, but be careful not to exceed 2 teaspoons, as the dough may become too tight. For a low‑sodium version, reduce the salt to ½ teaspoon, but expect a slightly flatter flavor profile.
Another tip: sprinkle the salt evenly over the flour before mixing to ensure an even distribution. This prevents pockets of high salt concentration that could cause uneven fermentation.
The Yeast Engine
Yeast is the invisible force that turns dough into bread. It ferments sugars, producing carbon dioxide and alcohol, which create the airy structure of the loaf. The teaspoon of active dry yeast is enough to leaven the dough without overpowering the other flavors.
If you’re using fresh yeast, replace the teaspoon of active dry yeast with 15 grams of fresh yeast, which is roughly equivalent. For instant yeast, you can use the same amount, but the rise will be faster, so keep an eye on the dough.
To activate the yeast, dissolve it in warm water (about 110°F) with a pinch of sugar. Let it sit for 5–10 minutes until it becomes frothy. This step ensures the yeast is alive and kicking, leading to a better rise.
Everything’s prepped? Good. Let’s get into the real action.
The Method — Step by Step
- In a large mixing bowl, combine 2 cups of all‑purpose flour and 1 teaspoon of salt. Stir them together until evenly distributed. This ensures that the salt doesn’t clump and create pockets of high concentration during fermentation.
- In a separate cup, dissolve 1 teaspoon of active dry yeast in 1 ½ cups of warm water (about 110°F). Add a pinch of sugar to feed the yeast. Let the mixture sit for 5–10 minutes until it becomes frothy, signaling that the yeast is active.
- Pour the frothy yeast mixture into the flour mixture. Use a wooden spoon or your hand to combine the ingredients until a shaggy dough forms. The dough should be slightly sticky but manageable.
- Transfer the dough onto a lightly floured surface and knead for 6–8 minutes. The goal is to develop gluten without overworking; the dough should feel elastic and smooth. If it’s too tacky, sprinkle a pinch of flour to help.
- Shape the dough into a round loaf and place it on a parchment‑lined baking sheet. Cover it with a clean kitchen towel and let it rest for 30 minutes. During this time, the dough will rise, creating air pockets that give the loaf its airy crumb.
- Preheat your oven to 425°F (220°C). While the oven heats, use a sharp knife to slash the top of the loaf. This allows the dough to expand evenly and prevents uneven cracking.
- Place the baking sheet in the preheated oven and bake for 25–30 minutes. The loaf should develop a deep golden crust and emit a toasty aroma. The internal temperature should reach 200°F (93°C) for optimal doneness.
- Remove the loaf from the oven and let it cool on a wire rack for at least 15 minutes before slicing. Cooling allows the crumb to set, preventing a gummy texture.
That's it — you did it. But hold on, I've got a few more tricks that'll take this to another level. Let’s dive into insider tips that will elevate your loaf from good to legendary.
Insider Tricks for Flawless Results
The Temperature Rule Nobody Follows
Many bakers assume room temperature is fine, but the dough’s temperature directly affects yeast activity. Aim for a dough temperature of 75–80°F (24–27°C). If the dough feels too cold, let it rest in a warm spot; if it’s too hot, chill it briefly to slow down fermentation.
A quick way to test is to touch the dough: it should feel pleasantly warm, not hot to the touch. If it’s too hot, the yeast may over‑ferment, leading to a sour taste and a dense crumb.
Temperature also affects the crust’s color; a cooler dough will produce a lighter crust, while a warmer dough yields a deeper, caramelized crust. Adjusting the dough temperature is a subtle but powerful way to control the final outcome.
Why Your Nose Knows Best
During proofing, pay attention to the aroma. A pleasant, yeasty scent indicates that fermentation is progressing properly. If you smell a sharp, sour odor, the dough may have gone too long, creating a sourdough-like tang.
The smell is a reliable indicator of the dough’s readiness. When the scent is sweet and slightly buttery, it’s time to bake. Trust your nose; it’s the best judge of dough quality.
If you’re unsure, lightly press the dough with your finger. A slight indentation that slowly springs back signals a good rise. If it doesn’t spring back, give it more time.
The 5‑Minute Rest That Changes Everything
After shaping the loaf, let it rest for exactly five minutes before covering it. This brief pause allows the gluten to relax, making the dough easier to shape and preventing it from shrinking during the final rise.
Many bakers skip this step, leading to a loaf that tightens and loses volume. The five‑minute rest is a small investment that pays off in a better crumb.
During this time, you can also prepare your baking sheet and preheat the oven to ensure everything is ready when the dough is ready to go.
Use a Dutch Oven for Ultimate Crust
If you have a Dutch oven, bake the loaf inside it. The enclosed environment traps steam, giving the loaf a crisp, golden crust and a soft interior. Preheat the Dutch oven in the oven for at least 20 minutes before adding the loaf.
When you remove the Dutch oven, carefully place the loaf inside and close the lid. Bake for 20 minutes, then remove the lid for the last 5 minutes to let the crust develop.
The result is a professional‑grade crust that’s hard to achieve on a regular baking sheet. This trick is a favorite among serious bakers who want to elevate their loaf.
Add a Splash of Milk for a Softer Crumb
If you prefer a softer crumb, replace a portion of the water with milk. The fat in the milk tenderizes the gluten, creating a lighter texture. Use the same hydration level to keep the dough consistent.
The milk also adds a subtle richness that pairs well with savory spreads. However, be cautious: too much milk can slow down yeast activity, so keep the substitution moderate.
This variation is especially appealing for breakfast breads or sandwich loaves that benefit from a tender crumb.
Use a Baking Stone for Even Heat
If you have a baking stone, place it in the oven before preheating. The stone distributes heat evenly, preventing hot spots that could cause uneven baking.
Place the loaf on the stone, and the bottom will get a crisp, caramelized finish. This technique is especially useful when baking multiple loaves at once.
If you don’t have a stone, a pizza stone works just as well, giving a similar even heat distribution.
Creative Twists and Variations
This recipe is a playground. Here are some of my favorite ways to switch things up:
Herb‑Infused Bread
Add a tablespoon of chopped fresh rosemary or thyme to the dough. The herbs infuse the bread with aromatic flavors that pair beautifully with roasted meats or cheeses. This variation is perfect for a rustic dinner party.
Cheese‑Rich Loaf
Fold in ½ cup of shredded mozzarella or cheddar before baking. The cheese melts into the crumb, creating pockets of gooey, savory delight. This loaf is ideal for a quick cheese toast or a comforting snack.
Sun‑Dried Tomato Bread
Stir in ¼ cup of finely chopped sun‑dried tomatoes. The tomatoes add a burst of umami and a pop of color that brightens the loaf. This variation works well with Mediterranean dips.
Spiced Cinnamon Sweet Bread
Mix in 1 teaspoon of ground cinnamon and 2 tablespoons of brown sugar. The result is a sweet, spiced loaf that’s great for breakfast or afternoon tea. The cinnamon adds warmth, while the sugar sweetens the dough.
Gluten‑Free Version
Swap the all‑purpose flour for a gluten‑free blend that contains xanthan gum. The dough will be slightly denser but still rise well. This version allows gluten‑sensitive bakers to enjoy a fresh loaf.
Chocolate Chip Bread
Fold in ½ cup of chocolate chips before baking. The chips melt into the crumb, creating pockets of chocolatey goodness. This variation is a hit with kids and chocolate lovers alike.
Storing and Bringing It Back to Life
Fridge Storage
Store the cooled loaf in a paper bag at room temperature for up to 3 days. The paper bag keeps the crust crisp while allowing the crumb to breathe. Avoid plastic bags, as they trap moisture and cause the crust to become soggy.
Freezer Friendly
Wrap the loaf tightly in aluminum foil and place it in a freezer bag. It can be stored for up to 3 months. When ready to eat, thaw at room temperature for 2 hours before reheating.
Best Reheating Method
To revive the loaf, preheat your oven to 350°F (175°C). Place the loaf on a baking sheet and warm for 10 minutes. If the crust feels dry, add a splash of water to the bottom of the pan to create steam, ensuring a fresh, crisp exterior.