Picture this: I’m in the middle of a Sunday brunch, the kitchen is a whirlwind of flour, sugar, and the scent of butter, when my phone buzzes with a frantic text from a friend. “I need a snack that’s both indulgent and easy—can you help?” I laughed, but the craving was real. That moment sparked a midnight culinary experiment that ended with a batch of peanut butter cookie bars so buttery, so decadently chewy, that I almost didn’t want to share them. I’ve tried dozens of cookie bars over the years, but this one—this version—has a depth of flavor that feels like a secret handshake with your taste buds.
The first bite is a symphony: a crisp, caramelized edge gives way to a gooey, peanut‑laden center that practically melts in your mouth. The aroma of toasted flour and butter fills the air, while the faint scent of vanilla lingers like a comforting hug. The texture is a perfect balance—crunchy on the outside, silky on the inside—making each bar feel like a mini‑dessert that’s still a snack. I swear the sound of the first crack when you bite into it is like a tiny celebration, a tiny explosion of joy that makes you want to taste it again and again.
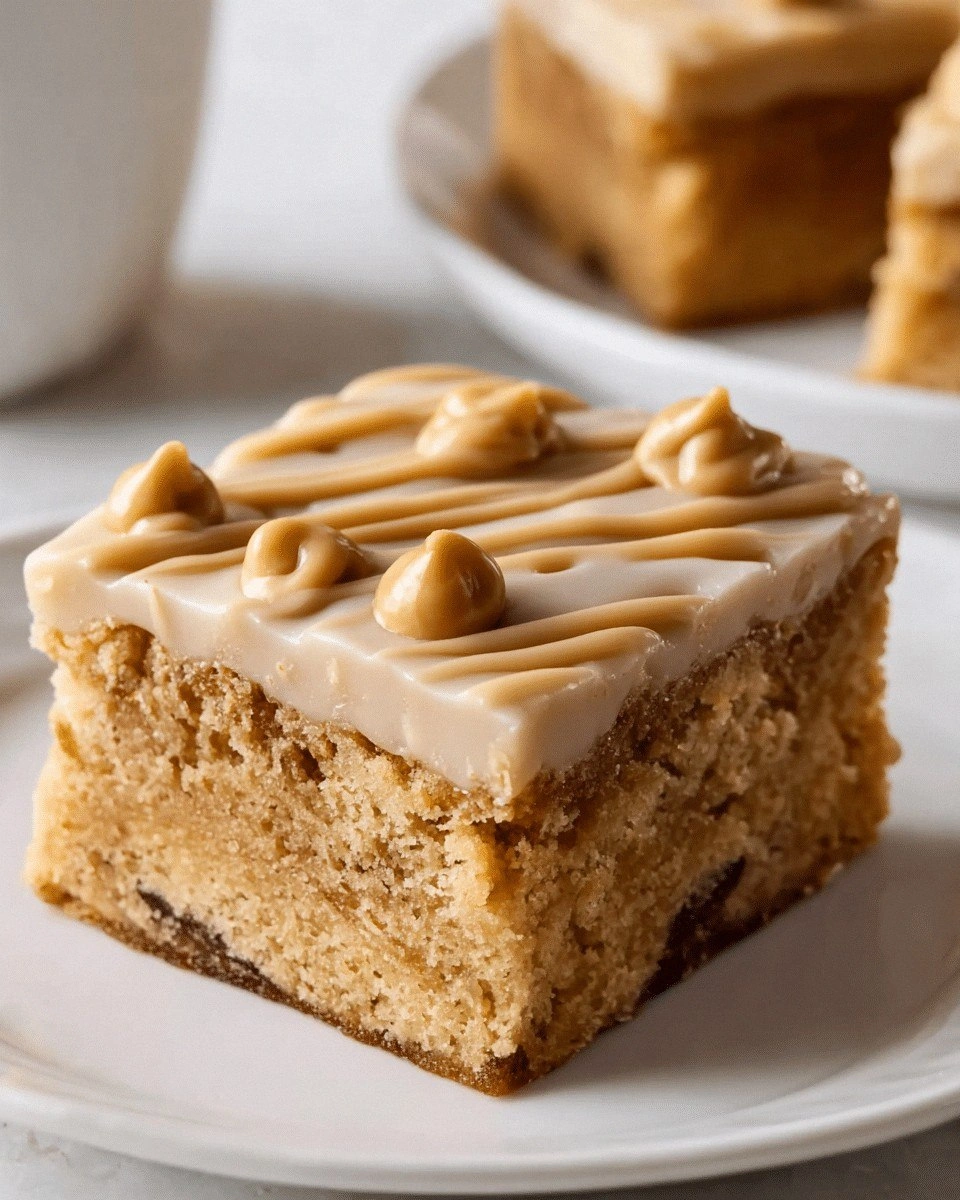
What sets this recipe apart isn’t just the ingredients, but the way they’re layered. The batter is intentionally thick, allowing the peanut butter to sit on top for a dramatic, glossy finish that invites you to scoop it up with a fork. The addition of sea salt flakes on top after baking gives a subtle briny contrast that elevates the sweetness without overpowering the nutty undertones. Even the chocolate chips are a deliberate choice—dark, slightly bitter, they cut through the richness and add a splash of color.
I’ll be honest—when I first baked these, I almost ate half the batch before anyone else got a chance. The temptation was real, and the bars were so good that I couldn’t help myself. But that’s the beauty of this recipe: it’s so irresistible that you’ll want to share it, and when you do, the reaction will be priceless. If you’ve ever struggled with cookie bars that are too dry or too sweet, you’re not alone—this version fixes both problems in one go.
Most recipes get this completely wrong, focusing on a single flavor profile or ignoring the importance of texture. Here, the recipe balances sweetness, saltiness, and the nutty richness of peanut butter, creating a harmonious bite that keeps you coming back for more. I dare you to taste this and not go back for seconds, because once you’ve tried it, you’ll wonder how you ever made it any other way. Picture yourself pulling this out of the oven, the whole kitchen smelling incredible, the timer ticking down, and the anticipation building.
Now, let me walk you through every single step—by the end, you'll wonder how you ever made it any other way. From the first whisk to the final sprinkle of sea salt, every detail is designed to bring out the best in peanut butter and chocolate. The result is a cookie bar that’s chewy, buttery, and packed with flavor—a true crowd‑pleaser for any occasion. Let’s dive into the magic.
What Makes This Version Stand Out
- Flavor Balance: The batter incorporates both granulated and brown sugars, creating a subtle caramel depth that complements the peanut butter’s natural sweetness. The sea salt flakes add a savory note that cuts through the richness. This combination turns an ordinary cookie bar into a gourmet treat.
- Texture Mastery: The thick batter and the gentle bake keep the bars chewy and moist, while the edges crisp up just enough to give a satisfying bite. The result is a bar that feels like a soft cookie on the inside and a crisp cookie on the outside.
- Ingredient Quality: Using creamy peanut butter with a hint of natural oil and high‑quality dark chocolate chips elevates the flavor profile. The butter is softened, not melted, ensuring a smooth, even spread.
- Ease of Prep: The recipe requires only a few basic pantry staples, making it quick to assemble and perfect for a last‑minute snack. The process is straightforward, yet the outcome feels like a professional dessert.
- Make‑Ahead Potential: These bars can be made ahead and stored for weeks. They maintain their texture and flavor, making them a reliable go‑to for parties or busy mornings.
- Customization: The recipe is highly adaptable. You can swap in crunchy peanut butter for an extra texture, add dried fruit for a sweet twist, or use coconut oil for a different flavor profile.
- Visual Appeal: The glossy peanut butter topping and the speckled chocolate chips create a look that’s both appetizing and Instagram‑ready.
- Healthier Options: By adjusting the sugar content or using a natural sweetener, you can tailor the bars to fit various dietary preferences without sacrificing taste.
Inside the Ingredient List
The Flavor Base
All-purpose flour provides the structure that holds the bars together, while baking soda ensures a gentle lift. Salt is crucial; it balances the sweetness and brings out the nutty flavor of the peanut butter. The vanilla extract adds a warm, aromatic undertone that ties everything together. Each component is essential; omitting any will alter the final taste.
The Sweet Symphony
Granulated sugar gives a crisp bite and quick caramelization, while packed brown sugar adds moisture and a deep molasses note. Together, they create a caramelized crust that’s both sweet and slightly savory. If you prefer a lighter sweetness, reduce the brown sugar by a quarter cup.
The Creamy Core
Unsalted butter, softened to room temperature, blends seamlessly with the sugars and flour, creating a tender crumb. Peanut butter is the star—its natural oils give the bars a silky mouthfeel and a rich, nutty aroma. Use a high‑quality creamy peanut butter for the best flavor; a crunchy version adds texture but changes the bite.
The Chocolate Accent
Dark chocolate chips provide bursts of bittersweet flavor that contrast the sweet dough. They also add a pleasant visual contrast with their glossy dark color. If you prefer milk chocolate, it will be sweeter and less intense.
The Finishing Touch
Sea salt flakes, applied after baking, create a subtle briny pop that elevates the overall flavor profile. They also add a textural contrast to the soft dough. If you’re avoiding salt, simply omit or replace with a pinch of smoked sea salt for a smoky twist.
Everything's prepped? Good. Let's get into the real action.
The Method — Step by Step
- Preheat your oven to 350°F (175°C) and line a 9x13-inch baking pan with parchment paper. The parchment ensures a clean release, and the even heat distribution helps the bars bake uniformly. Let the oven warm up while you prepare the dough.
- In a medium bowl, whisk together 2 cups of all-purpose flour, 1 tsp baking soda, and 1 tsp salt. The dry mix forms the backbone of the bars, giving them structure and a subtle lift. Keep this mixture aside while you work on the wet components.
- In a large mixing bowl, beat 1 cup of softened unsalted butter, 1 cup of granulated sugar, and 1 cup of packed brown sugar until the mixture is light and fluffy. The creaming process incorporates air, which helps the bars stay moist. Beat for about 3 minutes, watching the mixture lighten in color.
- Add 2 large eggs, one at a time, beating well after each addition. The eggs bind the batter and add richness. Once the eggs are fully incorporated, stir in 1 tsp vanilla extract and 1 cup of creamy peanut butter. The peanut butter should be smooth and easy to mix.
- Gradually fold in the dry flour mixture until just combined. Avoid overmixing; a few streaks of flour are fine. The batter should be thick but pourable. At this point, the dough is ready for chocolate.
- Fold in 1 cup of dark chocolate chips, ensuring they’re evenly distributed. The chocolate will melt slightly during baking, creating pockets of gooeyness. The aroma of chocolate will mingle with the butter, creating an irresistible scent.
- Press the batter firmly into the prepared pan using a spatula or the bottom of a glass. The even surface ensures uniform baking. Lightly tap the pan on the counter to release air bubbles.
- Bake for 25–28 minutes, or until the edges are golden and a toothpick inserted near the center comes out with a few moist crumbs. The bars should smell buttery and slightly toasted. Keep an eye on the top to avoid overbrowning.
- Remove the pan from the oven and immediately sprinkle 0.5 tsp of sea salt flakes over the hot surface. The salt melts slightly, creating a glossy finish. Let the bars cool in the pan for 10 minutes before transferring to a wire rack.
- Once the bars have cooled to room temperature, cut them into 4x4-inch squares. Use a sharp knife to ensure clean cuts, and wipe the blade between cuts to prevent sticking.
- Serve immediately or store in an airtight container at room temperature for up to 3 days. If you prefer them firmer, refrigerate for 1–2 hours before serving.
- For a dramatic presentation, drizzle a thin line of melted dark chocolate over the top and sprinkle a pinch of sea salt. This adds a glossy finish and an extra burst of flavor. Let the chocolate set before serving.
That's it — you did it. But hold on, I've got a few more tricks that'll take this to another level.
Insider Tricks for Flawless Results
The Temperature Rule Nobody Follows
Keep the oven at a steady 350°F. Many people set it too high, causing the edges to brown before the center sets. A stable temperature ensures even baking and a uniform texture.
Why Your Nose Knows Best
The first aroma that hits you as the bars bake is a sign of proper caramelization. If the smell is faint, increase the oven temperature by 25°F for a minute. Your nose is the best judge of doneness.
The 5-Minute Rest That Changes Everything
Letting the bars rest in the pan for 10 minutes after baking allows the steam to escape and the flavors to settle. Cutting them immediately can cause them to crumble.
The Butter Trick for a Golden Crust
Brush the top of the batter with melted butter before adding sea salt flakes. This creates a glossy, caramelized crust that enhances both flavor and appearance.
The Perfect Chocolate Distribution
When folding in chocolate chips, do it gently to avoid breaking them. This keeps the chocolate intact, providing pockets of gooeyness in each bite.
The Secret to Chewy Bars
Use a higher ratio of brown sugar to granulated sugar. The molasses in brown sugar retains moisture, resulting in chewier bars.
The No‑Bake Finish
If you’re short on time, bake the bars for only 20 minutes, then let them cool fully before cutting. The bars will still be chewy, but the edges will be slightly softer.
The Crunch Factor
Add 1/2 cup of chopped roasted peanuts to the batter for an extra crunch. The peanuts also add a nutty aroma that complements the peanut butter base.
The Lightening Up Option
Replace the butter with coconut oil for a tropical twist. Coconut oil gives a subtle coconut flavor and a slightly firmer texture.
The Classic Finish
After baking, drizzle melted dark chocolate over the top and sprinkle sea salt flakes. Let the chocolate set for a minute before serving to create a glossy, decadent finish.
Creative Twists and Variations
Nutty Crunch Bars
Add 1/2 cup of chopped roasted almonds or walnuts to the batter for an extra crunch. This variation adds a nutty aroma that pairs well with the peanut butter base. Ideal for those who love a textural contrast.
Chocolate‑Covered Delight
Dip the cut bars in melted dark chocolate and let them set. The chocolate coating adds a glossy finish and a richer flavor. Perfect for a dessert platter.
Spiced Variation
Stir in 1/2 tsp of cinnamon or 1/4 tsp of cayenne pepper for a warm, spicy kick. The spices add depth without overpowering the peanut butter. Great for autumn or winter snacking.
Coconut Twist
Replace the butter with coconut oil and add 1/2 cup of shredded coconut to the batter. The coconut flavor pairs beautifully with peanut butter, creating a tropical vibe. The bars will have a slightly firmer bite.
Fruit‑Infused Bars
Fold in 1/2 cup of dried cranberries or raisins before baking. The dried fruit adds a sweet burst and a chewy texture. It’s a great way to sneak in some fruit.
Salted Caramel Version
Drizzle a thin layer of salted caramel sauce over the top before baking. The caramel caramelizes and creates a sweet‑salty glaze. This variation is a crowd‑pleaser at parties.
Vegan Alternative
Swap the butter for 1 cup of vegan margarine and use flaxseed eggs (1 tbsp ground flaxseed + 3 tbsp water) instead of large eggs. The texture remains moist and chewy, and the flavor stays on point. Perfect for vegan guests.
Low‑Sugar Edition
Replace the brown sugar with 1/2 cup of coconut sugar and use a sugar substitute like Stevia for the granulated sugar portion. The bars will still be chewy and flavorful, but with fewer calories.
Storing and Bringing It Back to Life
Fridge Storage
Store the bars in an airtight container at room temperature for up to 3 days. The butter and peanut butter help preserve moisture. If you notice a slight dryening, cover the container with a damp paper towel.
Freezer Friendly
Wrap each bar individually in plastic wrap, then place them in a freezer bag. They can be stored for up to 2 months. Thaw at room temperature for 20 minutes before serving.
Best Reheating Method
To revive frozen bars, place them in a preheated oven at 300°F for 10 minutes. Add a tiny splash of water to the pan before reheating to create steam and restore moisture. The bars will feel freshly baked again.