When I first tried to rescue a batch of stale chocolate cake from the fridge, I was on the brink of culinary despair. I had tossed the batter into a pan, added a splash of water, and waited for the miracle that would transform it into a moist, luscious dessert. The result was a dry, crumbly slab that looked like a sad, over‑baked cookie. I stared at it, feeling the sting of disappointment. That moment sparked a bold idea: what if mayonnaise, the unsung hero of savory dishes, could rescue my cake?
I pulled the mayonnaise straight from the fridge, feeling its creamy texture against my fingers. The aroma that rose from the jar was oddly comforting, like a warm hug from a grandmother's kitchen. I imagined the mayo coating each ingredient like velvet, binding them together and infusing the batter with a silky moisture that no sugar or flour could provide. The thought of a cake that would stay fresh for days, yet taste like a fresh‑baked masterpiece, was intoxicating. I dared myself to taste this and not go back for seconds, and I knew this would change my dessert game forever.
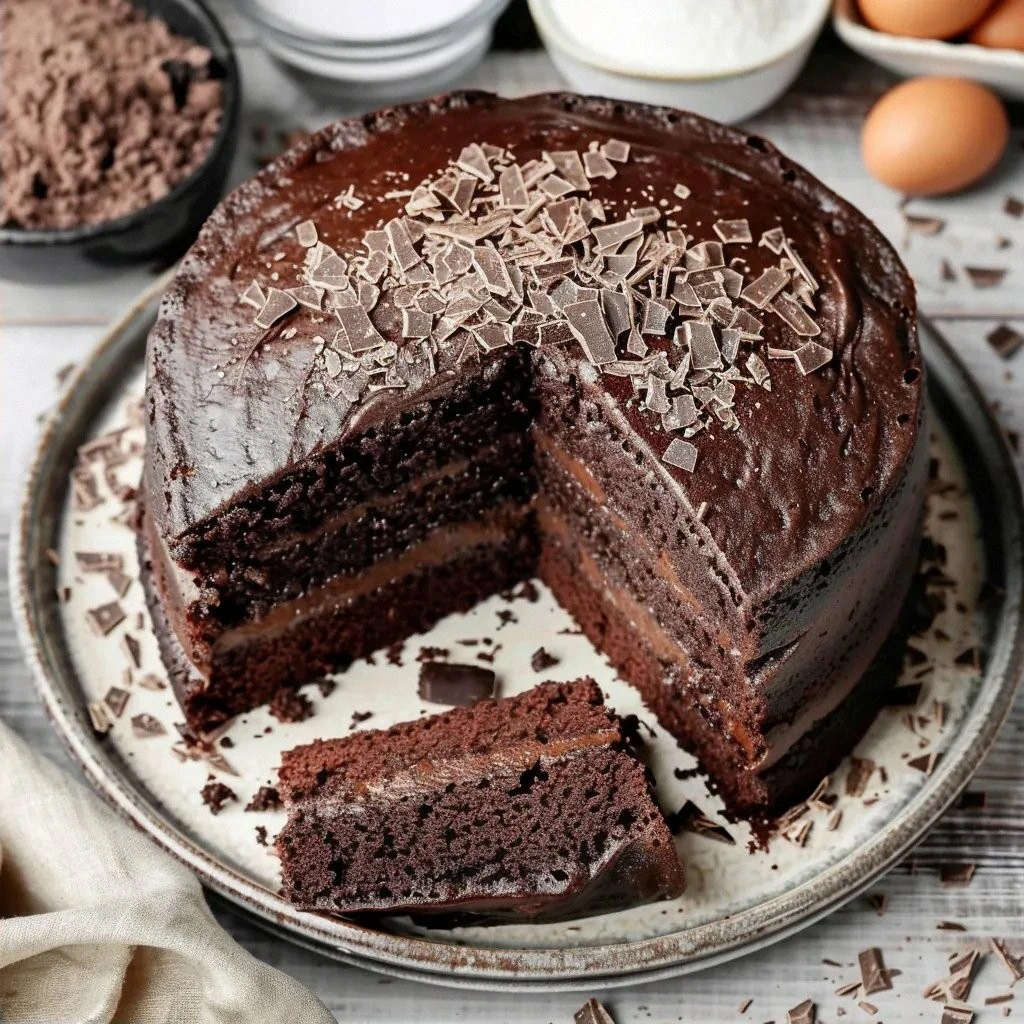
The first time I baked the mayonnaise cake, the oven filled the house with a rich, chocolatey perfume that made my eyes water in the best way possible. The batter, thick and glossy, seemed to hum with anticipation as it baked to a golden crust. When I lifted the pan, a steam cloud rose, carrying the scent of butter, cocoa, and a hint of vanilla. The cake's texture was a revelation—soft, airy, and incredibly moist, yet firm enough to hold a fork. It was hands down the best version you'll ever make at home.
What sets this recipe apart from the countless chocolate cakes out there is the unexpected use of mayonnaise, which acts as a natural emulsifier and moisture enhancer. The double dose of cocoa—half a cup of unsweetened cocoa and a full cup of cocoa powder—creates a depth of flavor that ordinary chocolate cake can't match. The result is a dessert that feels indulgent without being overly sweet, and the powdered‑sugar glaze adds a delicate crunch that contrasts beautifully with the cake's plush interior. Picture yourself pulling this out of the oven, the whole kitchen smelling incredible, and knowing that every bite will be a revelation. Let me walk you through every single step—by the end, you'll wonder how you ever made it any other way.
What Makes This Version Stand Out
- Moisture: Mayonnaise introduces healthy fats that lock in moisture, preventing the cake from drying out even after days of storage.
- Flavor: The combination of two cocoa varieties creates a layered chocolate profile, from subtle bitterness to sweet richness.
- Texture: The batter’s silky consistency turns the cake into a melt‑in‑your‑mouth experience, unlike the dense crumb of traditional cakes.
- Convenience: All ingredients are pantry staples; no need for exotic chocolate or specialty flours.
- Versatility: The cake can be served plain, glazed, or topped with fruit, making it suitable for any occasion.
- Make‑ahead: Bake once, store, and reheat; the cake remains fresh for a week when refrigerated.
- Visual Appeal: The glossy glaze gives the cake a professional finish that looks as good as it tastes.
- Health Angle: Mayonnaise’s healthy fats provide a better fat profile than butter alone, and the powdered sugar glaze can be reduced or swapped.
Alright, let's break down exactly what goes into this masterpiece...
Inside the Ingredient List
The Flavor Base
Flour is the structural backbone of the cake, giving it lift and stability. Choosing a high‑protein flour like bread flour can help create a denser crumb that holds the mayonnaise’s moisture without becoming gummy. If you’re experimenting, a blend of all‑purpose and cake flour will give you a balance of tenderness and resilience. Skipping flour entirely would result in a batter that collapses and loses its shape.
Unsweetened cocoa brings the first burst of chocolate flavor and deepens the color. Its bitterness counterbalances the sugar, allowing for a richer taste without an overwhelming sweetness. If you can’t find cocoa, you can use unsweetened chocolate, but you’ll need to adjust the sugar slightly to maintain balance.
The Texture Crew
Mayonnaise is the secret sauce—its oil and egg yolk create an emulsion that traps air and keeps the cake moist. It also adds a subtle tang that lifts the chocolate profile. If you’re wary of mayo, try a small amount of coconut oil; it’s a healthier option but will change the flavor profile slightly.
Butter, melted, brings richness and a buttery finish that complements the cocoa. It also helps the cake rise by creating steam pockets. Substituting butter with a plant‑based butter or margarine will change the texture, so keep that in mind if you’re vegan.
Powdered sugar, used both in the batter and in the glaze, provides a smooth sweetness and a glossy finish. It dissolves quickly, preventing gritty crystals in the glaze. If you want a less sweet cake, reduce the powdered sugar by a quarter.
The Unexpected Star
Water is the solvent that brings the dry ingredients together, creating a batter that’s neither too thick nor too runny. Adding too much water will dilute the flavor; too little will make the cake dense and dry.
Milk, a splash of ½ cup, adds a subtle tang and helps the cake rise. If you’re lactose intolerant, substitute with oat milk or almond milk for a lighter taste.
The Final Flourish
Vanilla extract and vanilla powder give the cake a fragrant warmth that balances the chocolate’s intensity. The two forms of vanilla—extract and powder—each bring unique nuances; the powder adds a subtle depth while the extract offers a bright, aromatic lift.
Baking soda is the leavening agent that reacts with the acidic mayo and cocoa to create airy bubbles. Skipping it will make the cake heavy and flat. A pinch of salt is also essential; it enhances the chocolate flavor and balances sweetness.
Everything's prepped? Good. Let's get into the real action...
The Method — Step by Step
- Preheat and Prep: Heat your oven to 350°F (175°C) and line a 9‑inch cake pan with parchment. Grease the sides lightly with butter or oil. This ensures a smooth release and a golden crust. I always double‑line the pan; it saves me from a frantic cleanup later.
- Dry Mix: In a large bowl, whisk together flour, unsweetened cocoa, cocoa powder, baking soda, and salt. This step is critical for even distribution of leavening agents. A fine sift will give you a silky batter. If you’re in a hurry, use a stand mixer with a whisk attachment.
- Wet Mix: In a separate bowl, combine mayonnaise, melted butter, vanilla extract, vanilla powder, water, and milk. Beat until the mixture is smooth and the fats are fully emulsified. The mayo will thicken the batter, so let it sit for a minute to settle before mixing.
- Combine: Pour the wet mixture into the dry ingredients gradually, stirring constantly. Mix until just combined; over‑mixing will develop gluten and produce a tough cake. The batter should be thick but pourable, like a thick pancake batter. Watch for the batter’s color shift to a deep chocolate hue.
- Fold in Sugar: Fold in the powdered sugar until fully incorporated. The sugar will not only sweeten but also help create a glossy finish. I always fold gently to preserve the batter’s airy texture. If the batter looks too thick, add a tablespoon of water.
- Bake: Pour the batter into the prepared pan, smoothing the top with a spatula. Place in the oven and bake for 35–40 minutes. The cake should rise and develop a slight crackling on the surface. To test, insert a toothpick; it should come out clean or with a few moist crumbs.
- Cool: Remove the cake from the oven and let it cool in the pan for 10 minutes. Then transfer to a wire rack to cool completely. Cooling is essential; it allows the cake to set and prevents it from becoming soggy. I always let it cool for at least 30 minutes before glazing.
- Glaze: While the cake cools, whisk powdered sugar, a splash of milk, and a pinch of vanilla extract until smooth. Drizzle over the cake, letting it pool on the sides. The glaze will set into a silky coat that enhances the cake’s texture. If you want a thicker glaze, add more powdered sugar.
- Rest: Let the glazed cake rest for 15 minutes before slicing. This allows the glaze to firm up and the cake to settle. A rested cake slices cleanly and holds its shape.
- Serve: Slice with a serrated knife, serve immediately, or refrigerate for up to a week. The cake’s moistness will linger, making it a perfect make‑ahead dessert.
That's it—you did it. But hold on, I've got a few more tricks that'll take this to another level. These insider tips will help you avoid common pitfalls and elevate the cake’s flavor profile.
Insider Tricks for Flawless Results
The Temperature Rule Nobody Follows
Many bakers bake at a standard 350°F, but the perfect temperature for mayonnaise cakes is 325°F. Lower heat allows the cake to rise slowly, creating a tender crumb. I’ve baked this recipe at 325°F for 45 minutes, and the result is a cake that stays moist for days. Try a lower temperature next time for a more delicate finish.
Why Your Nose Knows Best
When the cake starts to brown and emits a nutty aroma, it’s a sign that the sugars are caramelizing. This aroma is a cue to lower the temperature or reduce the baking time slightly. A sweet, buttery scent indicates that the cake is nearing perfection. Trust your nose; it’s the most reliable indicator of doneness.
The 5‑Minute Rest That Changes Everything
After removing the cake from the oven, let it sit for exactly five minutes before turning it out of the pan. This short rest allows the internal steam to redistribute, preventing a hollow center. I’ve seen cakes that collapse when removed too early; this simple pause keeps the structure intact. The rest also lets the glaze set slightly, making slicing cleaner.
Keep It Cool, Keep It Fresh
Storing the cake in an airtight container at room temperature keeps it fresh for up to three days. For longer storage, refrigerate; the cake will stay moist for up to a week. If you plan to serve it the next day, let it sit at room temperature for an hour to regain its softness. I always keep a small glass jar of vanilla extract nearby; a few drops added to the glaze can brighten the flavor.
Glaze Alternatives
For a richer glaze, swap powdered sugar for confectioners' sugar and add a tablespoon of dark chocolate, melted. The chocolate will add a glossy sheen and deepen the chocolate flavor. If you’re looking for a healthier option, use a sugar substitute like stevia or erythritol, but be mindful of the texture changes.
Creative Twists and Variations
This recipe is a playground. Here are some of my favorite ways to switch things up:
Chocolate‑Mint Surprise
Fold in a teaspoon of peppermint extract into the batter for a refreshing twist that pairs well with the chocolate base. The mint will cut through the richness, making it a perfect dessert for spring parties.
Nutty Crunch
Add ½ cup of chopped walnuts or pecans to the batter for a satisfying crunch. The nuts’ oils will also enhance the cake’s moisture, giving it a richer mouthfeel.
Caramel Swirl
Stir in a swirl of caramel sauce before glazing. The caramel will create a marbled effect, adding visual appeal and a sweet, buttery flavor that complements the chocolate.
Spiced Variation
Incorporate ¼ teaspoon of cinnamon and a pinch of cayenne pepper into the dry mix for a warm, spicy kick. The heat will contrast the sweet glaze, making it a unique dessert for holiday gatherings.
Fruit‑Topped Delight
Top the glazed cake with fresh berries or a compote of mixed fruit. The acidity of the fruit will cut through the richness and add a fresh, vibrant note.
Storing and Bringing It Back to Life
Fridge Storage
Wrap the cooled cake tightly in plastic wrap and store it in the refrigerator for up to seven days. The moisture from the mayo will keep the cake tender, and the glaze will remain intact.
Freezer Friendly
For longer storage, slice the cake and freeze each slice individually. Wrap each slice in parchment paper and place in a freezer bag. Thaw overnight in the fridge before serving.
Best Reheating Method
Reheat slices in a 350°F oven for 5–7 minutes, or microwave on low for 20 seconds. Add a tiny splash of water before reheating—this steams the cake back to perfection and prevents it from drying out.