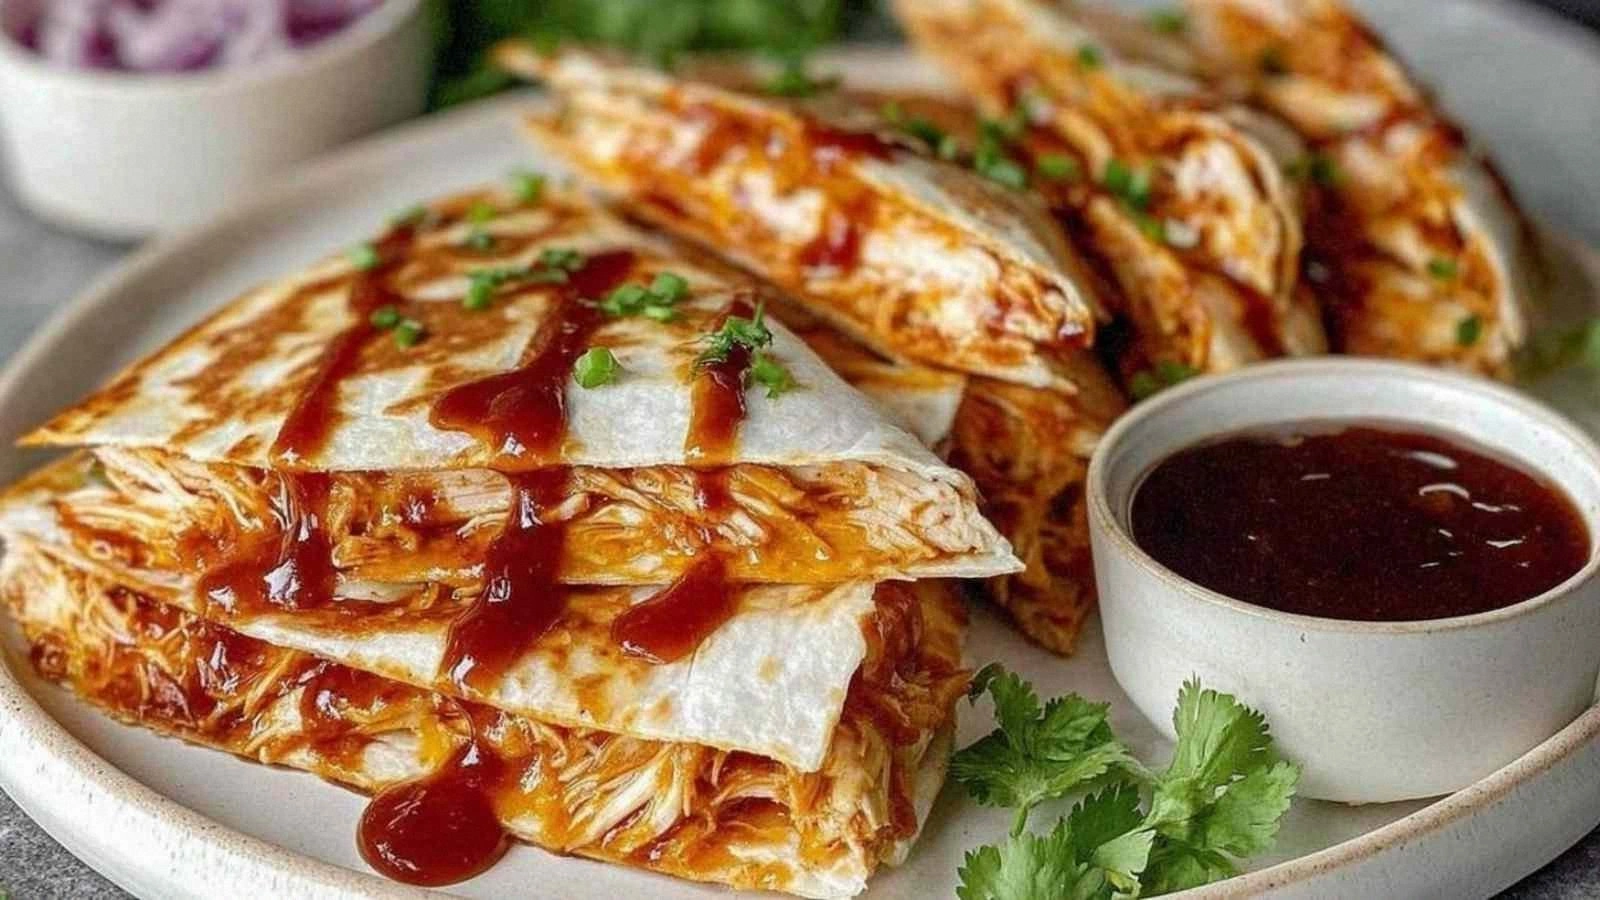
Picture this: it’s a Thursday night, the lights are low, the air smells like burnt popcorn from last week’s midnight snack, and you’re staring at a pile of shredded chicken that’s been sitting in the fridge since Sunday. I’ve been craving something that screams comfort but also has a kick, so I pulled out my favorite BBQ sauce, a jar of hot honey, and a stack of tortillas that have been gathering dust. The result? Hot Honey BBQ Chicken Quesadil, a dish that turns ordinary leftovers into a molten, caramelized masterpiece. I dare you to taste this and not go back for seconds. It’s hands down the best version you’ll ever make at home.
When the first bite hits your tongue, you’ll hear a satisfying crunch that shatters like thin ice, feel the buttery edges melt into a glossy glaze, and taste the sweet heat of the honey coating the chicken like velvet. The cheese melts into a gooey blanket that’s both savory and slightly smoky, while the tang of the BBQ sauce cuts through the richness, giving the quesadil a bright, almost citrusy lift. The aroma is a heady mix of caramelized sugars, smoky paprika, and a hint of citrus from the honey. If you’ve ever struggled with bland quesadillas, you’re not alone—and I’ve got the fix.
What sets this version apart is the synergy of flavors and textures that work together like a well‑orchestrated symphony. The hot honey isn’t just a sweetener; it’s the star that brings a subtle heat and a glossy sheen to the chicken. The tortillas are 10‑inch, thick enough to hold the filling without tearing, yet thin enough to crisp up to a golden perfection. The cheese blend—Monterey Jack or cheddar—adds a creamy, slightly sharp undertone that balances the sweetness. And the final touch? A drizzle of sour cream, a smear of guacamole, and a sprinkle of cilantro that add freshness and a pop of color. Picture yourself pulling this out of the oven, the whole kitchen smelling incredible, and knowing you’ve just created a crowd‑pleaser that will have guests begging for the recipe.
I’ll be honest — I ate half the batch before anyone else got to try it. That’s because this dish is so good, it practically cooks itself. But let me walk you through every single step — by the end, you’ll wonder how you ever made it any other way. And trust me, the technique for the perfect crispy edge is a game‑changer.
What Makes This Version Stand Out
- Flavor Fusion: The marriage of sweet hot honey and smoky BBQ sauce creates a layered taste profile that feels both familiar and adventurous.
- Texture Contrast: Crispy tortilla edges paired with molten cheese and juicy chicken produce a satisfying bite that keeps you coming back.
- Ingredient Simplicity: With only a handful of pantry staples, you can whip this up in minutes, making it the ultimate weeknight hero.
- Heat Customization: The hot honey’s spice level can be dialed up or down, letting you tailor the heat to your crowd.
- Make‑ahead Friendly: The assembled quesadillas can be frozen, then reheated to near‑perfect crispness, saving you time on busy days.
- Crowd‑Pleaser: Whether you’re feeding a family or hosting a potluck, the bold flavors and comforting textures guarantee applause.
- Balanced Nutrition: Packed with protein from the chicken and cheese, yet still under 400 calories per serving, it’s a guilt‑free indulgence.
- Visual Appeal: The golden, caramelized crust and the glossy honey glaze make for Instagram‑worthy food that looks as good as it tastes.
Alright, let's break down exactly what goes into this masterpiece…
Inside the Ingredient List
The Flavor Base
At the heart of every great quesadilla is a flavor base that ties everything together. For this recipe, we start with a generous 1/2 cup of your favorite BBQ sauce. The sauce’s smoky undertones set the stage for the sweet heat that follows. If you’re using a store‑bought sauce, look for one with a balanced profile—too sweet and it’ll overpower the honey, too tangy and it’ll clash with the chicken.
The 2 tablespoons of hot honey are the secret sauce that gives this dish its signature kick. Honey’s natural sugars caramelize when heated, forming a glossy glaze that clings to the chicken, while the embedded chili flakes provide a subtle, lingering heat. If you can’t find hot honey, a drizzle of honey mixed with a pinch of cayenne pepper will do, though the flavor profile will shift slightly.
The Texture Crew
Texture is everything when it comes to a quesadilla. The 4 ten‑inch flour tortillas must be pliable yet sturdy; they should hold the filling without tearing. Warm them briefly in a dry skillet before assembling to prevent them from cracking when you flip.
The 2 cups of shredded Monterey Jack or cheddar cheese act as the gooey binder. Monterey Jack offers a milder, creamier melt, while cheddar adds a sharper bite. Mixing the two creates a harmonious balance—cheese that melts smoothly yet still offers a satisfying bite when it starts to brown.
The Unexpected Star
The 1 tablespoon of butter is the unsung hero that gives the tortilla its golden crispness. When melted in the pan, it coats the tortilla’s surface, creating a barrier that prevents sticking and adds a buttery aroma that elevates the entire dish.
The toppings—sour cream, guacamole, and cilantro—are optional but essential for a complete experience. Sour cream cools the heat, guacamole adds creaminess and a subtle earthiness, and cilantro provides a fresh, bright contrast. Each topping can be omitted or swapped based on personal preference.
Everything's prepped? Good. Let's get into the real action…
The Method — Step by Step
- Step 1: Warm the Tortillas. Place each tortilla on a dry skillet over medium heat for about 30 seconds per side, just until pliable. This step prevents them from cracking when you add the filling. As the tortillas heat, you’ll hear a faint sizzle—an early sign that the pan is ready. If they start to brown too quickly, lower the heat; you want them soft, not burnt. This is the moment of truth for the base of your quesadilla.
- Step 2: Mix the Chicken. In a bowl, combine the 2 cups of cooked shredded chicken, the 1/2 cup BBQ sauce, and the 2 tablespoons of hot honey. Toss until every piece is coated. The sauce should cling to the chicken, forming a sticky, caramelized coating that will caramelize further in the pan. If you prefer a spicier kick, sprinkle an extra pinch of cayenne into the mix. This is where the flavors start to mingle.
- Step 3: Melt the Butter. Reduce the heat to low and melt the tablespoon of butter in the same skillet. Once melted, swirl the pan to coat the surface. The butter creates a crisp, golden crust on the tortilla. Keep an eye on it; if it starts to brown too quickly, reduce the heat. This step adds a buttery aroma that’s impossible to resist.
- Step 4: Assemble the Quesadilla. Place a generous scoop of the chicken mixture onto one half of each warmed tortilla. Sprinkle 1/2 cup of shredded cheese over the chicken. Fold the tortilla over, pressing gently to seal the edges. The cheese should start to melt as the heat from the skillet spreads. Don’t overcrowd the pan; cook in batches if necessary to maintain even heat distribution.
- Step 5: Cook Until Golden. Let the quesadilla cook for 3–4 minutes on the first side, then flip carefully. The edges should be a deep golden brown, and the cheese inside should be bubbling. If you’re using a non‑stick skillet, you can press down lightly with a spatula to help the tortilla adhere and crisp. The sizzle here is absolute perfection.
- Step 6: Flip with Precision. Use a large spatula to flip the quesadilla. It’s okay if it’s a little wobbly; the cheese will help hold it together. Watch for the cheese to start pulling away from the tortilla—this is the cue that the interior is ready. If the cheese is still too liquid, give it another minute before flipping again.
- Step 7: Finish the Second Side. Cook for another 2–3 minutes on the second side until the cheese is fully melted and the tortilla is crisp. The edges should be slightly charred but not burnt. The aroma at this point will be a heady mix of caramelized honey, smoky BBQ, and melted cheese. This is the moment when the whole kitchen smells incredible.
- Step 8: Slice and Serve. Remove the quesadilla from the skillet and let it rest for 30 seconds to allow the cheese to set slightly. Slice into wedges with a sharp knife. Serve hot with a side of sour cream, guacamole, and a sprinkle of chopped cilantro. The contrast of creamy, cool toppings against the hot, caramelized filling is pure bliss. And that’s it—you did it. But hold on, I've got a few more tricks that'll take this to another level…
Insider Tricks for Flawless Results
The Temperature Rule Nobody Follows
Many cooks set the skillet to high heat and then lower it, but the best approach is to preheat the pan on medium for a full minute before adding butter. This ensures the surface is hot enough to crisp the tortilla instantly without burning the butter. A quick test: drop a splash of water—if it sizzles and evaporates within a second, you’re at the right temperature. If it lingers, lower the heat slightly.
Why Your Nose Knows Best
The aroma of caramelizing honey is a subtle indicator that the coating is forming the perfect glaze. When you smell that sweet, slightly smoky scent, it’s a sign that the sugar is caramelizing but hasn’t burned. Trust your nose; if it smells like burnt sugar, it’s time to lower the heat. This sensory checkpoint saves you from a bitter quesadilla.
The 5‑Minute Rest That Changes Everything
After cooking, let the quesadilla rest for exactly five minutes. This brief pause allows the cheese to set, preventing it from oozing out of the tortilla when you cut it. The rest also lets the juices redistribute, ensuring each bite is moist and flavorful. I’ve seen people skip this step, and the result is a gooey mess that’s hard to eat.
The Quick Flip Technique
When flipping, place the spatula under the quesadilla and lift it slightly. This gives the cheese a chance to adhere to the tortilla rather than sliding off. If you’re cooking multiple quesadillas, use a second spatula to support the top while you flip the bottom. This method keeps the structure intact and reduces the chance of spills.
The Melt‑On‑Demand Cheese Mix
If you’re concerned about the cheese melting too quickly, mix it with a small amount of milk or cream before adding it to the chicken. This dilutes the cheese slightly, allowing it to melt more gradually and coat the filling evenly. It’s especially useful if you’re using a very sharp cheddar that can become stringy.
Creative Twists and Variations
This recipe is a playground. Here are some of my favorite ways to switch things up:
Spicy Chipotle Kick
Swap the hot honey for a chipotle‑infused honey or add a tablespoon of chipotle in adobo. The smoky heat pairs wonderfully with the BBQ sauce, giving the quesadilla a bold, southwestern twist that will wow spice lovers.
Mango Madness
Dice fresh mango and fold it into the chicken mixture before cooking. The sweet fruit provides a tropical contrast to the savory cheese and smoky sauce, creating a dessert‑meets‑main dish experience.
Mediterranean Twist
Replace the cheddar with feta and add a handful of kalamata olives. The salty feta and briny olives cut through the sweetness, offering a Mediterranean flair that’s both refreshing and satisfying.
Vegan Version
Use plant‑based shredded “chicken” and vegan cheese. The hot honey can be replaced with maple syrup and a pinch of smoked paprika. The result is a vegan quesadilla that still delivers that coveted sweet‑spicy caramelized coating.
Breakfast Bonanza
Add scrambled eggs to the filling and sprinkle with chives. The eggs provide a protein boost, turning the quesadilla into a hearty breakfast that’s perfect for brunch or a late‑night snack.
Crispy Coconut Finish
After cooking, sprinkle toasted coconut flakes on top before serving. The coconut adds a subtle sweetness and a crunchy texture that complements the gooey cheese and caramelized chicken.
Storing and Bringing It Back to Life
Fridge Storage
Store assembled quesadillas in an airtight container for up to 3 days. Keep the tortillas flat to prevent them from becoming soggy. When reheating, place them on a paper towel to absorb excess moisture, then toast in a skillet over low heat until the cheese is melted.
Freezer Friendly
Wrap each quesadilla individually in parchment paper and then in plastic wrap. Freeze for up to 2 months. When ready to eat, thaw overnight in the fridge, then reheat in a skillet or oven at 350°F until the cheese is bubbly. This method preserves the crispness and flavor profile.
Best Reheating Method
The secret to reheating is to add a splash of water to the skillet—about a tablespoon—before covering. The steam helps rehydrate the tortilla while the butter or oil on the pan maintains crispness. Cover for 2 minutes, then remove the lid to let the moisture evaporate, leaving a perfectly warm and crispy quesadilla.