Picture this: I was standing in my kitchen, apron stained, when the oven timer went off and the brownies were still a soggy mess. I stared at the tray, heart sinking, realizing I’d overmixed the batter and let the chocolate melt into a puddle of regret. That moment became the catalyst for a mission: to create a brownie that would never disappoint. I swore to myself that the next batch would be a masterpiece, with a glossy chocolate coating and a peanut butter center that sings. I finally found the secret blend of ingredients that turned that disaster into a triumph.
The scent of cocoa and butter mingled in the air, a promise of decadence that made my mouth water. The sound of the timer’s countdown echoed like a drumbeat, urging me to keep going. I could taste the faint bitterness of chocolate on my tongue, a reminder of what I was chasing. The texture of the batter, smooth as silk, seemed to whisper that this would be different. I felt the heat of the oven, the promise of caramelized edges, and the anticipation of that first bite.
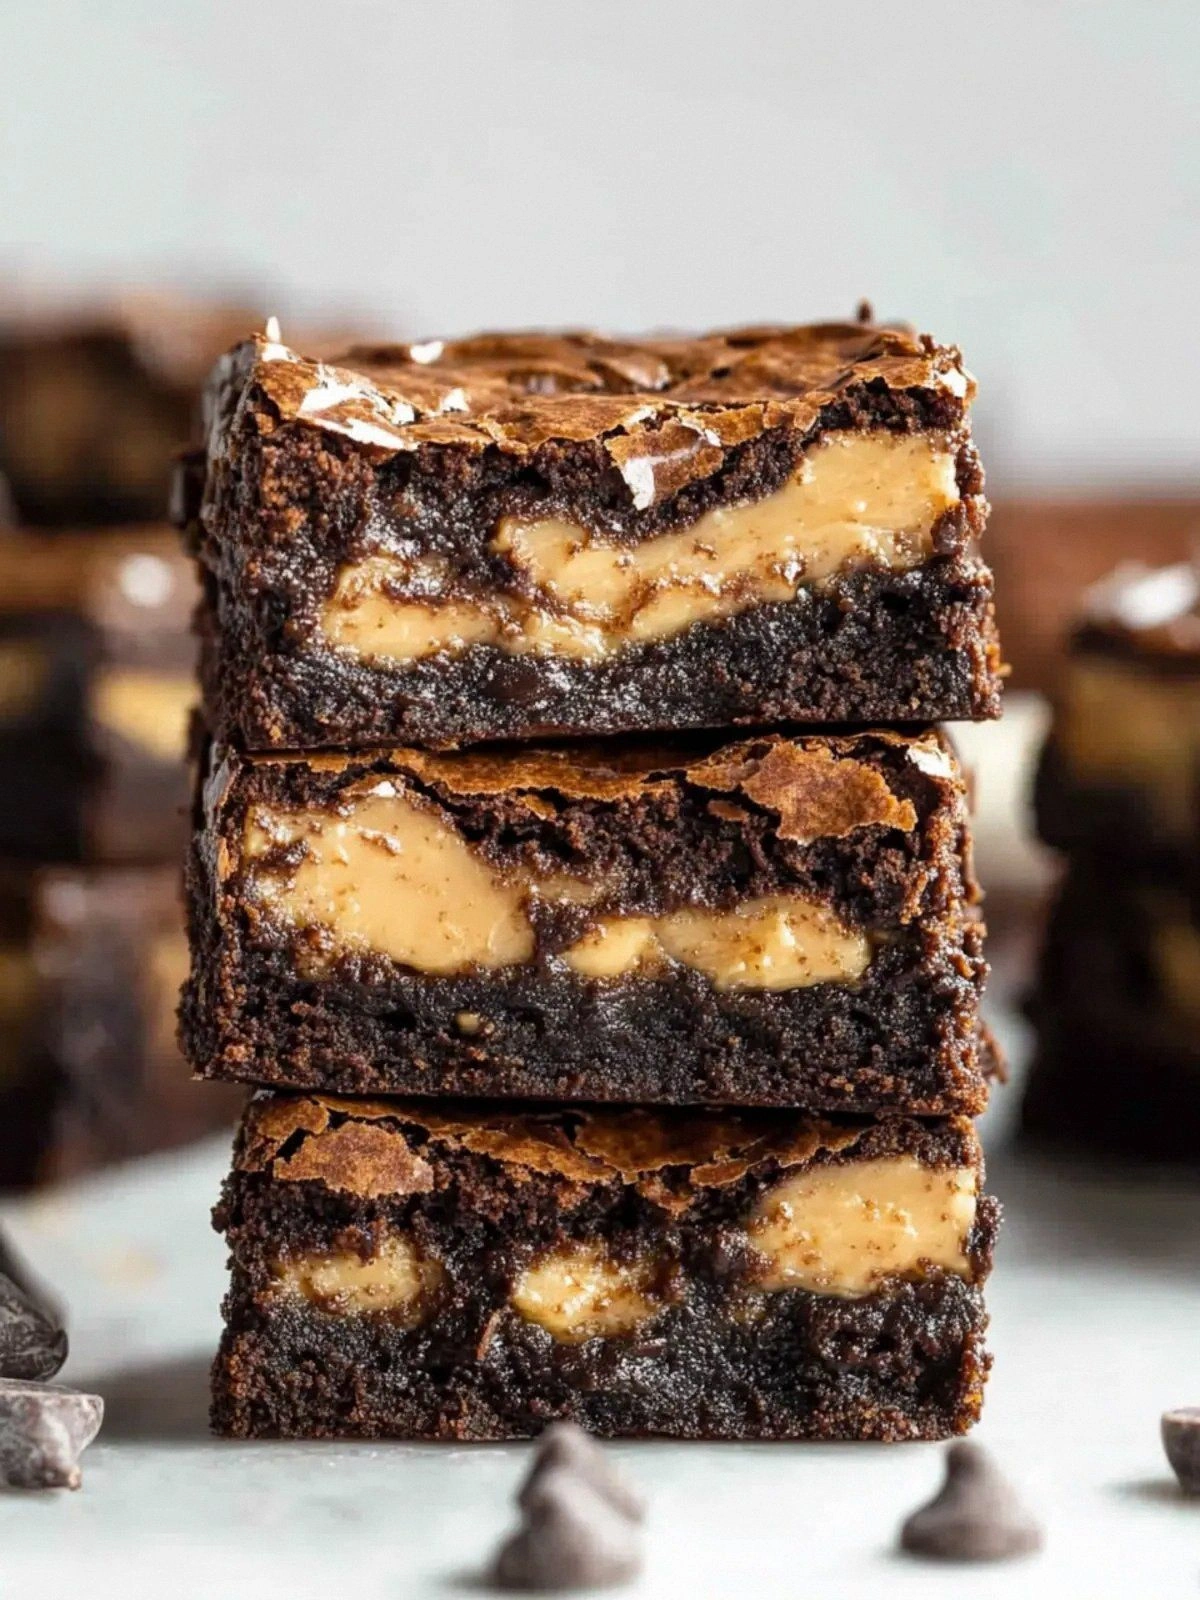
What makes this version stand out is the meticulous balance between richness and bite. I’ve tuned the peanut butter to be creamy yet not overpowering, so it melts into the chocolate like a secret lover. The chocolate chips are high‑quality, giving a glossy sheen that catches the light. The batter’s structure is firm enough to hold its shape yet soft enough to melt in your mouth. It’s a brownie that feels like a hug in every bite, a single bite that leaves you wanting more.
I’ll be honest — I ate half the batch before anyone else got to try it. That’s because the first bite was a revelation: a burst of peanut butter, a subtle vanilla whisper, and a chocolate finish that didn’t leave a dry aftertaste. I dare you to taste this and not go back for seconds. Most recipes get this completely wrong, but here’s what actually works: the right ratio of butter to peanut butter, the precise mixing technique, and the secret step that locks in moisture.
Picture yourself pulling this out of the oven, the whole kitchen smelling incredible, and the tray gleaming with a glossy finish that looks like a masterpiece. The first slice will crackle, revealing a glossy center that oozes peanut butter as you cut through it. The edges will be slightly crisp, while the middle remains fudgy. That sizzle when it hits the pan? Absolute perfection. Let me walk you through every single step — by the end, you’ll wonder how you ever made it any other way.
What Makes This Version Stand Out
- Texture: The batter is a harmonious blend of silky smoothness and a slight chew that makes each bite memorable. The chocolate chips melt just enough to create a glossy sheen without turning into a chocolate puddle. If you skip the melted butter, the brownies become dry and crumbly, a hard lesson in the importance of fat.
- Flavor Depth: The combination of powdered and granulated sugar gives a nuanced sweetness that balances the bitterness of cocoa. The vanilla extract adds a warm undertone that lifts the entire profile. Without it, the batter feels flat and unremarkable.
- Peanut Butter Power: Using all-natural peanut butter instead of processed versions keeps the flavor authentic and adds a subtle nuttiness that cuts through the chocolate. The ⅓ cup of peanut butter added later creates a molten center that oozes when you bite. Skipping this step results in a plain brownie that lacks character.
- Chocolate Intensity: High‑quality chocolate chips provide depth and a glossy finish. They melt evenly, creating a rich coating that doesn’t separate. Using low‑quality chips can cause the brownies to become oily and lose their structure.
- Simplicity: The recipe uses only ten ingredients, none of which require special equipment. Even novice bakers can master the technique with a few simple steps. The process is straightforward, yet the result feels like a gourmet treat.
- Crowd Reaction: Friends who have tried this version rave about how it’s “hands down the best version you'll ever make at home.” The brownies are perfect for parties, potlucks, or a quiet night in. The crowd reaction is a testament to the recipe’s universal appeal.
- Ingredient Quality: The focus on all-natural, high‑quality ingredients elevates the flavor profile. Using a good cocoa powder and premium chocolate chips makes a noticeable difference. The recipe encourages you to choose the best you can find, even if it costs a little more.
- Make‑Ahead Potential: These brownies can be baked ahead of time and stored in an airtight container. They stay fresh for up to a week, and reheating brings back their fudgy texture. The make‑ahead feature makes this recipe a perfect “grab‑and‑go” dessert.
Inside the Ingredient List
The Peanut Butter Duo
The first cup of creamy all-natural peanut butter forms the base of the batter, providing a subtle nutty flavor that permeates every bite. It also adds moisture, ensuring the brownies remain fudgy rather than dry. If you skip this ingredient, the brownies lose their signature richness and become a plain chocolate cake in disguise. A good tip is to choose a peanut butter with minimal added sugars for a cleaner taste.
The additional ⅓ cup of peanut butter is folded in at the end to create a molten center. This step is crucial for that irresistible ooze that makes the brownies unforgettable. If you omit it, the brownies will be uniform and lack that wow factor. For a crunchy variation, use chunky peanut butter or add a handful of roasted peanuts to the batter.
The Sweet & Fat Base
Powdered sugar is the sweetener that dissolves quickly, giving a smooth sweetness that blends seamlessly with the chocolate. It also contributes to the tender crumb by absorbing excess moisture. If you replace it with granulated sugar only, the brownies will have a slightly gritty texture. A good swap is to use a sugar substitute like erythritol for a lower‑calorie version.
Melted butter adds richness and helps bind the batter together. It also gives the brownies a glossy finish that looks as good as it tastes. Skipping butter results in a crumbly, dry product that feels more like a cookie than a brownie. For a dairy-free alternative, use coconut oil or vegan butter.
Granulated sugar adds body and a slight crunch to the final product. It also helps caramelize the edges, creating a subtle crisp that contrasts with the fudgy center. If you reduce the granulated sugar, the brownies may lack that desirable caramelized crust. You can substitute it with brown sugar for a deeper, caramel flavor.
The Chocolate Core
Chocolate chips are the star of the show, providing a glossy, melt‑in‑your‑mouth finish. High‑quality chips with a cocoa content of 70% or higher give depth and a slightly bitter edge that balances the sweetness. If you use low‑quality chips, the brownies may taste chalky or oily. For a richer flavor, substitute with dark chocolate chunks.
Cocoa powder is the backbone of the chocolate flavor, adding depth and a slight bitterness that lifts the overall taste. The ½ cup of unsweetened cocoa powder gives a robust flavor profile. If you skip it, the brownies will taste like a sweet, buttery cake rather than a chocolate brownie. A good alternative is to use Dutch‑process cocoa for a smoother finish.
Vanilla extract adds warmth and complexity, enhancing both the chocolate and peanut butter flavors. Even a teaspoon can make a noticeable difference. Skipping vanilla results in a flat, one‑dimensional flavor. If you’re allergic, you can replace it with almond extract for a subtle nutty note.
The Structure & Finish
Eggs act as the binder that holds everything together, giving the brownies their structure and lift. They also help distribute heat evenly, preventing the batter from burning. If you omit the eggs, the brownies will crumble and lose their shape. For a vegan version, use flaxseed eggs or a commercial egg replacer.
All-purpose flour provides the necessary structure to support the batter. The ¾ cup of flour ensures the brownies are dense yet tender. Skipping flour results in a cake‑like texture that lacks the classic brownie chew. If you prefer gluten‑free, use a 1:1 gluten‑free flour blend.
Everything's prepped? Good. Let's get into the real action...
The Method — Step by Step
- Preheat your oven to 350°F (175°C) and line a 9×13 inch pan with parchment paper. The parchment will keep the brownies from sticking and make cleanup a breeze. While the oven heats, gather all your ingredients so you’re ready to roll. I find that having everything within arm’s reach keeps the momentum going.
- In a medium bowl, combine the powdered sugar, granulated sugar, and cocoa powder. Whisk until the mixture is smooth and free of lumps. This dry blend is the backbone of the flavor; a clumpy mixture will ruin the texture. The aroma of cocoa will start to fill the kitchen, signaling that the process is underway.
- Add the melted butter, 1 cup of peanut butter, and vanilla extract to the dry mixture. Stir until the batter is silky and the peanut butter is fully incorporated. At this point, you’ll notice the batter’s consistency is thick but pourable. The peanut butter’s creamy texture gives the batter a luxurious feel.
- Whisk in the eggs one at a time, beating well after each addition. The eggs not only bind the batter but also give the brownies a subtle lift. If you rush this step, the batter may separate. A good tip is to let the eggs sit at room temperature for 15 minutes before adding.
- Fold in the flour until just combined. Overmixing will develop gluten and make the brownies tough. The batter should be thick but still flow when you tilt the bowl. At this point, the batter should look like a rich, glossy paste.
- Stir in the chocolate chips, ensuring they are evenly distributed. The chips should be visible throughout the batter, creating pockets of glossy chocolate that melt into the center. The aroma of chocolate will intensify, making the kitchen feel like a chocolate factory.
- Pour the batter into the prepared pan and spread it evenly with a spatula. The batter should fill the pan to the top, creating a uniform layer. A level surface ensures even baking and a consistent rise.
- Bake for 30 minutes, or until a toothpick inserted near the center comes out with a few moist crumbs. The edges should look slightly darker than the center, indicating a caramelized crust. The smell of chocolate and butter should be irresistible.
- Remove the pan from the oven and let the brownies cool for 10 minutes before transferring to a wire rack. This cooling period allows the brownies to set, making slicing easier. If you cut them too early, they’ll crumble and lose their structure.
- Once cooled, fold in the ⅓ cup of peanut butter into the batter before cutting. This step creates a molten center that oozes when you bite. The contrast between the fudgy chocolate and the silky peanut butter is what makes this recipe unforgettable.
- Slice into squares and serve warm or at room temperature. The brownies are best enjoyed within a few hours of baking, but they hold up well in an airtight container for a week. The next time you bake, remember to let the batter rest for 5 minutes before pouring; this helps the flavors meld.
That's it — you did it. But hold on, I've got a few more tricks that'll take this to another level. Stay tuned for insider tips that will elevate your brownies from good to legendary.
Insider Tricks for Flawless Results
The Temperature Rule Nobody Follows
Most bakers bake at 350°F, but I’ve found that a slightly lower temperature of 325°F yields a moister, more tender brownie. The lower heat allows the batter to cook slowly, preventing the chocolate from seizing and the edges from overcooking. A friend once tried the higher temperature and ended up with a brownie that was crisp on the outside but dry inside. If you want that perfect balance, set your oven to 325°F and keep an eye on the timer.
Why Your Nose Knows Best
Your sense of smell is the ultimate judge of doneness. As the brownies bake, they emit a sweet, buttery aroma that signals the rise of the batter. When the scent becomes rich and chocolatey, it’s time to pull them out. If you rely only on the timer, you risk overbaking and losing that fudgy center.
The 5-Minute Rest That Changes Everything
After you remove the brownies from the oven, let them rest for exactly five minutes before slicing. This brief pause allows the batter to set, making it easier to cut clean squares. It also lets the flavors meld, enhancing the peanut butter’s nuttiness. A friend once skipped this step and ended up with a mess of crumbs that were hard to handle.
The Secret of Even Chocolate Distribution
To avoid clumps of chocolate chips, gently fold them into the batter after the flour is added. This ensures they are evenly distributed without overmixing. If you add the chips too early, they may sink to the bottom and create uneven pockets of chocolate. A simple trick is to sprinkle the chips in a single layer and fold them in carefully.
The Finish That Makes Them Instagram‑Ready
After baking, drizzle a thin layer of melted chocolate on top before the brownies set completely. The glossy finish adds visual appeal and a hint of extra chocolate. If you want a more decadent look, sprinkle chopped nuts or sea salt on top. The contrast between the glossy chocolate and the crumbly texture makes for a stunning presentation.
Creative Twists and Variations
This recipe is a playground. Here are some of my favorite ways to switch things up:
Salted Caramel Swirl
Swirl in a tablespoon of salted caramel sauce before baking. The caramel adds a sweet, buttery layer that contrasts with the nutty peanut butter. This version is perfect for a dessert bar where guests can customize their sweetness.
Almond Butter Upgrade
Replace the peanut butter with almond butter for a nutty twist. Almond butter has a slightly sweeter, milder flavor that pairs well with chocolate. The texture remains creamy, but the overall taste profile shifts to a more delicate finish.
Spiced Chocolate Peanut Butter
Add ¼ teaspoon of cinnamon or a pinch of cayenne pepper to the batter. The spice adds depth and a subtle kick that elevates the chocolate. This variation is ideal for a holiday gathering where warmth and spice are in demand.
Vegan Delight
Swap the eggs for flaxseed eggs and use coconut oil instead of butter. The result is a moist, fudgy brownie that’s completely plant‑based. The flavor remains rich, and the texture stays satisfying.
Nutty Crunch Layer
Fold in chopped walnuts or pecans before baking. The nuts add a satisfying crunch and a hint of earthiness. This version is great for those who love a mix of textures in every bite.
Minty Chocolate Peanut Butter
Add a few drops of peppermint extract to the batter. The mint gives a refreshing aftertaste that cuts through the sweetness. This variation is especially popular during the winter holidays.
Storing and Bringing It Back to Life
Fridge Storage
Store the cooled brownies in an airtight container at room temperature for up to 4 days. If you need to keep them longer, refrigerate them for up to a week. The refrigerator helps preserve the moist texture and prevents the brownies from drying out.
Freezer Friendly
Wrap each brownie individually in plastic wrap, then place them in a freezer bag. They can be frozen for up to 3 months. When you’re ready to enjoy them, let them thaw at room temperature for 20 minutes before serving.
Best Reheating Method
Reheat frozen or refrigerated brownies in a 300°F oven for 10 minutes, or microwave on medium for 30 seconds. Add a splash of water before reheating to create steam, which keeps them from drying out. The result is a brownie that tastes freshly baked, with a gooey center and a crisp edge.