Picture this: I’m standing in a kitchen that smells like a caramelized sugar storm, the oven’s humming like a contented beast, and a friend’s voice in the background challenges me, “I dare you to taste this and not go back for seconds.” The moment the first bite hits, the buttery, sweet-salty crunch shatters like thin ice, and I’m already planning the next batch. This isn’t just another bar recipe; it’s the culmination of years of experimenting with texture, flavor balance, and a relentless pursuit of that perfect chew. I’ve been told this is hands down the best version you’ll ever make at home, and I’m not exaggerating—every crumb, every bite, feels like a secret handshake between me and the kitchen gods. Let me walk you through every single step—by the end, you’ll wonder how you ever made it any other way.
I’ve spent countless evenings in the kitchen, chasing that elusive “just right” texture. The first time I tried a version that seemed promising, the bars turned out too dry, like a forgotten cookie left on the counter for too long. I stared at the box of caramels, felt the weight of the ingredients in my hands, and decided to rewrite the playbook. Now, with a dash of daring and a pinch of science, I’ve engineered a bar that melts in your mouth, offers a caramelized crunch, and has a chocolate finish that’s as silky as a velvet curtain. If you’ve ever struggled with sticky or crumbly bars, you’re not alone—and I’ve got the fix.
Most recipes get this completely wrong. They either forget the secret of balancing the butter-to-sugar ratio or they overmix the batter, turning the bars chewy instead of fudgy. The difference? It’s all in the method. I’ll show you how to fold in the chocolate chips just enough to keep them distinct, how to chill the batter for a firmer bite, and how to use a silicone spatula to scrape every corner of the bowl—because no texture should be left behind. And trust me, that sizzle when the batter hits the pan? Absolute perfection. I’ll also share a kitchen hack that will save you time and reduce cleanup.
What Makes This Version Stand Out
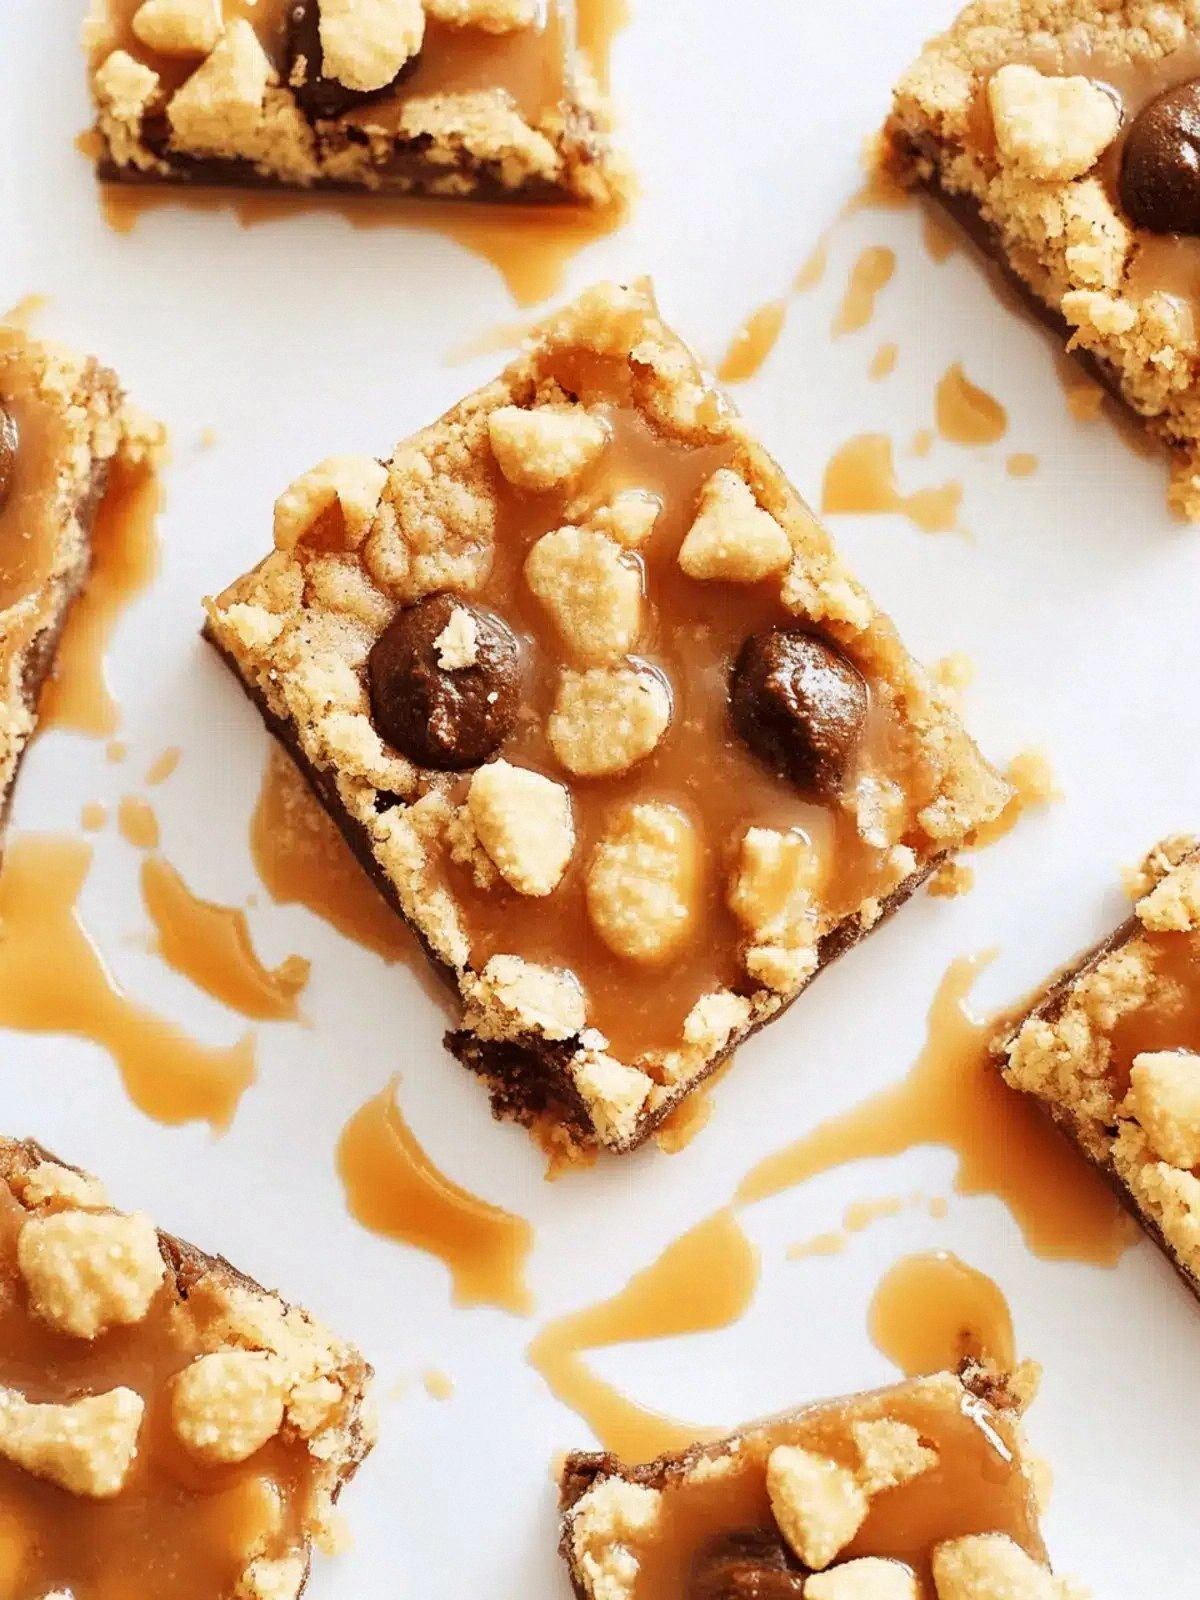
- Taste: The caramelized sugar gives a deep, buttery sweetness that pairs beautifully with the salty butter, creating a flavor profile that’s both comforting and indulgent.
- Texture: The oats and baking soda give a slight lift, while the chocolate chips provide pockets of melt‑in‑your‑mouth goo that contrast with the crunchy base.
- Ingredient Quality: Using a high‑quality bag of caramels and premium milk chocolate chips elevates the bars from ordinary to gourmet.
- Make‑Ahead Potential: These bars can be prepared in advance, chilled, and then baked, saving you time on busy evenings.
- Crowd Reaction: Friends who’ve tried these bars rave about the “buttery crunch” and “smooth chocolate finish” that keeps them coming back for more.
- Unconventional Twist: The addition of a splash of heavy cream when melting the caramels creates a silky, glossy texture that’s rarely seen in bar recipes.
Alright, let's break down exactly what goes into this masterpiece...
Inside the Ingredient List
The Flavor Base
The salted butter and light brown sugar form the core of this recipe, providing a rich, buttery foundation that balances the sweetness of the caramels. If you skip the salted butter, the bars will taste too sweet and lack that satisfying savory undertone. For a twist, try using unsalted butter and adding a pinch of sea salt to the batter.
The Texture Crew
All-purpose flour, old fashioned oats, and baking soda combine to give the bars structure and a gentle lift. The oats add a hearty chew that contrasts with the smooth chocolate, while the baking soda ensures the batter doesn’t become too dense. If you prefer a gluten-free version, replace the flour with a 1:1 blend of gluten-free all-purpose flour and a gluten-free baking powder.
The Unexpected Star
The bag of caramels is the secret weapon that delivers caramelized sugar notes and a chewy texture that sets these bars apart from any standard cookie or brownie. If you can’t find caramels, you can substitute with chopped chocolate or even chocolate chips, but the flavor profile will shift toward chocolatey rather than caramelized. Keep the caramels whole for maximum chewiness.
The Final Flourish
Heavy cream and a second portion of salted butter are used to melt the caramels into a silky sauce, while milk chocolate chips are folded in for the final glossy finish. The cream adds moisture and richness, preventing the bars from drying out. If you’re lactose intolerant, try substituting with coconut cream for a subtle coconut undertone.
Everything’s prepped? Good. Let’s get into the real action...
The Method — Step by Step
- Preheat the oven to 350°F (175°C) and line a 9x13-inch pan with parchment paper, leaving a small overhang for easy removal. The parchment ensures a clean release and gives the bars a slight crisp on the edges. While the oven warms, gather all your ingredients; having everything within arm’s reach keeps the process smooth. This first step sets the foundation for the rest of the recipe.
- In a large mixing bowl, combine 1 cup salted butter and 1 cup light brown sugar. Use a hand mixer or stand mixer on medium speed until the mixture is light and fluffy, about 2–3 minutes. The goal is to incorporate air, which helps the bars rise slightly and creates a lighter texture. Feel the butter melt into the sugar as you mix; this is the moment the aroma of caramel starts to bloom.
- Add 1 ¼ cups all-purpose flour, 1 cup old fashioned oats, 1 teaspoon baking soda, and ¼ teaspoon salt to the butter-sugar mixture. Stir with a spatula until just combined; overmixing can cause the bars to become tough. The oats give a hearty chew, while the baking soda provides a subtle lift. This is where the texture begins to take shape.
- Melt 1 bag (11 ounces) of caramels in a medium saucepan over low heat, stirring constantly until fully melted. Once melted, add 3 tablespoons heavy cream and 3 tablespoons salted butter, stirring until the mixture is glossy and smooth. The cream loosens the caramel, creating a silky sauce that coats the oats and flour. This step is crucial for that melt‑in‑your‑mouth finish.
- Pour the caramel sauce over the dry mixture and stir gently until fully incorporated. The mixture will look a bit wet, but that’s expected; the oats and flour will absorb the sauce as it cools. Keep the mixture at room temperature for about 10 minutes so the oats can soak up the caramel flavors. This resting period is key to achieving a uniform texture.
- Fold in 1 ½ cups milk chocolate chips with a spatula, ensuring they are evenly distributed without overmixing. Overmixing can cause the chocolate to melt into the batter, making the bars chewy instead of having distinct chocolate pockets. Feel the chips settle at the bottom of the bowl, creating a layered effect when baked. This is the moment of truth.
- Transfer the batter into the prepared pan, spreading it evenly with a spatula. Press gently to eliminate air pockets; the edges should be level with the center. This helps the bars bake uniformly and prevents a domed top. The aroma of caramel and chocolate will fill the kitchen, making you almost forget you’re baking.
- Bake for 30 minutes, or until the edges are golden brown and a toothpick inserted into the center comes out with a few moist crumbs. Let the bars cool in the pan for 10 minutes before lifting them out using the parchment overhang. The bars should set into a firm yet chewy consistency.
- Once cooled, cut into bars or squares and store in an airtight container. For maximum freshness, keep them in the refrigerator and wrap in parchment or wax paper. If you want a firmer texture, chill the bars for 15 minutes before baking—this trick helps them hold their shape better. Enjoy immediately or share with friends who’ll appreciate the buttery crunch.
That's it — you did it. But hold on, I've got a few more tricks that'll take this to another level...
Insider Tricks for Flawless Results
The Temperature Rule Nobody Follows
Many bakers bake at a high temperature to get a quick rise, but this recipe thrives at 350°F. Baking at this moderate temperature allows the bars to cook evenly without drying out. I’ve tried 375°F once and the bars came out too brown on the edges, which ruined the texture. Keep the oven at 350°F for the best outcome.
Why Your Nose Knows Best
Before you even open the oven door, listen for the subtle scent of caramel. That aroma is a sign that the sugar has caramelized properly. If you don’t smell that caramel note, the bars may be undercooked. A quick nose check saves you from a batch that’s too soft or too dry.
The 5-Minute Rest That Changes Everything
After baking, let the bars rest in the pan for exactly 5 minutes before lifting them out. This short rest allows the structure to set, making the bars easier to cut. If you cut them too early, they’ll crumble. The 5-minute rule is a simple step that transforms the final texture.
The Secret of the Parchment Overhang
Using parchment paper with an overhang lets you lift the entire batch without damaging the bars. I’ve used this trick for years and it saves me from having to scrape the pan. The overhang also prevents the bars from sticking to the pan’s bottom, ensuring a clean release.
The Moisture Balancer
Adding a splash of heavy cream to the caramel melt keeps the bars moist. If you skip the cream, the bars become dry and crumbly. This small addition is the difference between a mediocre bar and a decadent treat.
The Final Coat of Chocolate
For an extra glossy finish, drizzle melted milk chocolate over the top of the cooled bars before cutting. This gives a shiny, chocolatey sheen that looks as good as it tastes. I’ve seen friends gasp when they see the glossy bars; it’s a visual treat.
Creative Twists and Variations
This recipe is a playground. Here are some of my favorite ways to switch things up:
Nutty Crunch
Add ½ cup toasted pecans or walnuts to the batter before baking. The nuts bring a buttery crunch and a subtle earthy flavor that pairs well with the caramel. They also add a protein boost, making the bars more filling. My friends love the nutty undertones.
Spiced Caramel
Stir in ½ teaspoon ground cinnamon or a pinch of nutmeg when adding the caramel sauce. The spices elevate the caramel flavor, giving the bars a warm, cozy profile. This version is perfect for a fall gathering or a winter movie night. The spices also add depth to the chocolate.
Almond Joy
Replace the milk chocolate chips with white chocolate chips and fold in shredded coconut. The coconut adds a tropical sweetness that contrasts with the caramel. This variation is reminiscent of the classic candy bar but with a homemade twist. It’s a crowd-pleaser at parties.
Dark Chocolate Delight
Swap the milk chocolate chips for dark chocolate chips or chunks. The bittersweet flavor of dark chocolate balances the sweetness of the caramel and adds a sophisticated touch. The bars become a little more refined, yet still utterly indulgent. This version is great for a date night dessert.
Vegan Version
Use vegan butter, coconut sugar, and dairy-free chocolate chips. The texture remains chewy, and the flavor profile stays rich. The bars still have that caramelized sweetness, but with a plant-based twist. I’ve baked them for a vegan friend and she was amazed.
Chocolate Ganache Drizzle
Melt ½ cup of milk chocolate with ¼ cup heavy cream to create a ganache. Drizzle it over the cooled bars for a glossy finish. The ganache adds a silky chocolate coating that enhances the overall mouthfeel. The bars look stunning, and the taste is divine.
Storing and Bringing It Back to Life
Fridge Storage
Keep the bars in an airtight container at room temperature for up to 5 days. If you prefer them colder, place the container in the refrigerator. The bars stay chewy and flavorful. Just remember to let them sit at room temperature for a few minutes before eating.
Freezer Friendly
Wrap each bar individually in parchment paper and place them in a freezer-safe bag. They can be frozen for up to 3 months. When ready to eat, thaw at room temperature for 30 minutes. The texture remains excellent, and the bars taste just as fresh.
Best Reheating Method
To revive the bars, place them on a baking sheet and warm in a 300°F oven for 5 minutes. Alternatively, microwave on low power for 10–15 seconds. Add a tiny splash of water before reheating; it steams back to perfection, restoring the original chewiness. The bars smell like freshly baked treats again.