I’m going to start with a confession that will make you raise an eyebrow: I once tried to bake a “quick” cranberry apple cake in a mug, and it turned into a soggy, sad excuse for a dessert that could barely hold itself together. That disaster sparked a fierce determination to create a version that would never let you down, no matter how many times you’ve burned the edges of a loaf or over‑mixed a batter. Fast forward a few weeks of trial, error, and a lot of tasting, and I finally nailed the perfect balance of tart cranberries, sweet apples, and a buttery, cake‑like crumb that practically melts on your tongue. This isn’t just another skillet cake; it’s the kind of comfort food that makes you feel like you’ve been wrapped in a warm blanket made of sugar and spice.
Picture this: the kitchen is filled with the scent of cinnamon swirling with the bright, almost floral aroma of fresh cranberries, while the apples release a buttery perfume that makes the whole house feel like a cozy bakery on a crisp autumn morning. The skillet itself starts to hum as the butter sizzles, a sound that says, “We’re about to create something legendary.” The batter spreads out in the pan, and as it bakes, the edges turn a gorgeous golden‑brown, the top develops a subtle crackle, and the fruit pieces soften into juicy pockets that burst with each forkful. When you finally pull it out, the steam rises like a fragrant veil, and you know you’ve just made magic.
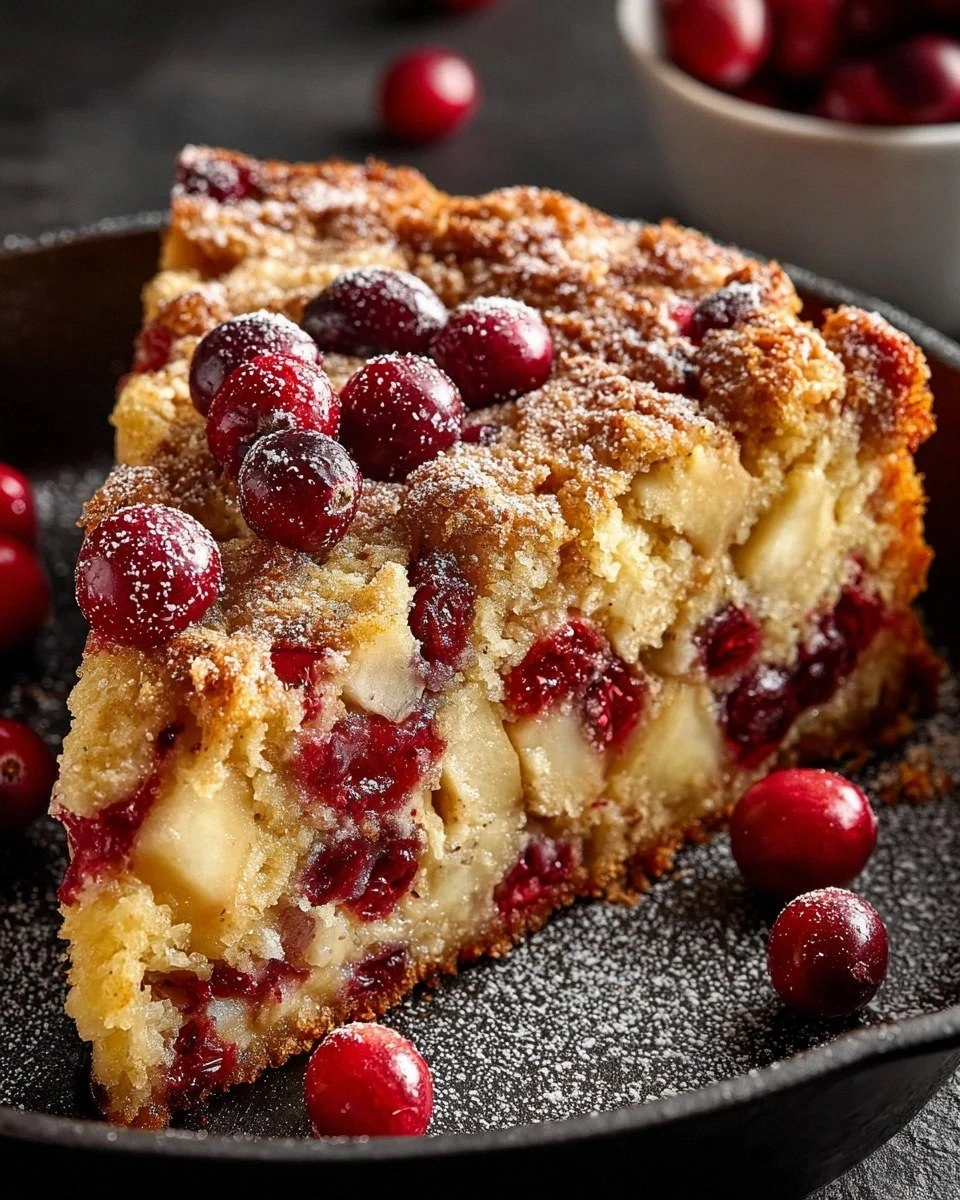
What makes this version stand out from the sea of “fruit cake” recipes floating around the internet? Most of them either drown the fruit in sugar, use a bland batter, or forget the crucial step of giving the cake a crisp, caramelized top. I’ve taken those missteps and turned them on their head: the secret lies in a quick‑whisked yogurt‑butter blend that keeps the crumb tender while adding a subtle tang, and a sprinkle of coarse sugar that creates that satisfying crackle you can’t resist. I dare you to taste this and not go back for seconds—because once you’ve experienced that perfect contrast of textures, you’ll be hooked.
Okay, ready for the game‑changer? I’m about to reveal a technique that most home bakers overlook: a brief, high‑heat sear before the oven does its work, which locks in moisture and gives the bottom a buttery, almost caramelized crust. It’s a simple trick, but it transforms the cake from “good” to “hands down the best version you’ll ever make at home.” Let me walk you through every single step — by the end, you’ll wonder how you ever made it any other way.
What Makes This Version Stand Out
- Flavor Harmony: The tartness of cranberries is perfectly balanced by the natural sweetness of apples, while a hint of cinnamon ties everything together like a warm hug.
- Moisture Mastery: The combination of melted butter and Greek yogurt creates a tender crumb that stays moist for days, no soggy bottom here.
- Texture Contrast: Coarse sugar on top gives a crunchy crown, while the interior remains soft and fluffy, delivering a satisfying bite every time.
- Simplicity: Fewer than fifteen ingredients, most of which you probably already have on hand, means you won’t need a trip to the specialty store.
- One‑Pan Wonder: Baked in a skillet, it serves up a rustic, home‑cooked look without the need for a fancy cake pan or extra cleanup.
- Make‑Ahead Magic: This cake actually tastes better the next day after the flavors have melded, making it perfect for meal‑prep or a make‑ahead brunch.
- Crowd‑Pleaser: Whether it’s a family breakfast, a holiday dessert, or a simple snack, the vibrant colors and comforting flavors win over every palate.
- Adaptable: Swap the Greek yogurt for sour cream, use gluten‑free flour, or add a splash of bourbon for an adult‑only twist.
Inside the Ingredient List
The Flavor Base
Cranberries are the star of the show, bringing a bright, tart punch that cuts through the sweetness of the apples and sugar. Fresh cranberries give you that firm bite, while frozen ones are a convenient alternative that still deliver the same punchy flavor. If you can find a particularly tart variety, even better—those little gems will make the cake sing. Skipping them would leave the cake flat and one‑dimensional, so don’t be tempted to cut corners.
Apples add juiciness and a mellow sweetness that balances the cranberries’ acidity. I prefer a mix of Granny Smith for tartness and Honeycrisp for natural honeyed notes, but any firm apple will do. The key is to dice them into uniform bite‑size pieces so they cook evenly and don’t turn into mush. If you’re out of fresh apples, a good-quality frozen apple puree works, though you’ll lose some of that satisfying texture.
The Texture Crew
All‑purpose flour provides the structural backbone of the cake, forming the gluten network that holds everything together. If you need a gluten‑free version, a blend with a 1:1 ratio of rice flour to tapioca starch works beautifully, though you’ll want to add a tablespoon of xanthan gum to mimic gluten’s elasticity. Skipping the flour entirely would result in a soupy disaster, so keep it as the foundation.
Baking powder and baking soda are the leavening duo that gives this cake its airy lift. The powder adds a gentle rise, while the soda reacts with the yogurt’s acidity for a quick burst of bubbles. Using just one of them will leave the cake dense and heavy—trust me, I’ve tried, and it was a sad, flat pancake. A pinch of salt enhances every flavor, acting like a conductor that brings the orchestra together.
The Unexpected Star
Unsalted butter, melted just enough to stay liquid, adds richness and a silky mouthfeel that you can’t achieve with oil alone. Its milk solids also contribute a nutty, caramelized note when they hit the hot skillet, giving the bottom of the cake that coveted crisp edge. If you accidentally use salted butter, add a little less extra salt to keep the balance.
Greek yogurt (or sour cream) is the secret moisture keeper. Its tang cuts through the sweetness and its protein strengthens the crumb, resulting in a cake that stays tender for days. You can swap it for the same amount of sour cream if you prefer a slightly richer, tangier profile. Skipping this dairy element would make the cake dry and crumbly, and nobody wants that.
The Final Flourish
Granulated sugar provides the primary sweetness, but don’t be shy about adjusting the amount—if you love a more tart bite, cut back a quarter cup. Eggs act as the binding agent, giving the batter structure while adding a subtle richness. A splash of vanilla extract lifts the entire flavor palette, making the fruit taste even more vibrant.
A sprinkle of coarse sugar and an extra dusting of ground cinnamon before the bake create a crunchy, caramelized crown that shatters like thin ice when you bite into it. These optional toppings are the difference between a good cake and a show‑stopping centerpiece. If you’re watching sugar, you can skip the coarse sugar, but you’ll miss that delightful textural contrast.
Everything's prepped? Good. Let's get into the real action...
The Method — Step by Step
Preheat your oven to 375°F (190°C) while you get the skillet ready. Place a 10‑inch cast‑iron skillet on the stovetop over medium‑high heat, and add the unsalted butter. Listen for that satisfying sizzle as the butter melts and begins to foam; that’s your cue that the pan is hot enough to give the cake a golden base.
While the butter is melting, whisk together the flour, baking powder, baking soda, salt, and cinnamon in a large bowl. This dry mix ensures that the leavening agents are evenly distributed, preventing any pockets of bitterness. If you’re using a gluten‑free blend, add a teaspoon of xanthan gum here.
In a separate bowl, combine the melted butter with the Greek yogurt, sugar, and vanilla extract. Beat until the mixture is smooth and glossy—this is the moment where the butter and yogurt become best friends, creating that velvety texture we crave.
Now, create a well in the dry ingredients and pour the wet mixture into it. Gently fold with a rubber spatula, stopping as soon as the flour disappears. Over‑mixing will develop gluten, turning your tender cake into a tough bread, and we definitely don’t want that.
Fold in the diced apples and cranberries, distributing them evenly throughout the batter. The fruit should be suspended like jewels, not settled at the bottom. Watch Out: If the berries are too wet, pat them dry with a paper towel; excess moisture can make the batter soupy and affect the rise.
Give the skillet a quick swirl to spread the batter evenly, then sprinkle the coarse sugar and a light dusting of extra cinnamon over the top. This creates that coveted crackly crown that will caramelize as it bakes. The scent at this point is already intoxicating—your kitchen should feel like a bakery on a bustling Saturday morning.
Transfer the skillet to the preheated oven and bake for 25‑30 minutes, or until the edges pull away from the pan and a toothpick inserted into the center comes out clean. Around the 20‑minute mark, you’ll notice the top turning a deep amber and the sugar forming a glossy crust—this is the moment of truth.
Remove the skillet from the oven and let the cake rest for 10 minutes. This pause lets the steam settle, finishing the cooking process and allowing the flavors to meld. When you finally slice into it, the interior should be tender and moist, while the outside boasts a caramelized, crunchy rim that shatters with a gentle press.
That's it — you did it. But hold on, I've got a few more tricks that'll take this to another level, ensuring every bite is as perfect as the first.
Insider Tricks for Flawless Results
The Temperature Rule Nobody Follows
Never bake a skillet cake at a temperature lower than 350°F. The high heat creates a rapid rise and a caramelized crust, while lower temps leave the batter soggy and the fruit watery. If you’re using a convection oven, reduce the temperature by 25°F to avoid over‑browning. A friend once tried 325°F and ended up with a cake that looked like a soggy pancake—lesson learned.
Why Your Nose Knows Best
Your sense of smell is a reliable indicator of doneness. Around the 20‑minute mark, you’ll start to detect a sweet, nutty aroma with hints of toasted cinnamon. When the scent becomes almost caramel‑like, it’s time to check the edges; they should be pulling away from the pan. Trust that nose over the clock, and you’ll avoid under‑ or over‑baking.
The 5‑Minute Rest That Changes Everything
Allowing the cake to rest for five minutes after it comes out of the oven lets the crumb set and the juices redistribute. Skipping this step makes the cake fall apart when you cut into it, as the interior is still too loose. This brief pause also gives the sugar topping a chance to firm up, delivering that satisfying crunch.
Egg‑Room Temperature Magic
Always bring your eggs to room temperature before whisking them into the batter. Cold eggs can cause the butter to seize, leading to a lumpy texture. I once tried using straight‑out‑of‑the‑fridge eggs and ended up with a batter that looked like clumped oil—definitely not the smooth pour I was aiming for.
The Flip‑It‑Quick Test
If you’re daring, give the skillet a quick, gentle shake after 15 minutes; the batter should wobble slightly but not spill. This “jiggle test” tells you the structure is set enough to hold its shape, and the bottom is developing that coveted golden crust. If it’s still liquid, give it another 5 minutes before checking again.
Creative Twists and Variations
This recipe is a playground. Here are some of my favorite ways to switch things up:
Maple‑Glazed Walnut Version
Swap the coarse sugar for a drizzle of maple syrup and sprinkle toasted walnuts on top before baking. The maple adds a caramel nuance while the walnuts contribute a buttery crunch that pairs beautifully with the cranberries.
Spiced Pumpkin Fusion
Replace half of the apples with canned pumpkin puree and add a pinch of ground ginger and cloves. This autumnal twist turns the cake into a pumpkin‑cranberry delight, perfect for Thanksgiving brunches.
Berry‑Burst Medley
Mix in a cup of fresh blueberries or blackberries alongside the cranberries. The additional berries introduce a burst of juiciness and a deeper color palette that looks stunning on the plate.
Chocolate Swirl Surprise
Stir in ¼ cup of dark chocolate chips and a tablespoon of cocoa powder into the batter. The chocolate adds richness that balances the tart fruit, creating a sophisticated flavor combo for adult palates.
Vegan Friendly Edition
Replace the butter with coconut oil, use a flax‑egg (1 tbsp ground flaxseed + 3 tbsp water) in place of each egg, and swap Greek yogurt for coconut yogurt. The result is a plant‑based version that still boasts a moist crumb and vibrant fruit.
Storing and Bringing It Back to Life
Fridge Storage
Allow the cake to cool completely, then cover the skillet loosely with foil or transfer the cake to an airtight container. It will stay fresh for up to four days in the refrigerator. Before serving, warm a slice in the microwave for 20‑30 seconds or reheat the whole skillet in a 300°F oven for 10 minutes.
Freezer Friendly
Wrap the cooled cake tightly in plastic wrap, then a layer of aluminum foil, and place it in a freezer‑safe bag. It freezes beautifully for up to two months. To revive, thaw overnight in the fridge, then warm in a 350°F oven for 15 minutes; add a splash of water to the pan to create steam and restore moisture.
Best Reheating Method
When reheating, add a teaspoon of water around the edges of the cake before placing it in the oven. The steam generated keeps the interior from drying out while the top regains its crispness. A quick broil for the last minute can bring back that caramelized crown if you love extra crunch.